
By Sabine Venier
Published Mar 21, 2025


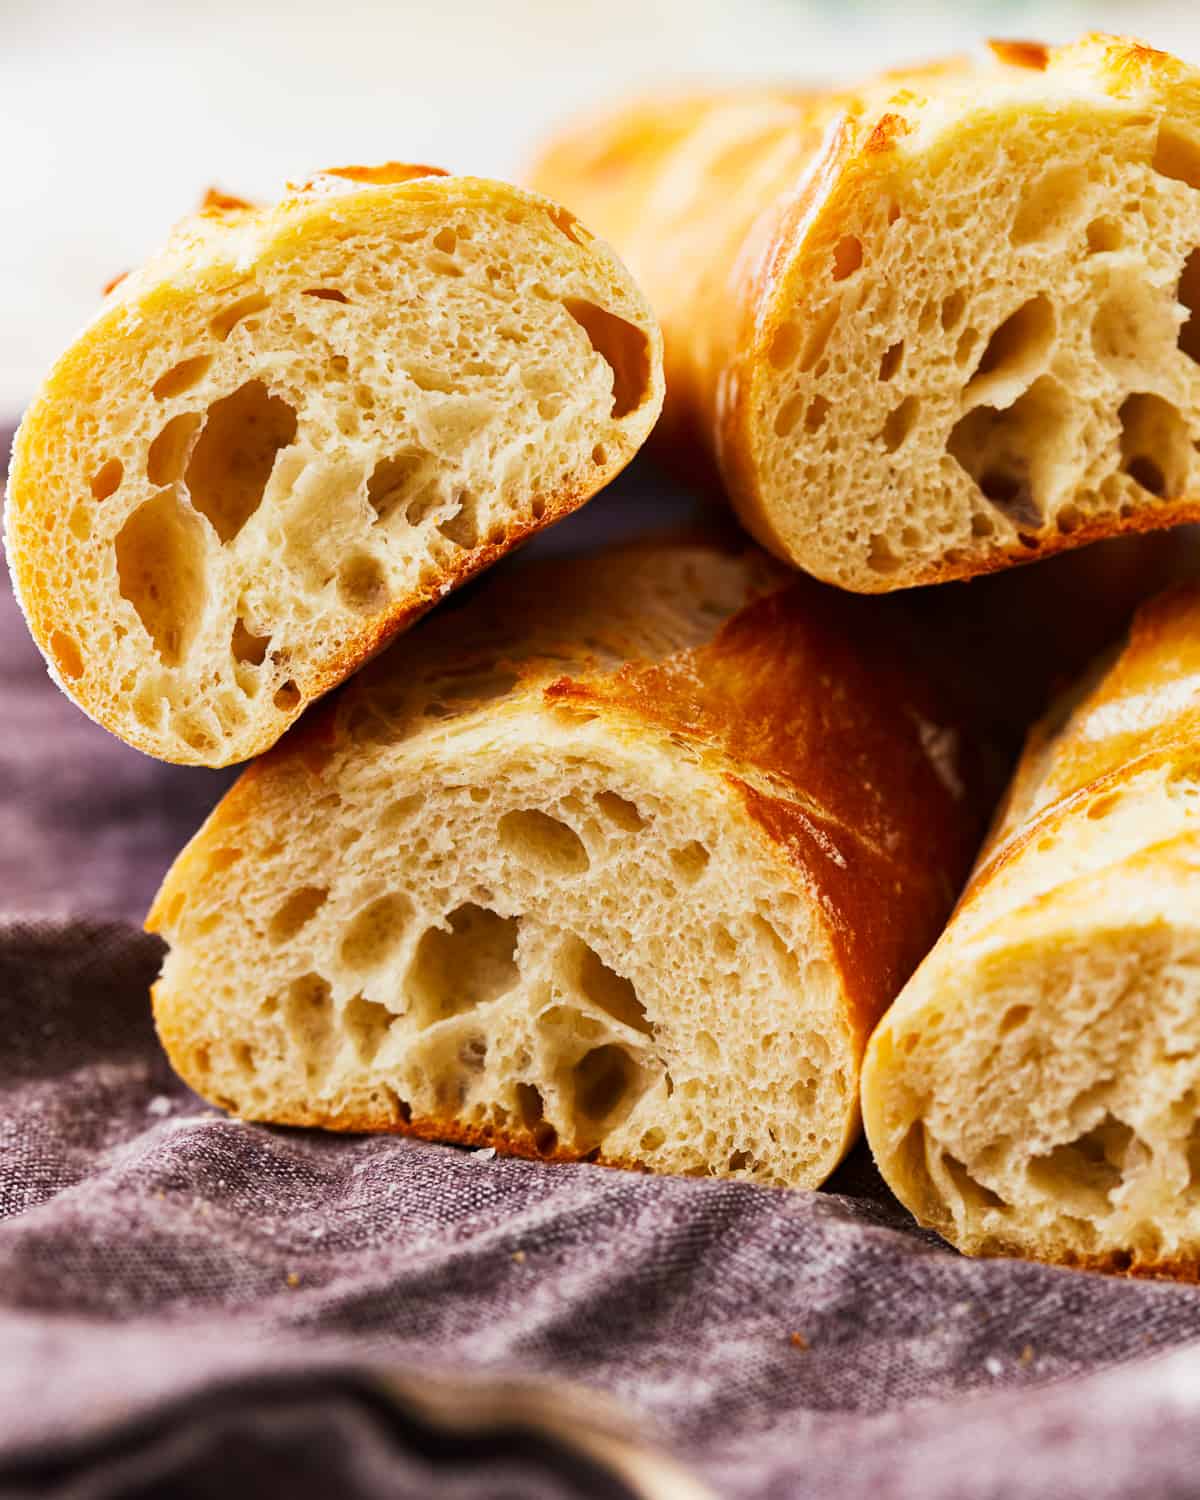
In my opinion, nothing beats the perfect texture of a freshly baked baguette! Soft and chewy on the inside, with a crisp crust on the outside, and plenty of nooks and crannies to hold a rich slather of butter. Well, you can get that authentic French-bakery-style bread right at home with this easy baguette recipe, and I’ll show you how!
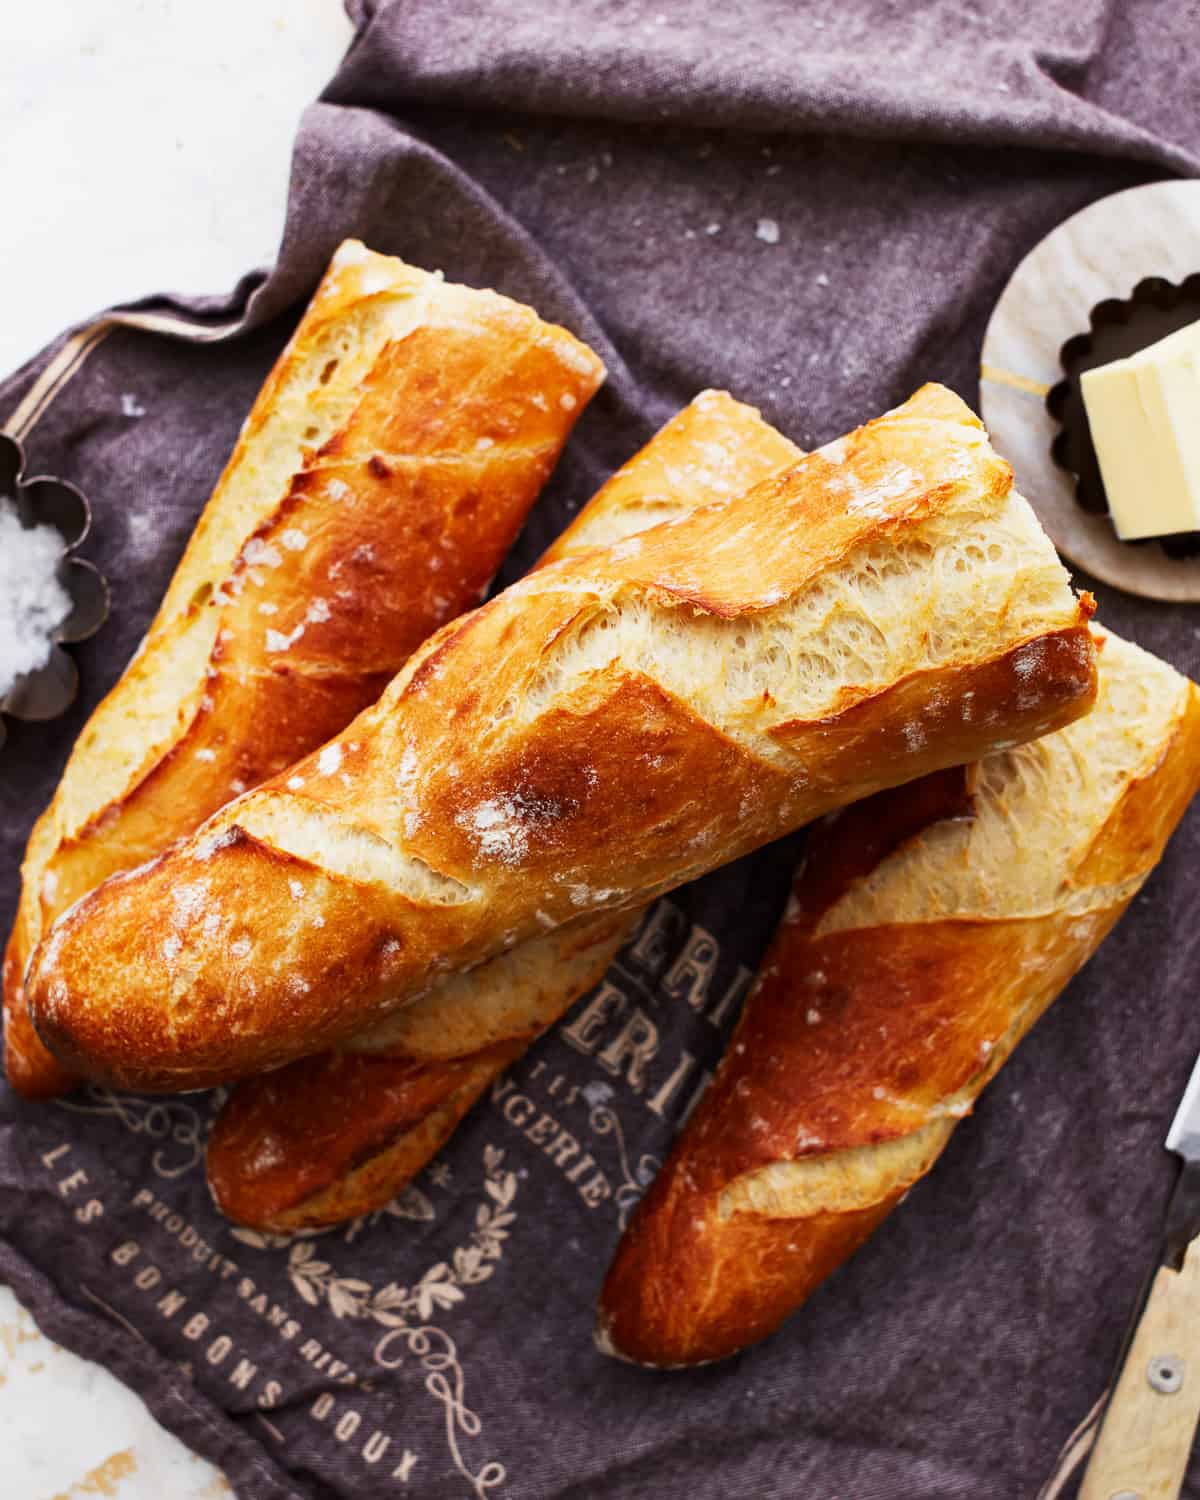
Homemade French baguettes are easier than I ever thought! All the usual bread basics plus a little honey for sweetness. From start to finish, it took me just 3 hours to make this oven-fresh bread.
Tips for Beginners
- I highly recommend using a kitchen scale for this recipe. Alternatively, measure the flour using the spoon-and-level method to avoid dense and dry baguettes.
- Warm water helps to hydrate the dough and activate the yeast. If your water is too cold, the yeast may not reach its full potential. If it’s too hot, you risk killing the yeast.
- The dough should be smooth, elastic, and slightly tacky to the touch after kneading. When pressed gently with a finger, it should spring back slowly.
- Don’t skip the rise time—it’s super important for developing the flavor and texture of this bread.
- To achieve a shatteringly crisp crust on your homemade French baguettes, it’s important to create steam in the oven. Steam helps keep the dough moist, which allows the crust to expand before it sets. You can do this by pouring water into a cast iron pan or rimmed baking sheet set on the bottom rack of your oven.
Ingredients1x2x3x
- ▢ 3 cups bread flour 360 grams, plus more for dusting
- ▢ 1½ teaspoons instant yeast 4 grams
- ▢ 1¼ teaspoons kosher salt 4 grams
- ▢ 1 tablespoon honey 22 grams
- ▢ 1 cup warm water 227 grams (about 110°F)
Instructions
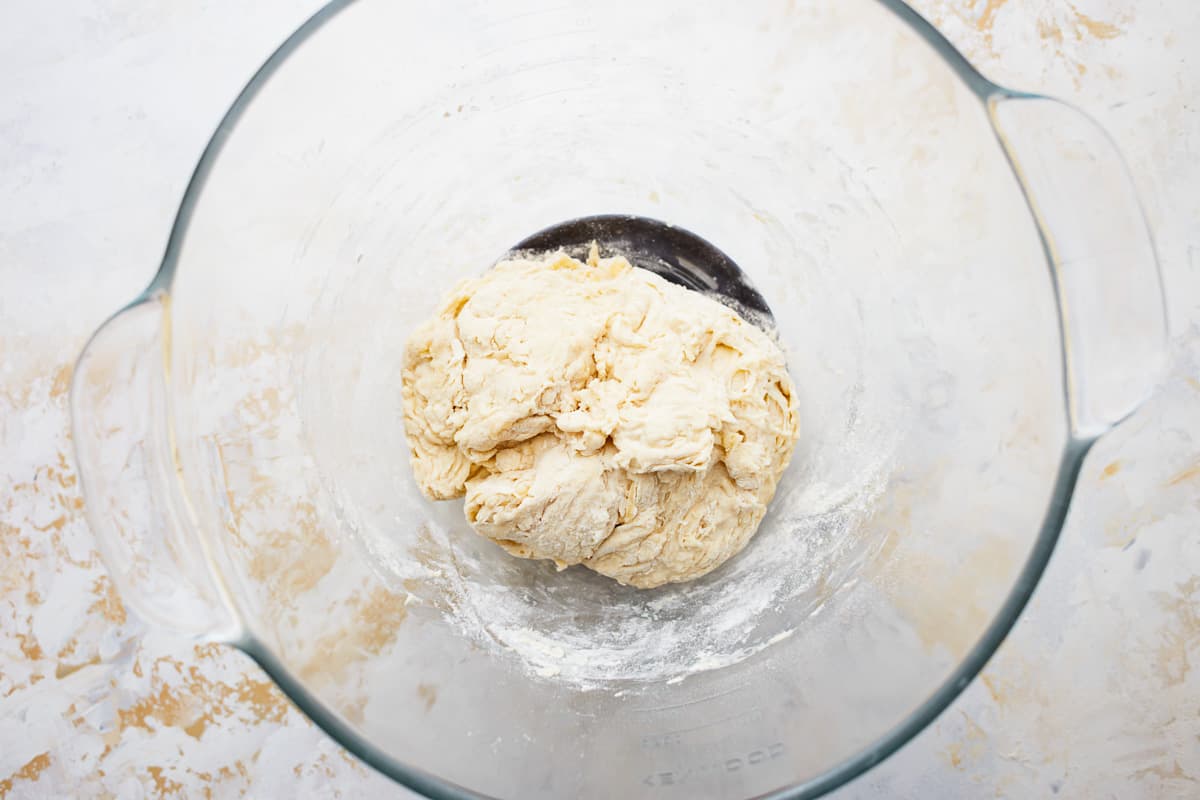
- In a large mixing bowl, combine the flour, yeast, salt, honey, and water, stirring until a shaggy dough forms. 3 cups bread flour, 1½ teaspoons instant yeast, 1¼ teaspoons kosher salt, 1 tablespoon honey, 1 cup warm water
- Turn the dough out onto a lightly floured surface and knead it for about 10 minutes until it becomes smooth and elastic. Alternatively, you can knead it for 10 minutes on low speed using a stand mixer with a dough hook attachment.
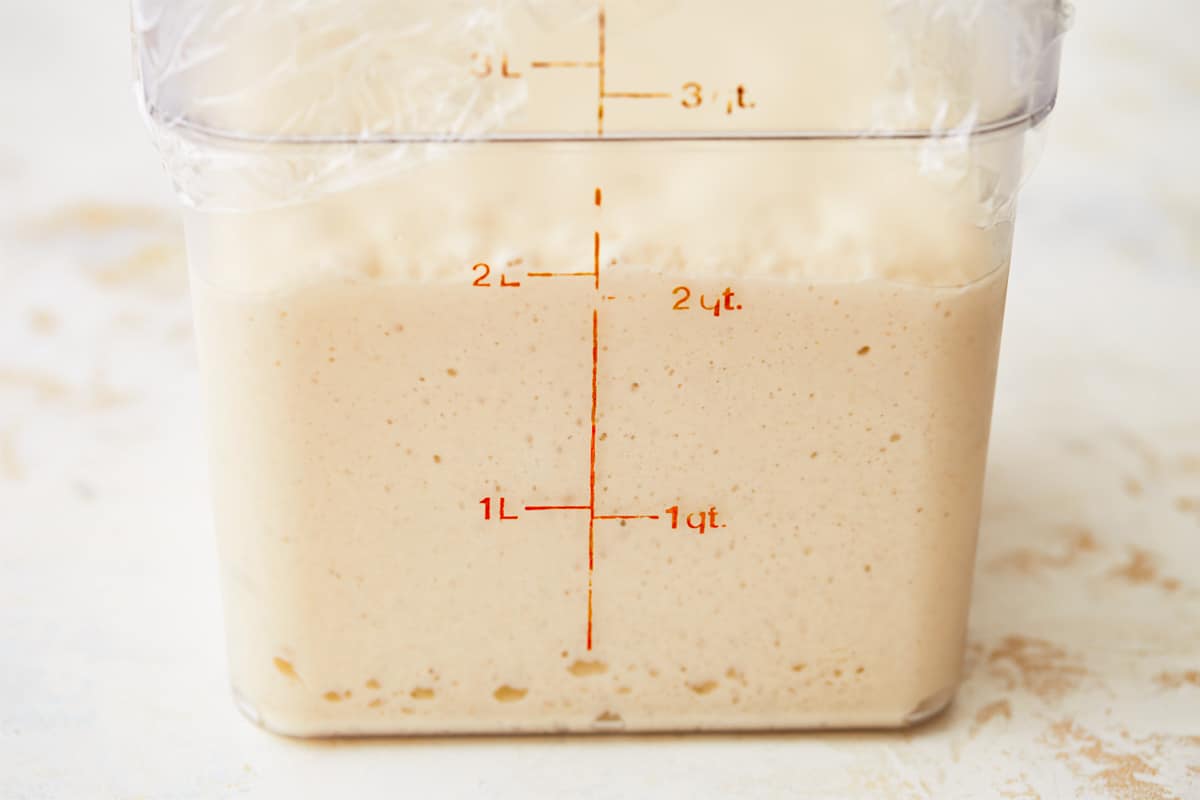
- Place the dough in a lightly oiled container, cover with a damp cloth, and let it rise in a warm area until doubled in size, about 1-1½ hours.
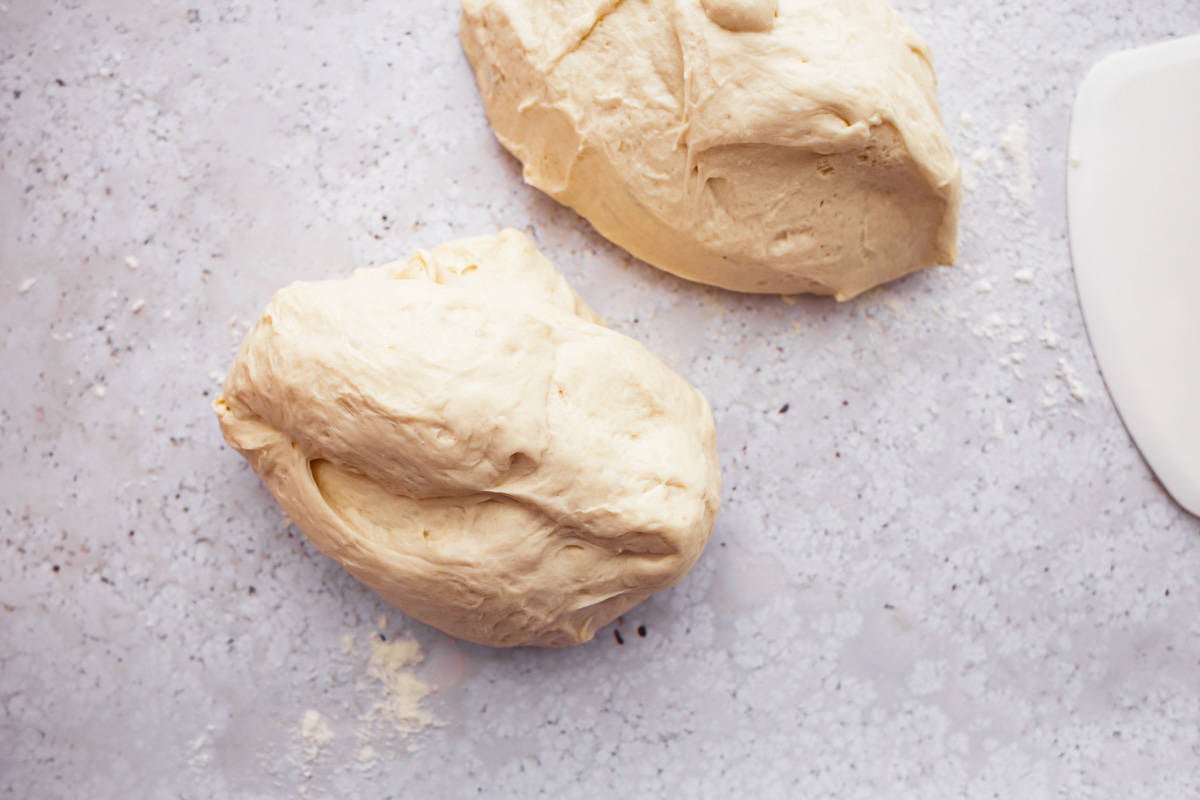
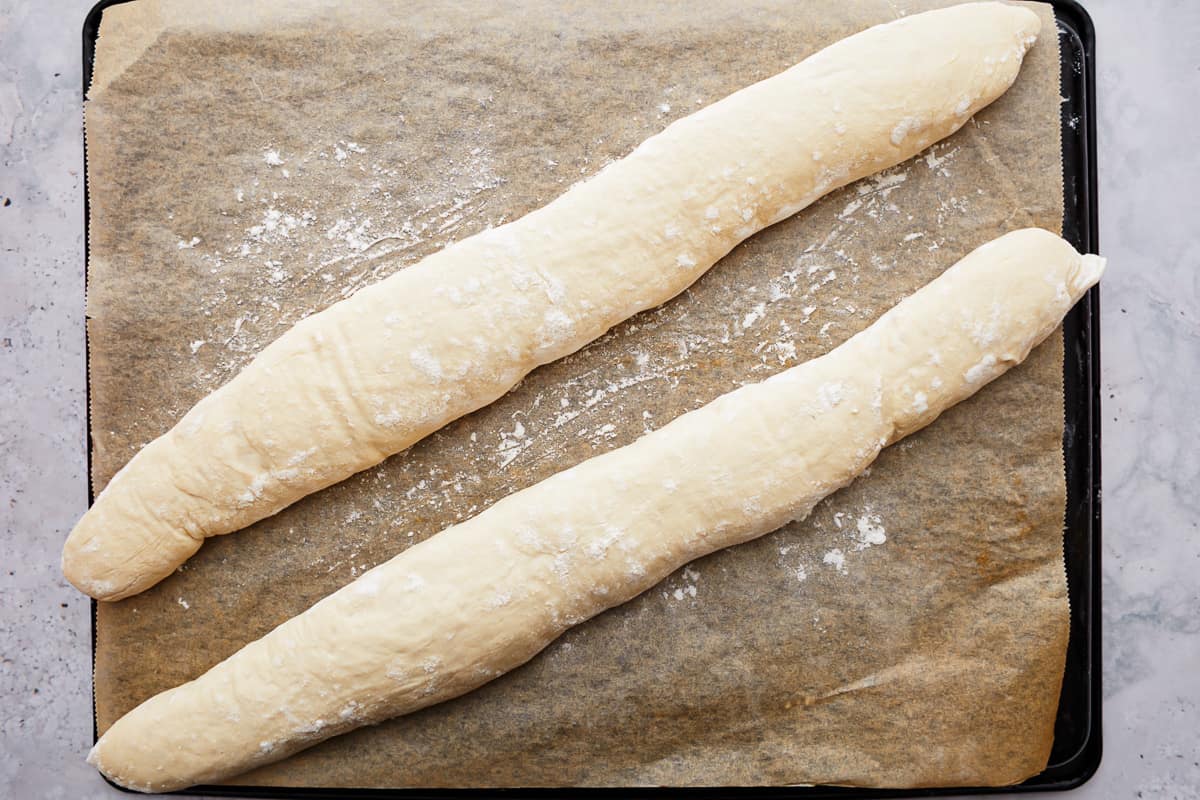
- Gently deflate the dough and divide it into two equal parts (approx. 308 grams each). Roll each piece into a long, thin shape, approximately 14 inches long.
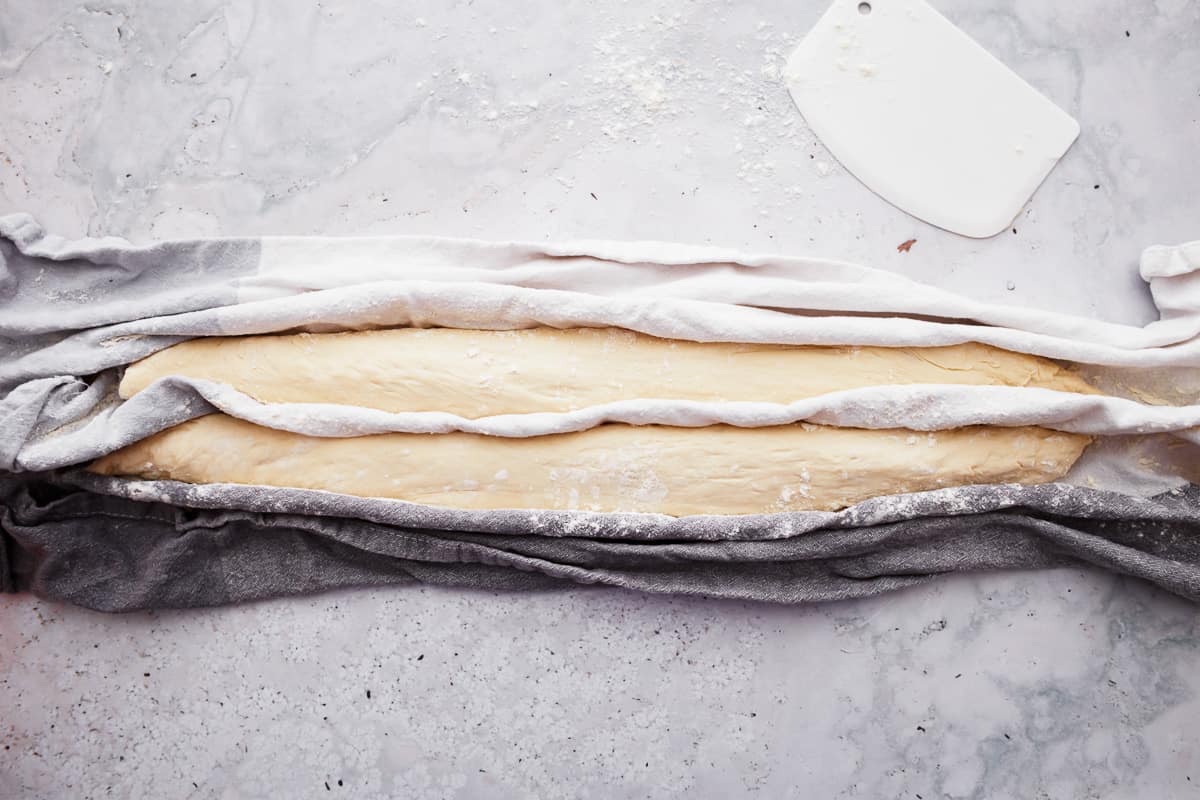
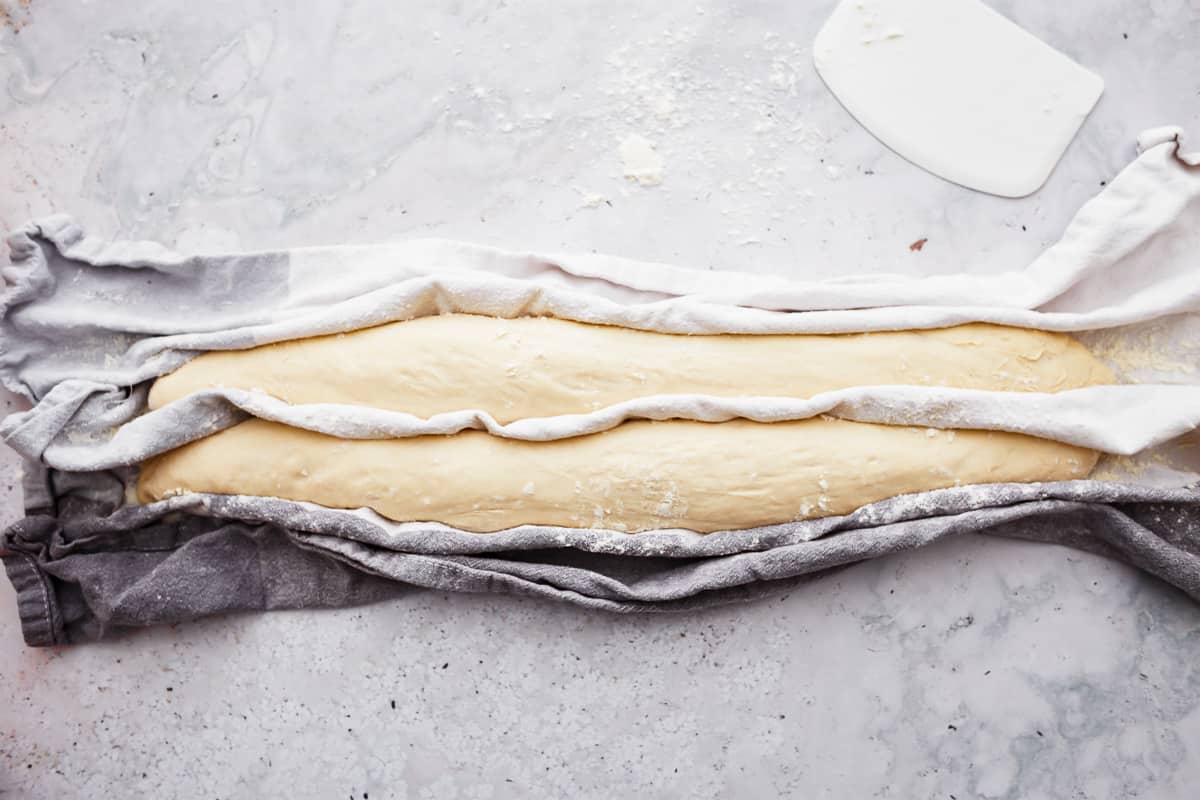
- Transfer the shaped dough onto a baker’s linen or a floured kitchen towel, creating folds between the loaves to help them keep their shape as they undergo a second rise.
- Cover with the towel and let rise again for about 1 hour, or until puffy and nearly doubled.
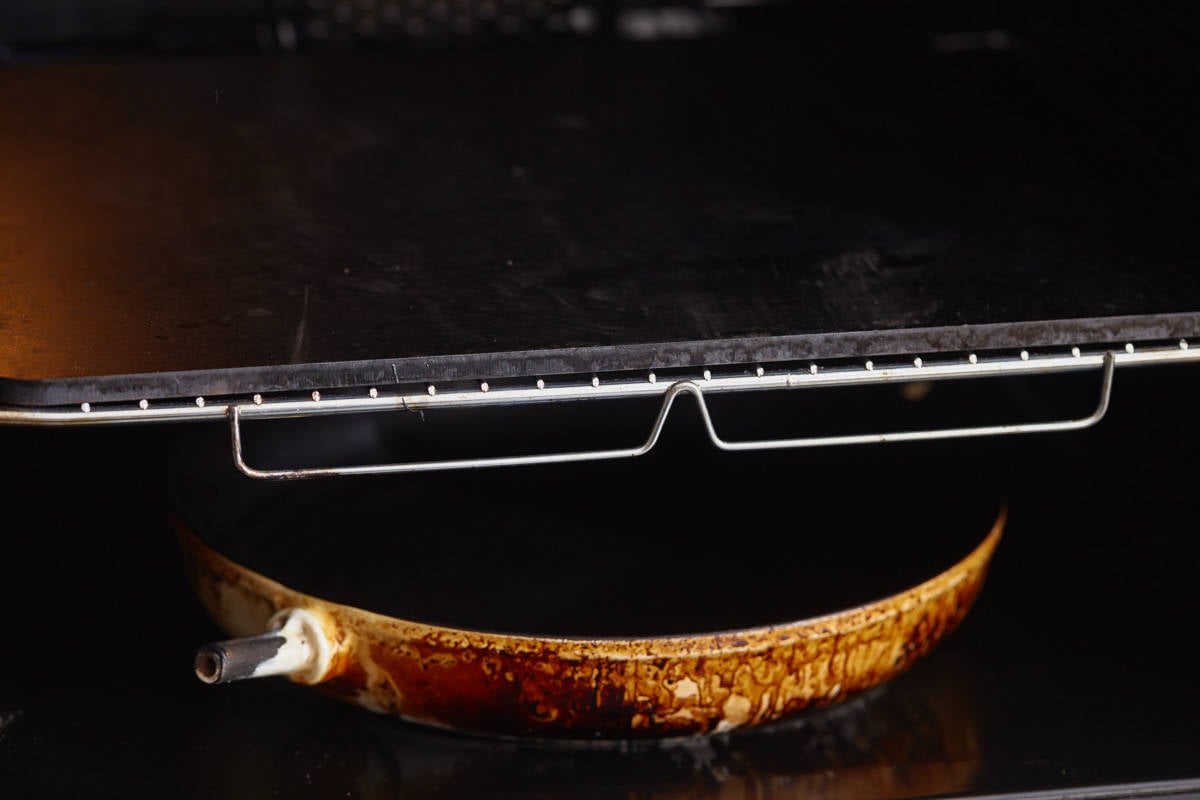
- Preheat the oven to 475°F with a baking stone or baking steel inside. If you don’t have a baking stone or steel, you can use an inverted baking sheet or pizza pan as an alternative. Place an empty cast iron pan on the bottom rack of the oven.
- Carefully transfer the loaves onto a piece of parchment paper on a baking peel or the back of a baking sheet.
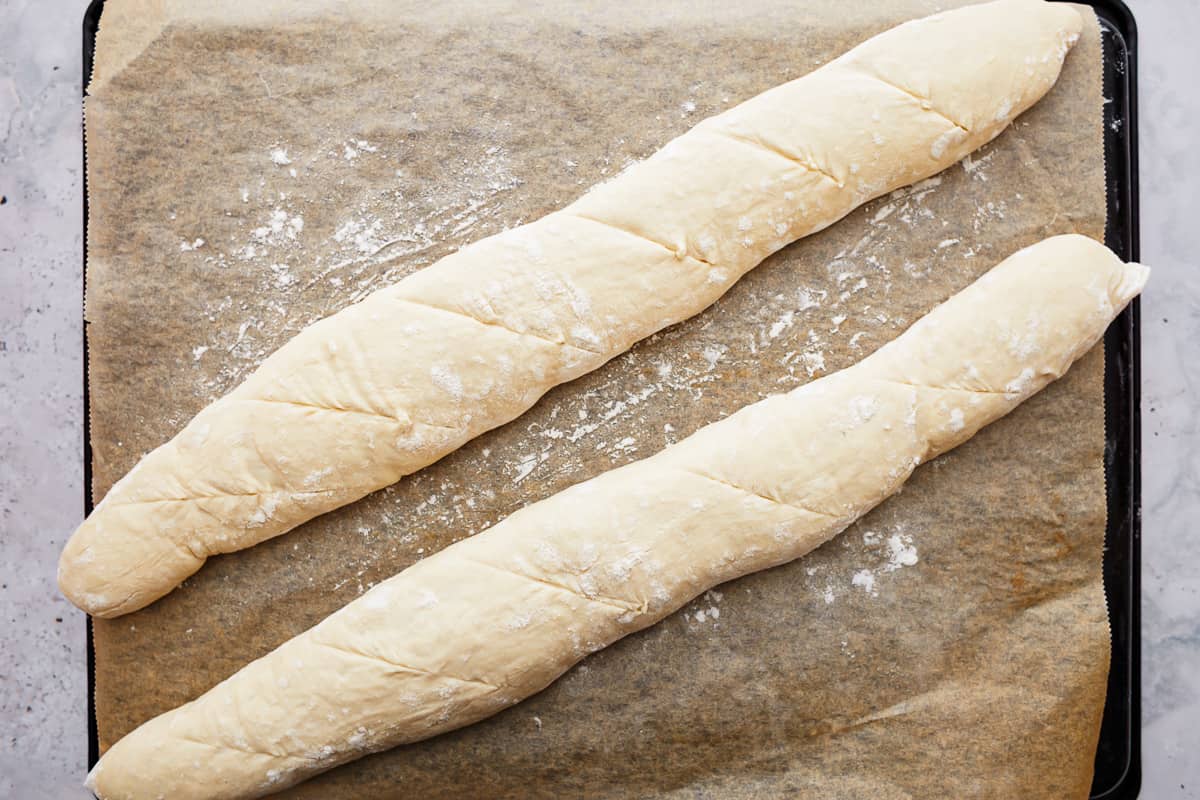
- Slash the tops of the loaves with a lame or sharp knife, making 4-6 diagonal cuts on each.
- Slide the parchment paper and loaves onto the preheated baking stone in the oven. Pour a cup of water into the hot cast iron pan on the bottom to create steam, and then quickly close the oven door. Bake for 15 minutes.
- Carefully remove the pan with water, rotate the baguettes, and then lower the oven temperature to 450°F. Continue baking for an additional 10-15 minutes or until they achieve a deep golden brown color.
- Cool on a wire rack before slicing.
Equipment
- Kitchen Scale (optional, but recommended!)
- Stand Mixer (optional)
Becky’s Tips
- This recipe makes 2 baguettes. A serving is approximately ¼ of a baguette.
- Use high-quality flour with a 12-14% protein content for best texture. However, all-purpose flour can be used in a pinch, though the results may not be as artisanal.
- Properly baked bread should be gold brown and sound hollow when tapped on the bottom. If measuring with a thermometer, the internal temperature should be 190-210°F.
- Traditional baguettes rely on instant yeast for leavening. Without it, you would need to use a sourdough starter , which involves a different process and timeline.
Nutrition information is automatically calculated, so should only be used as an approximation.
How to Make a Baguette Step-by-Step
Mix the Dough: In a large mixing bowl, combine 3 cups of bread flour, 1½ teaspoons of instant yeast, 1¼ teaspoons of kosher salt, 1 tablespoon of honey, and 1 cup of warm water, stirring until a shaggy dough forms.
Knead the Dough: Turn the dough out onto a lightly floured surface and knead it for about 10 minutes until it becomes smooth and elastic. Alternatively, you can knead it for 10 minutes on low speed using a stand mixer with a dough hook attachment.
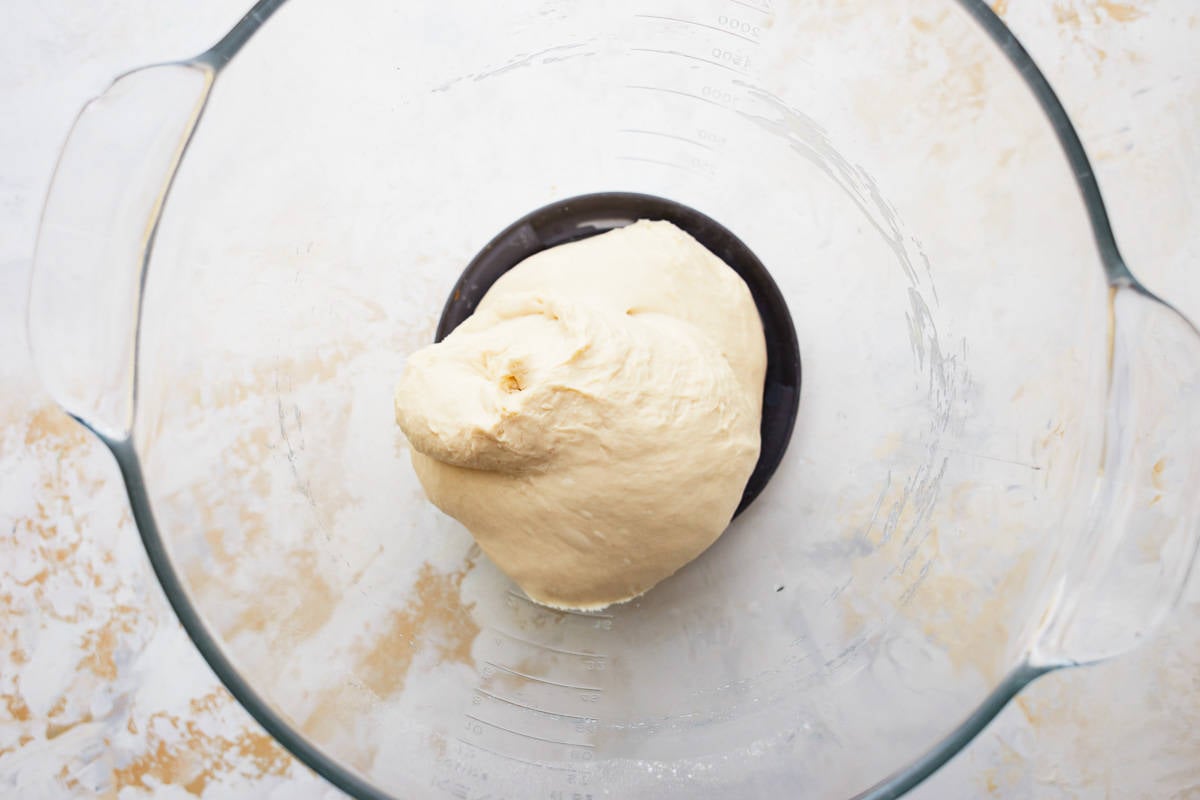
Proof the Dough: Place the dough in a lightly oiled container, cover with a damp cloth, and let it rise in a warm area until doubled in size, about 1-1½ hours.
Divide the Dough: Gently deflate the dough and divide it into two equal parts (approx. 308 grams each). Roll each piece into a long, thin shape, approximately 14 inches long.
Shape the Dough: Transfer the shaped dough onto a baker’s linen or a floured kitchen towel, creating folds between the loaves to help them keep their shape as they undergo a second rise.
Let the Dough Rise: Cover with the towel and let rise again for about 1 hour, or until puffy and nearly doubled.
Preheat the Oven: Preheat the oven to 475°F with a baking stone or baking steel inside. If you don’t have a baking stone or steel, you can use an inverted baking sheet or pizza pan as an alternative. Place an empty cast iron pan on the bottom rack of the oven.
Transfer the Dough: Carefully transfer the loaves onto a piece of parchment paper on a baking peel or the back of a baking sheet.
Score the Dough: Slash the tops of the loaves with a lame or sharp knife, making 4-6 diagonal cuts on each. This allows it to expand during baking and helps control where the bread will balloon. It also creates the classic baguette look.


How to Store and Reheat
Store your fresh baguettes in a paper bag at room temperature for up to 2 days. Avoid plastic bags, as they will soften the crust. Enjoy at room temperature or gently warmed in the oven or microwave.
For longer storage, I recommend freezing French baguettes in an airtight bag for up to 1 month. Let thaw overnight in the refrigerator before enjoying.
Serving Suggestions
A French baguette is so incredibly versatile. I love it with a pat of butter (try my favorite honey butter ) or olive oil and balsamic vinegar before a big meal. It’s also great for mopping up our 15 bean soup or beef barley soup , or excess sauce from your dinner. Use it as the base for steak sandwiches or a teriyaki chicken sub .
If you’re feeling snacky, it makes a great base for bruschetta .
More Bread Recipes To Try
No Knead Dutch Oven Bread

Easy Cheesy Garlic Bread Recipe (Texas Toast Garlic Bread)
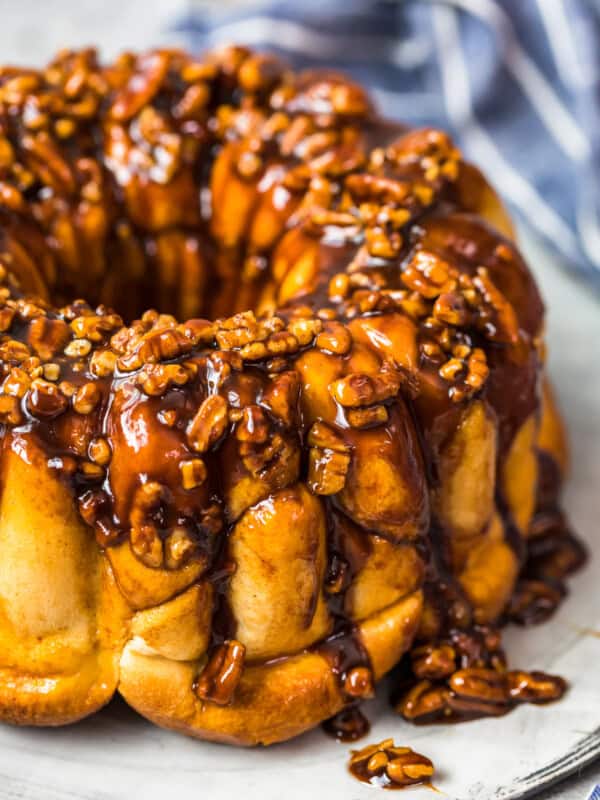
Butterscotch Monkey Bread Recipe (Bubble Bread)
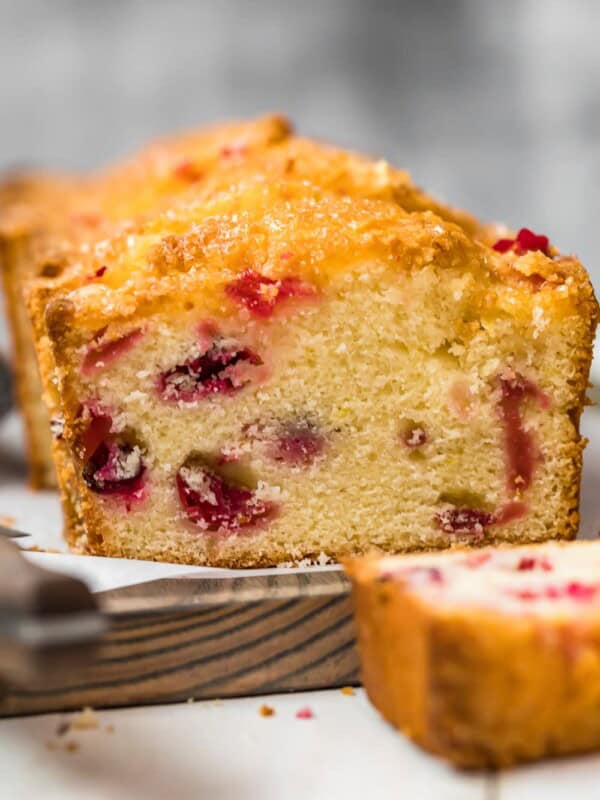
Glazed Lemon Cranberry Bread

French Baguette Recipe
Equipment
- Kitchen Scale (optional, but recommended!)
- Stand Mixer (optional)
Ingredients
- 3 cups bread flour 360 grams, plus more for dusting
- 1½ teaspoons instant yeast 4 grams
- 1¼ teaspoons kosher salt 4 grams
- 1 tablespoon honey 22 grams
- 1 cup warm water 227 grams (about 110°F)
Instructions
- In a large mixing bowl, combine the flour, yeast, salt, honey, and water, stirring until a shaggy dough forms. 3 cups bread flour, 1½ teaspoons instant yeast, 1¼ teaspoons kosher salt, 1 tablespoon honey, 1 cup warm water
- Turn the dough out onto a lightly floured surface and knead it for about 10 minutes until it becomes smooth and elastic. Alternatively, you can knead it for 10 minutes on low speed using a stand mixer with a dough hook attachment.
- Place the dough in a lightly oiled container, cover with a damp cloth, and let it rise in a warm area until doubled in size, about 1-1½ hours.
- Gently deflate the dough and divide it into two equal parts (approx. 308 grams each). Roll each piece into a long, thin shape, approximately 14 inches long.
- Transfer the shaped dough onto a baker’s linen or a floured kitchen towel, creating folds between the loaves to help them keep their shape as they undergo a second rise.
- Cover with the towel and let rise again for about 1 hour, or until puffy and nearly doubled.
- Preheat the oven to 475°F with a baking stone or baking steel inside. If you don’t have a baking stone or steel, you can use an inverted baking sheet or pizza pan as an alternative. Place an empty cast iron pan on the bottom rack of the oven.
- Carefully transfer the loaves onto a piece of parchment paper on a baking peel or the back of a baking sheet.
- Slash the tops of the loaves with a lame or sharp knife, making 4-6 diagonal cuts on each.
- Slide the parchment paper and loaves onto the preheated baking stone in the oven. Pour a cup of water into the hot cast iron pan on the bottom to create steam, and then quickly close the oven door. Bake for 15 minutes.
- Carefully remove the pan with water, rotate the baguettes, and then lower the oven temperature to 450°F. Continue baking for an additional 10-15 minutes or until they achieve a deep golden brown color.
- Cool on a wire rack before slicing.
Notes
- This recipe makes 2 baguettes. A serving is approximately ¼ of a baguette.
- Use high-quality flour with a 12-14% protein content for best texture. However, all-purpose flour can be used in a pinch, though the results may not be as artisanal.
- Properly baked bread should be gold brown and sound hollow when tapped on the bottom. If measuring with a thermometer, the internal temperature should be 190-210°F.
- Traditional baguettes rely on instant yeast for leavening. Without it, you would need to use a sourdough starter , which involves a different process and timeline.
Nutrition

By Becky Hardin
Published Jul 12, 2017


This Essential Grocery List is an absolute life saver for my family on the busy weeks. When I started this journey to learn how to cook, I quickly realized that the first step in cooking is having staple ingredients on hand. I want to avoid having to run out to the grocery store every single time I prepare a new recipe. Having a well-stocked pantry has made my life in the kitchen so much simpler, because when it’s time to cook, I have what I need.

Essential Grocery List
It’s so helpful to have a basic grocery list to help me remember which foods to buy at the store. This food shopping list is my go-to!
It’s better to stock up on things like grains, seasonings and spices, baking essentials, oils, condiments, canned and frozen foods, etc. so I can just grab them when I need them. These things have a long shelf life , so I keep them in my kitchen for convenience.
However, I do have to go to the supermarket sometimes, and there’s a way to make that trip easy and hassle-free: I keep a grocery list! If I go in blindly, I’ll leave with things I don’t need, and nothing that actually helps me prepare a good meal.
In the list below, I’ve compiled everything I always have on my stock-up grocery list.
I’ve got you covered! I created an easy grocery list filled with all of the essentials. Plus there’s a free printable version that you can take with you to the grocery store. It has everything you need to stock your pantry, your freezer, and your refrigerator.

Click to get my Free Printable Grocery List
What to Buy at the Grocery Store
This is the perfect grocery list filled with all the basics and essentials. It should help get you going if you’re new to cooking, or if you’re just left staring helplessly at an empty pantry and don’t know how to fill it.
When I first started cooking, things could seem overwhelming. I quickly realized that they more prepared I could be, the more confident I felt. If you already have the basics in your kitchen, then you can shop stress-free.
So print out our easy grocery list, stock up your pantry and fridge, and you’ll be cooking in no time!
Click to get my Free Printable Grocery List for the perfectly stocked pantry and freezer!
Fresh Produce
- Apples
- Bananas
- Strawberries
- Avocados
- Bell Peppers
- Carrots
- Broccoli
- Garlic
- Lemons/Limes
- Onion
- Parsley
- Cilantro
- Basil
- Potatoes
- Spinach
- Tomatoes
GRAINS
- Breadcrumbs
- Pasta
- Quinoa
- Rice
- Sandwich Bread
- Tortillas
MEAT/PROTEIN
- Chicken
- Eggs
- Ground Beef
- Sliced Turkey
- Lunch Meat
DAIRY
- Butter
- Sliced Cheese
- Shredded Cheese
- Milk
- Sour Cream
- Greek Yogurt
BAKING GOODS
- Baking powder
- Baking Soda
- Granulated Sugar
- Brown Sugar
- Flour
- Honey
- Vanilla Extract
- Dry Yeast
- Chocolate Chips
- Cocoa Powder
- Powdered Sugar
FREEZER
- Fruit and Berries
- Frozen Veggies (Corn, Peas, Broccoli, etc)
- Juice Concentrate
- Pizza or Other Convenience Meals
- Pie Crust
- Cookie Dough
CANNED/DRIED GOODS
- Chicken stock/broth
- Salsa
- Diced Tomatoes
- Jam/Jelly
- Peanut Butter
- Pasta Sauce
- Beans (Black Beans, Chickpeas, Baked Beans, etc)
- Soups
- Tuna
- Green Chiles
- Canned Veggies
- Coffee or Tea
Get more details on the best non-perishable and pantry foods
CONDIMENTS/SPICES
- Black Pepper
- Chili Powder
- Cinnamon
- Crushed Red Pepper
- Cumin
- Garlic Powder
- Ketchup
- Mustard
- Mayo
- Nutmeg
- Paprika
- Salt (Course Sea Salt and Kosher Salt)
- Soy Sauce
- Steak Sauce
- Hot Sauce/ Buffalo Sauce
- Salad Dressings
OILS/VINEGARS
- Apple cider vinegar
- Balsamic vinegar
- Coconut Oil
- Olive Oil
- Vegetable/Canola Oil
- Red Wine Vinegar
- White Vinegar
- Cooking Wine
- White Wine Vinegar
SNACKS
- Crackers
- Nuts
- Quick Oats
- Popcorn
- Tortilla Chips
- Cereal
Click to get my Free Printable Grocery List for the perfectly stocked pantry and freezer!

Click ☝🏻 for my FREE Grocery List Printable!
I hope this essential grocery list can help you buy what you need and make your home cooking so much easier!
Stock Your Kitchen
Find more ideas for your grocery list, stock up your kitchen, and print more cooking guides and charts to keep handy!

Non-Perishable Foods to Stock Up On

Frozen Vegetables to Stock Up On (and Recipes to Make)

Ultimate List of Cooking Herbs for Your Kitchen

Ultimate List of Cooking Spices for Your Kitchen

Cooking Oil 101: Types of Cooking Oils to Use

26 Types of Pasta and When to Use Them

What Fruits and Vegetables are in Season?

Meat Temperature Chart (Free Printable)

How to Meal Prep (Guide for Beginners)

Basic Cooking Measurements & Kitchen Conversion Chart

