
By Becky Hardin
Published Dec 9, 2021

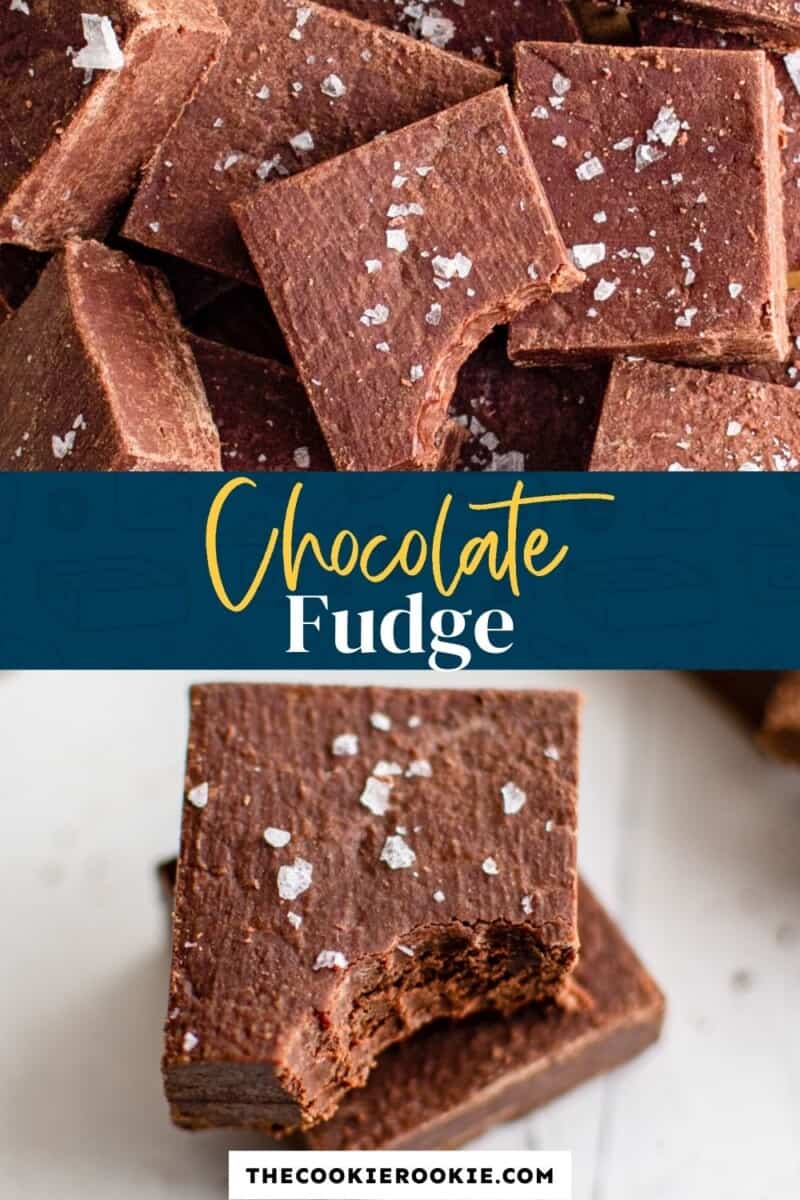

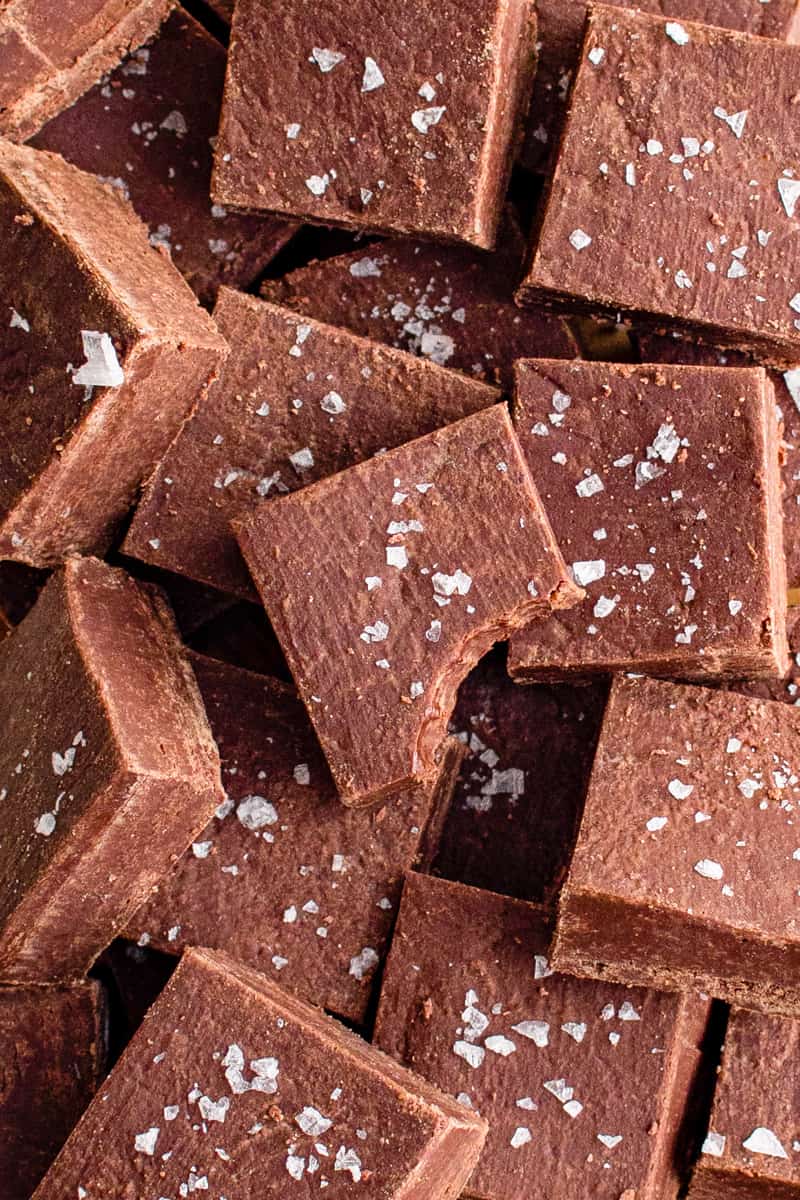
Chocolate Fudge is a classic treat that is surprisingly easy to make. You only need 5 ingredients! This easy homemade fudge recipe is simple, foolproof, and absolutely delicious. Everyone will love this rich, chocolatey dessert!
Easy Chocolate Fudge Recipe
Everyone loves a classic, old-fashioned chocolate fudge! It’s a fun dessert for holidays or parties, and it’s fun to make too. Kids and adults alike will devour this chocolatey treat!
This homemade fudge recipe is so easy to make, you’ll want to start making it all the time. And it’s easy to create different flavor variations with this recipe as the base.
No matter when you serve it, or what other ingredients you might add, this chocolate fudge recipe will delight anyone who tries it.
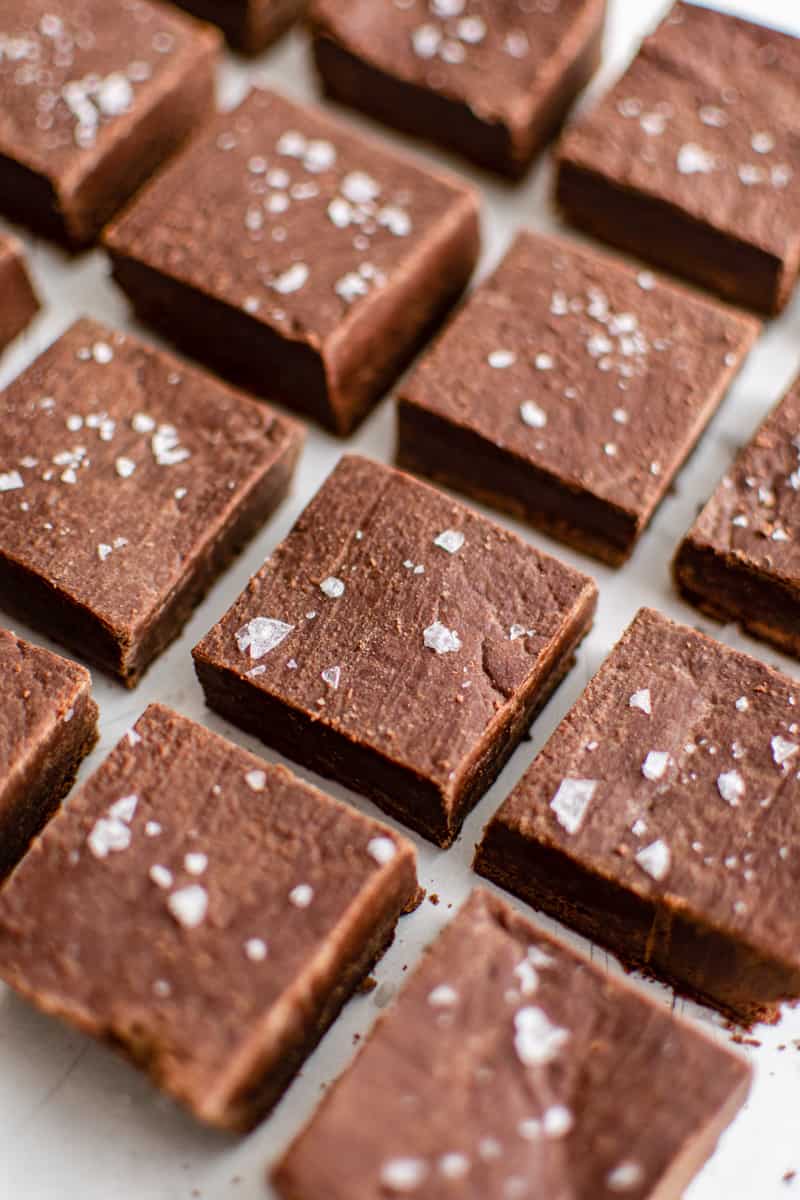
Once I show you how to make chocolate fudge at home, you’ll be making it for every occasion. It’s such a fun treat to have around, any time. There’s nothing better than biting into a little square of decadent chocolate like this.
Ingredients1x2x3x
- ▢ 4 cups semisweet chocolate chips 680 grams
- ▢ 14 ounces sweetened condensed milk 396 grams (1 can)
- ▢ 4 tablespoons unsalted butter 57 grams, melted (½ stick)
- ▢ ½ teaspoon pure vanilla extract 2 grams
- ▢ ¼ teaspoon kosher salt
Video
Instructions
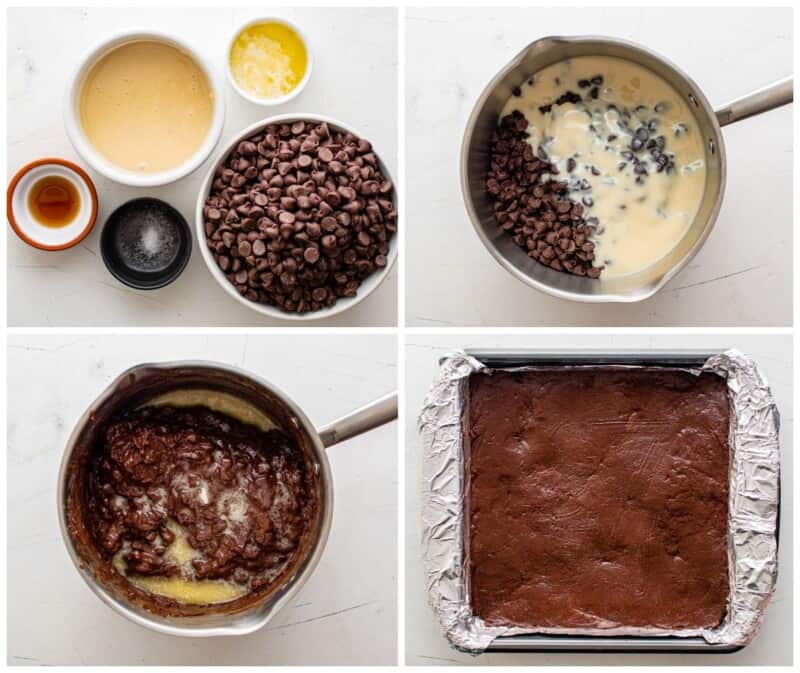
- Line an 8×8-inch baking pan with nonstick aluminum foil or parchment paper and set aside.
- Add the chocolate chips and sweetened condensed milk to a saucepan set over medium heat and stir until it starts to melt. Pour in the butter, vanilla, and salt. 4 cups semisweet chocolate chips, 14 ounces sweetened condensed milk, 4 tablespoons unsalted butter, ½ teaspoon pure vanilla extract, ¼ teaspoon kosher salt
- Stir until the chocolate is fully melted.
- Gently press the mixture into the prepared pan and let it set up at room temperature or in the refrigerator for 1 hour.
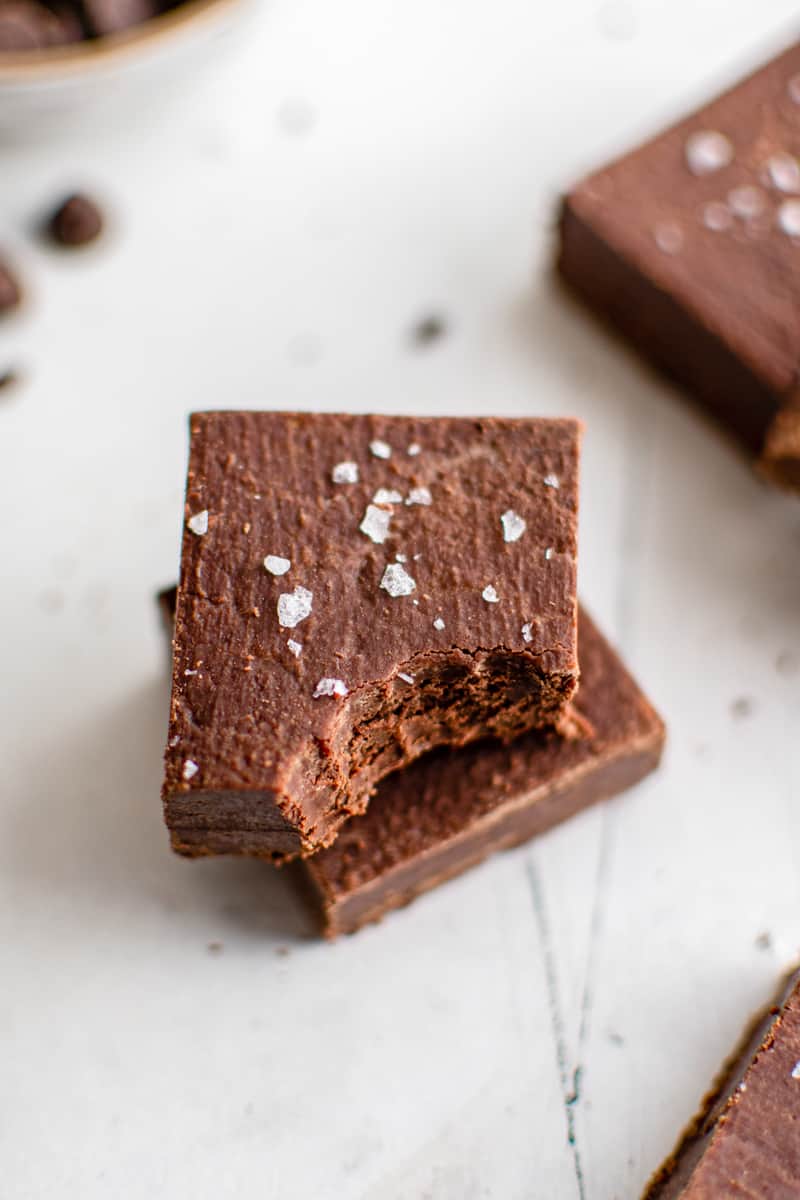
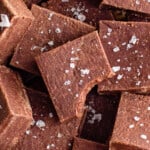
- Slice into 1-inch pieces and serve topped with flaky sea salt if desired.
Equipment
- Kitchen Scale (optional)
- 8×8-inch Baking Pan
Becky’s Tips
- Stir chocolate consistently until it melts for best results.
- Make sure the stove is set to medium heat. Too high and it’s likely to burn, too low and it will be difficult to properly heat, melt, and mix.
- Line the baking pan with parchment paper to make it easy to remove the fudge from the pan when it’s done.
- Let the fudge set at room temperature for best results.
- It’s easy to mix extra ingredients into this recipe to create your own flavor variations. Or add your favorite toppings at the end before it sets.
Nutrition information is automatically calculated, so should only be used as an approximation.
How to make Chocolate Fudge – Step-by-Step
- Line a baking pan with parchment paper.
- Heat chocolate chips and sweetened condensed milk in a saucepan, over medium heat.
- Stir until it starts to melt, then add the butter, vanilla, and salt. And continue stirring until the chocolate is fully melted.
- Pour the chocolate mixture into the pan, and let it set. You can do this at room temperature or in the fridge.
- Slice as desired to serve.
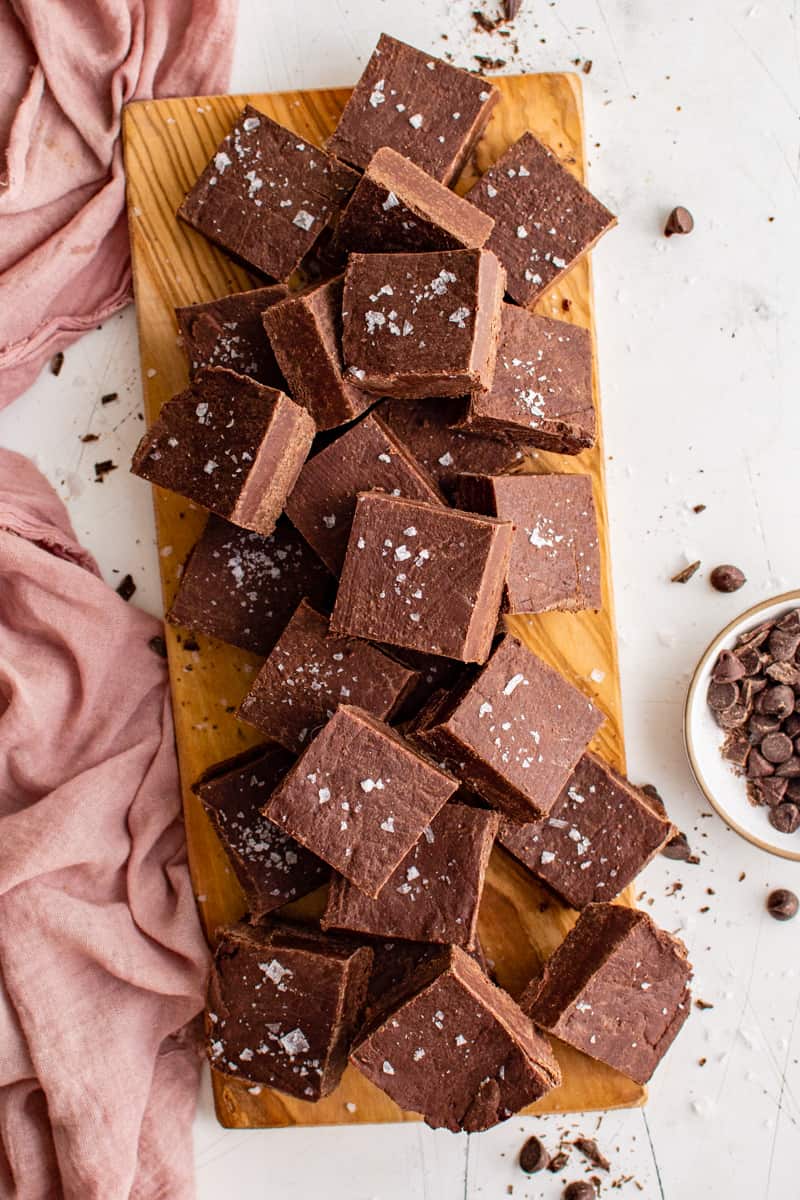
Fudge keeps at room temperature for up to 1 week, so you could make it anytime up to a week in advance. If making it for guests or a party, I recommend making it the day before so it has time to set.
Yes, you can double this recipe to make more. Use two 8×8 baking pans and distribute the chocolate evenly between the two.
You can let it set in the fridge or at room temperature. The fridge might speed up the setting process, but I prefer setting it at room temp. This leads to a much better consistency and texture.
The ideal consistency for chocolate fudge should not be too hard or too soft. It should be firm, but with a softness when biting into it.
You want to be stirring the chocolate consistently while it heats. If you don’t, it might end up grainy. If it cools too quickly, that could potentially lead to a grainy texture as well.
If your fudge isn’t hardening or setting, it might mean that your chocolate mixture wasn’t cooked enough, or hot enough. When heating on the stove, you want it to be fully melted, and it will start to thicken.
This depends on a few factors. In the fridge, allow 1-2 hours to fully set. At room temperature, it could take 3 hours or more.
Variations
This chocolate fudge recipe is so delicious just as it is. But it also works great as a base recipe for other types and flavor variations. You can easily add other ingredients into this homemade fudge to create something different! Here are some ideas.
- Peppermint Chocolate Fudge: Just replace the vanilla extract with peppermint extract to add a minty twist. This would be perfect for Christmas! You could even add some peppermint or candy cane bits on top.
- Nutty Fudge: If you’re a fan of nuts, add pecans, walnuts, cashews, or any kind of nut as a topping. You can mix them into the chocolate as well, but I’d recommend using small pieces if you do that for easier chewing.
- Caramel Chocolate Fudge: Add caramel into the fudge mixture or drizzle it on top before it sets.
Tips!
- Stir chocolate consistently until it melts for best results.
- Make sure the stove is set to medium heat. Too high and it’s likely to burn, too low and it will be difficult to properly heat, melt, and mix.
- Line the baking pan with parchment paper to make it easy to remove the fudge from the pan when it’s done.
- Let the fudge set at room temperature for best results.
- It’s easy to mix extra ingredients into this recipe to create your own flavor variations. Or add your favorite toppings at the end before it sets.
Does fudge need to be refrigerated?
No, homemade fudge does not need to be refrigerated at any point. It can set at room temperature, and it can be stored at room temperature too. If you prefer, you CAN refrigerate it to set or store, but it’s not necessary.
Can I add other ingredients to this chocolate fudge recipe?
Absolutely! This 5 ingredient chocolate fudge recipe has such a deliciously simple flavor. But you can easily add other ingredients to change it up. Check the variations section above for some ideas!
How do you store homemade fudge?
This fudge recipe yields a good amount, so you’ll definitely want to store and keep it until you eat it all up. You can store it at room temperature, in the refrigerator, or even in the freezer!
- Room Temperature: Store it in an airtight container at room temp, for up to 1 week. This is my preferred method if I plan to eat the fudge pretty quickly.
- Refrigerator: If you want the fudge to keep a little bit longer, layer it between sheets of wax paper or parchment paper, in an airtight container. Then keep it in the fridge up to 2-3 weeks.
- Freezer: For long-term storage, freeze your homemade fudge. Wrap it tightly in one or two layers (wax paper and aluminum foil is ideal), then place it in a freezer-safe bag or container. It will keep for 2-3 months. Let it thaw out in the fridge before serving.
You’re going to love making this homemade fudge! And you’re going to love eating it even more. Once you see how easy it is to make, this chocolate fudge recipe will be a regular treat at your house.
More Homemade Fudge Recipes to try:
- Peanut Butter Cup Fudge
- Strawberry Fudge
- Salted Caramel Chocolate Fudge
- Fantasy Fudge
- Coconut Fudge
- Butterfinger Fudge
- Red Velvet Fudge
If you make this recipe be sure to upload a photo in the comment section below or leave a rating. Enjoy!
Chocolate Fudge Recipe
Equipment
- Kitchen Scale (optional)
- 8x8-inch Baking Pan
Ingredients
- 4 cups semisweet chocolate chips 680 grams
- 14 ounces sweetened condensed milk 396 grams (1 can)
- 4 tablespoons unsalted butter 57 grams, melted (½ stick)
- ½ teaspoon pure vanilla extract 2 grams
- ¼ teaspoon kosher salt
Instructions
- Line an 8x8-inch baking pan with nonstick aluminum foil or parchment paper and set aside.
- Add the chocolate chips and sweetened condensed milk to a saucepan set over medium heat and stir until it starts to melt. Pour in the butter, vanilla, and salt. 4 cups semisweet chocolate chips, 14 ounces sweetened condensed milk, 4 tablespoons unsalted butter, ½ teaspoon pure vanilla extract, ¼ teaspoon kosher salt
- Stir until the chocolate is fully melted.
- Gently press the mixture into the prepared pan and let it set up at room temperature or in the refrigerator for 1 hour.
- Slice into 1-inch pieces and serve topped with flaky sea salt if desired.
Video
Notes
- Stir chocolate consistently until it melts for best results.
- Make sure the stove is set to medium heat. Too high and it’s likely to burn, too low and it will be difficult to properly heat, melt, and mix.
- Line the baking pan with parchment paper to make it easy to remove the fudge from the pan when it’s done.
- Let the fudge set at room temperature for best results.
- It’s easy to mix extra ingredients into this recipe to create your own flavor variations. Or add your favorite toppings at the end before it sets.
Nutrition
By Becky Hardin
Published Jul 12, 2017


This Essential Grocery List is an absolute life saver for my family on the busy weeks. When I started this journey to learn how to cook, I quickly realized that the first step in cooking is having staple ingredients on hand. I want to avoid having to run out to the grocery store every single time I prepare a new recipe. Having a well-stocked pantry has made my life in the kitchen so much simpler, because when it’s time to cook, I have what I need.

Essential Grocery List
It’s so helpful to have a basic grocery list to help me remember which foods to buy at the store. This food shopping list is my go-to!
It’s better to stock up on things like grains, seasonings and spices, baking essentials, oils, condiments, canned and frozen foods, etc. so I can just grab them when I need them. These things have a long shelf life , so I keep them in my kitchen for convenience.
However, I do have to go to the supermarket sometimes, and there’s a way to make that trip easy and hassle-free: I keep a grocery list! If I go in blindly, I’ll leave with things I don’t need, and nothing that actually helps me prepare a good meal.
In the list below, I’ve compiled everything I always have on my stock-up grocery list.
I’ve got you covered! I created an easy grocery list filled with all of the essentials. Plus there’s a free printable version that you can take with you to the grocery store. It has everything you need to stock your pantry, your freezer, and your refrigerator.

Click to get my Free Printable Grocery List
What to Buy at the Grocery Store
This is the perfect grocery list filled with all the basics and essentials. It should help get you going if you’re new to cooking, or if you’re just left staring helplessly at an empty pantry and don’t know how to fill it.
When I first started cooking, things could seem overwhelming. I quickly realized that they more prepared I could be, the more confident I felt. If you already have the basics in your kitchen, then you can shop stress-free.
So print out our easy grocery list, stock up your pantry and fridge, and you’ll be cooking in no time!
Click to get my Free Printable Grocery List for the perfectly stocked pantry and freezer!
Fresh Produce
- Apples
- Bananas
- Strawberries
- Avocados
- Bell Peppers
- Carrots
- Broccoli
- Garlic
- Lemons/Limes
- Onion
- Parsley
- Cilantro
- Basil
- Potatoes
- Spinach
- Tomatoes
GRAINS
- Breadcrumbs
- Pasta
- Quinoa
- Rice
- Sandwich Bread
- Tortillas
MEAT/PROTEIN
- Chicken
- Eggs
- Ground Beef
- Sliced Turkey
- Lunch Meat
DAIRY
- Butter
- Sliced Cheese
- Shredded Cheese
- Milk
- Sour Cream
- Greek Yogurt
BAKING GOODS
- Baking powder
- Baking Soda
- Granulated Sugar
- Brown Sugar
- Flour
- Honey
- Vanilla Extract
- Dry Yeast
- Chocolate Chips
- Cocoa Powder
- Powdered Sugar
FREEZER
- Fruit and Berries
- Frozen Veggies (Corn, Peas, Broccoli, etc)
- Juice Concentrate
- Pizza or Other Convenience Meals
- Pie Crust
- Cookie Dough
CANNED/DRIED GOODS
- Chicken stock/broth
- Salsa
- Diced Tomatoes
- Jam/Jelly
- Peanut Butter
- Pasta Sauce
- Beans (Black Beans, Chickpeas, Baked Beans, etc)
- Soups
- Tuna
- Green Chiles
- Canned Veggies
- Coffee or Tea
Get more details on the best non-perishable and pantry foods
CONDIMENTS/SPICES
- Black Pepper
- Chili Powder
- Cinnamon
- Crushed Red Pepper
- Cumin
- Garlic Powder
- Ketchup
- Mustard
- Mayo
- Nutmeg
- Paprika
- Salt (Course Sea Salt and Kosher Salt)
- Soy Sauce
- Steak Sauce
- Hot Sauce/ Buffalo Sauce
- Salad Dressings
OILS/VINEGARS
- Apple cider vinegar
- Balsamic vinegar
- Coconut Oil
- Olive Oil
- Vegetable/Canola Oil
- Red Wine Vinegar
- White Vinegar
- Cooking Wine
- White Wine Vinegar
SNACKS
- Crackers
- Nuts
- Quick Oats
- Popcorn
- Tortilla Chips
- Cereal
Click to get my Free Printable Grocery List for the perfectly stocked pantry and freezer!

Click ☝🏻 for my FREE Grocery List Printable!
I hope this essential grocery list can help you buy what you need and make your home cooking so much easier!
Stock Your Kitchen
Find more ideas for your grocery list, stock up your kitchen, and print more cooking guides and charts to keep handy!

Non-Perishable Foods to Stock Up On

Frozen Vegetables to Stock Up On (and Recipes to Make)

Ultimate List of Cooking Herbs for Your Kitchen

Ultimate List of Cooking Spices for Your Kitchen

Cooking Oil 101: Types of Cooking Oils to Use

26 Types of Pasta and When to Use Them

What Fruits and Vegetables are in Season?

Meat Temperature Chart (Free Printable)

How to Meal Prep (Guide for Beginners)

Basic Cooking Measurements & Kitchen Conversion Chart

