
By Becky Hardin
Published Nov 11, 2023


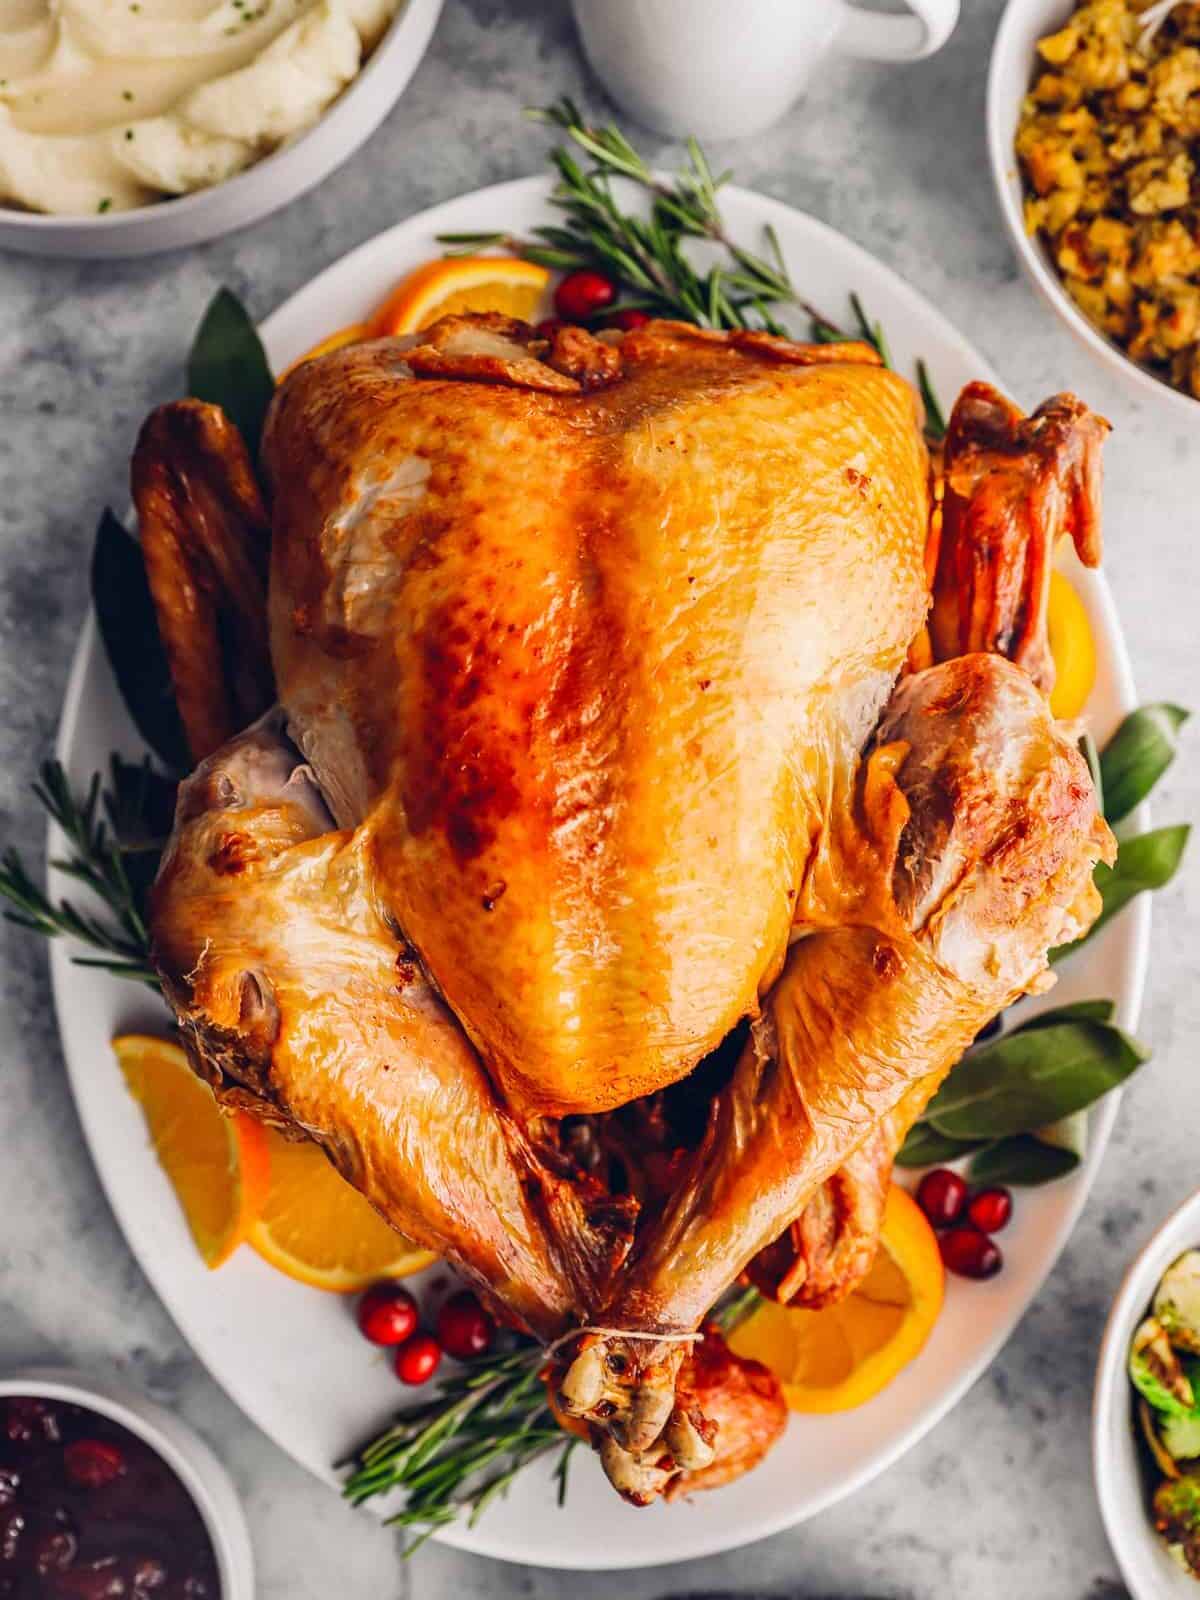
Deep Fried Turkey is the perfect main course for any holiday meal. Start with an herb-filled wet brine, then fry it for a super crispy and juicy result. It’s much quicker and easier to make than you might think!
Why We Love This Deep Fried Turkey Recipe
Frying a turkey results in the most juicy Thanksgiving meal you’ve ever tried! The first time we made this, we were hooked. Here are some reasons we make it again and again.
- Moist. The combination of brining and frying the turkey in oil makes it impossible to dry out.
- Tender. The wet brine helps break down the proteins in the muscle fibers, allowing the meat to retain more moisture during cooking.
- Flavorful. Adding salt, brown sugar, garlic, and fresh herbs to the brine infuses the turkey with so much flavor.
Variations on Fried Turkey
You can really infuse this fried turkey with just about any flavors you like. Try adding my favorite turkey rub to the brine in place of the herbs and garlic, or use whatever fresh or dried herbs you have on hand!
How to Make Ahead and Store
You can wet brine the turkey for up to 48 hours (longer if frozen) before frying it. Cover and refrigerate the turkey until ready to roast.
Store leftover deep fried turkey in an airtight container in the refrigerator for up to 3 days.
How to Freeze and Reheat
Freeze fried turkey in an airtight container for up to 3 months. Let thaw overnight in the refrigerator before reheating gently in the microwave or in a 300°F oven covered with foil for 20-30 minutes. I do not recommend freezing a fried turkey whole; always cut it into portions first.
Serving Suggestions
With this deep fried whole turkey at the center of the table, you can serve it with any side dishes you love. Try any of these easy Thanksgiving side dishes , such as Au Gratin Potatoes , Cranberry Sauce , Creamed Green Beans , Loaded Mac and Cheese , Dinner Rolls , or Turkey Gravy .
Turkey is notorious for being flavorless and dry. This wet brine method combats both of those issues by giving the herbs and salt time to penetrate the meat, leading to moist, flavorful turkey. You could also dry brine it instead.
A wet brine involves submerging the meat in a bucket of salted and seasoned water to add moisture and flavor.
Yes, you can wet brine a frozen turkey. Simply place the frozen turkey in the wet brine and leave it in the refrigerator to defrost. The time it will take to defrost is roughly 24 hours for every 4 pounds of turkey. For a 13-pound turkey, expect to let it defrost for 72 hours (3 days).
Yes, that should be just about perfect! You may need a bit more if you’re using a very large bird, though.
It will take about 3-5 minutes per pound to deep fry a turkey. For a 13-pound turkey, deep frying should take 39-65 minutes. It’s best to check the temperature of the meat with an instant-read thermometer so you know exactly when it is done cooking. The meat should read 165°F in the thickest part.
Leave the turkey uncovered!
Yes, it is possible to overcook deep-fried turkey. If the oil is too hot or the turkey is left in for too long, it will turn out dry and tough. I recommend keeping an instant-read thermometer on hand to ensure the oil and the turkey are at the right temp.
You can reuse the oil up to 3 times before discarding it! As long as the oil is not foamy, dark, or smoking excessively, it can be reused.
More Whole Turkey Recipes We Love
- Easy Thanksgiving Turkey
- Christmas Turkey
- Dry Brined Turkey
- Grilled Turkey
- Smoked Turkey
- Spatchcocked Turkey
Ingredients1x2x3x
- ▢ 3 gallons water
- ▢ 1¼ cups kosher salt
- ▢ 1 cup brown sugar
- ▢ 1 head garlic cut in half
- ▢ ½ cup fresh thyme divided
- ▢ ½ cup fresh sage leaves divided
- ▢ ½ cup fresh rosemary leaves divided
- ▢ 13-15 pounds whole turkey
- ▢ 3 gallons vegetable oil for frying
Instructions
Brine the Turkey
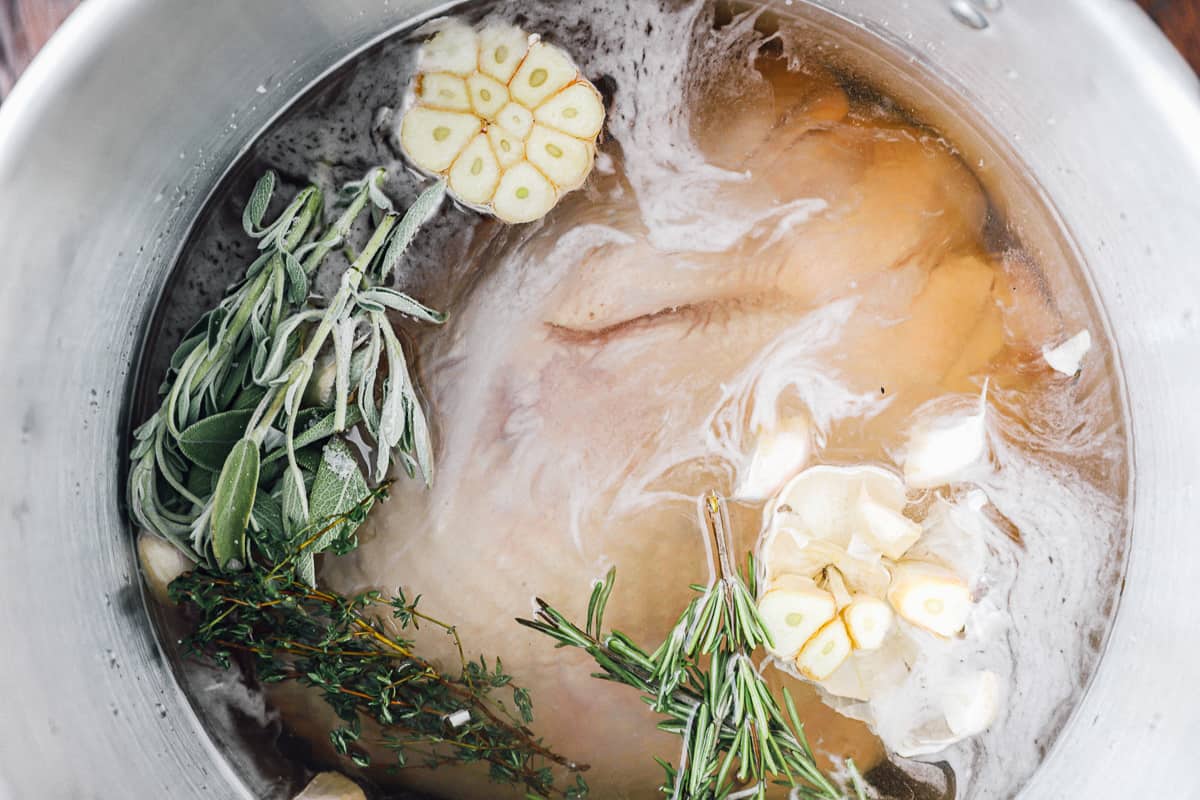
- Add the water, salt, and brown sugar to the pot and stir. Add in the garlic, and half of the thyme, sage, and rosemary. 3 gallons water, 1¼ cups kosher salt, 1 cup brown sugar, 1 head garlic, ½ cup fresh thyme, ½ cup fresh sage leaves, ½ cup fresh rosemary leaves
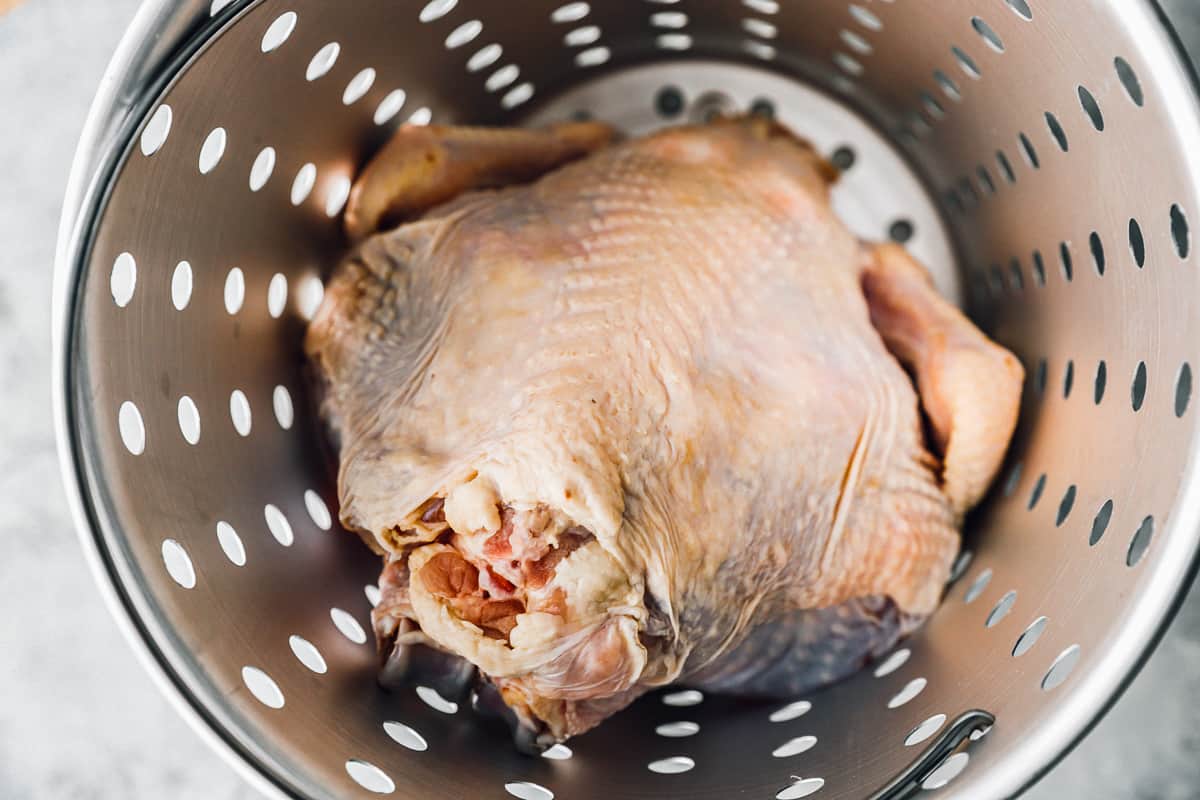
- Take the turkey out of the packaging and remove the neck and giblets. Remove any plastic pieces attached to the turkey. Place the turkey into the pot. Ensure there is enough water in the pot to completely cover the turkey and that you have at least 8 inches from the water line to top of the pot. See notes. 13-15 pounds whole turkey
- Cover the pot and let the turkey brine in the refrigerator or a cool environment for 12-24 hours.
Prep the Turkey
- Remove the turkey from the brine and place it on a large baking sheet lined with paper towel. Pat it dry on the inside and outside with extra paper towels, ensuring any liquid is removed. It may help to set the turkey right side up so the liquid drains out on the paper towel.
- Pour out the brine from the pot and rinse and wipe the pot dry.
- Pour oil into the pot and heat to 275°F. If it will reach to the oil, affix the thermometer to the rim of the pot. If not, check the temperature of the oil every few minutes. 3 gallons vegetable oil
Fry the Turkey
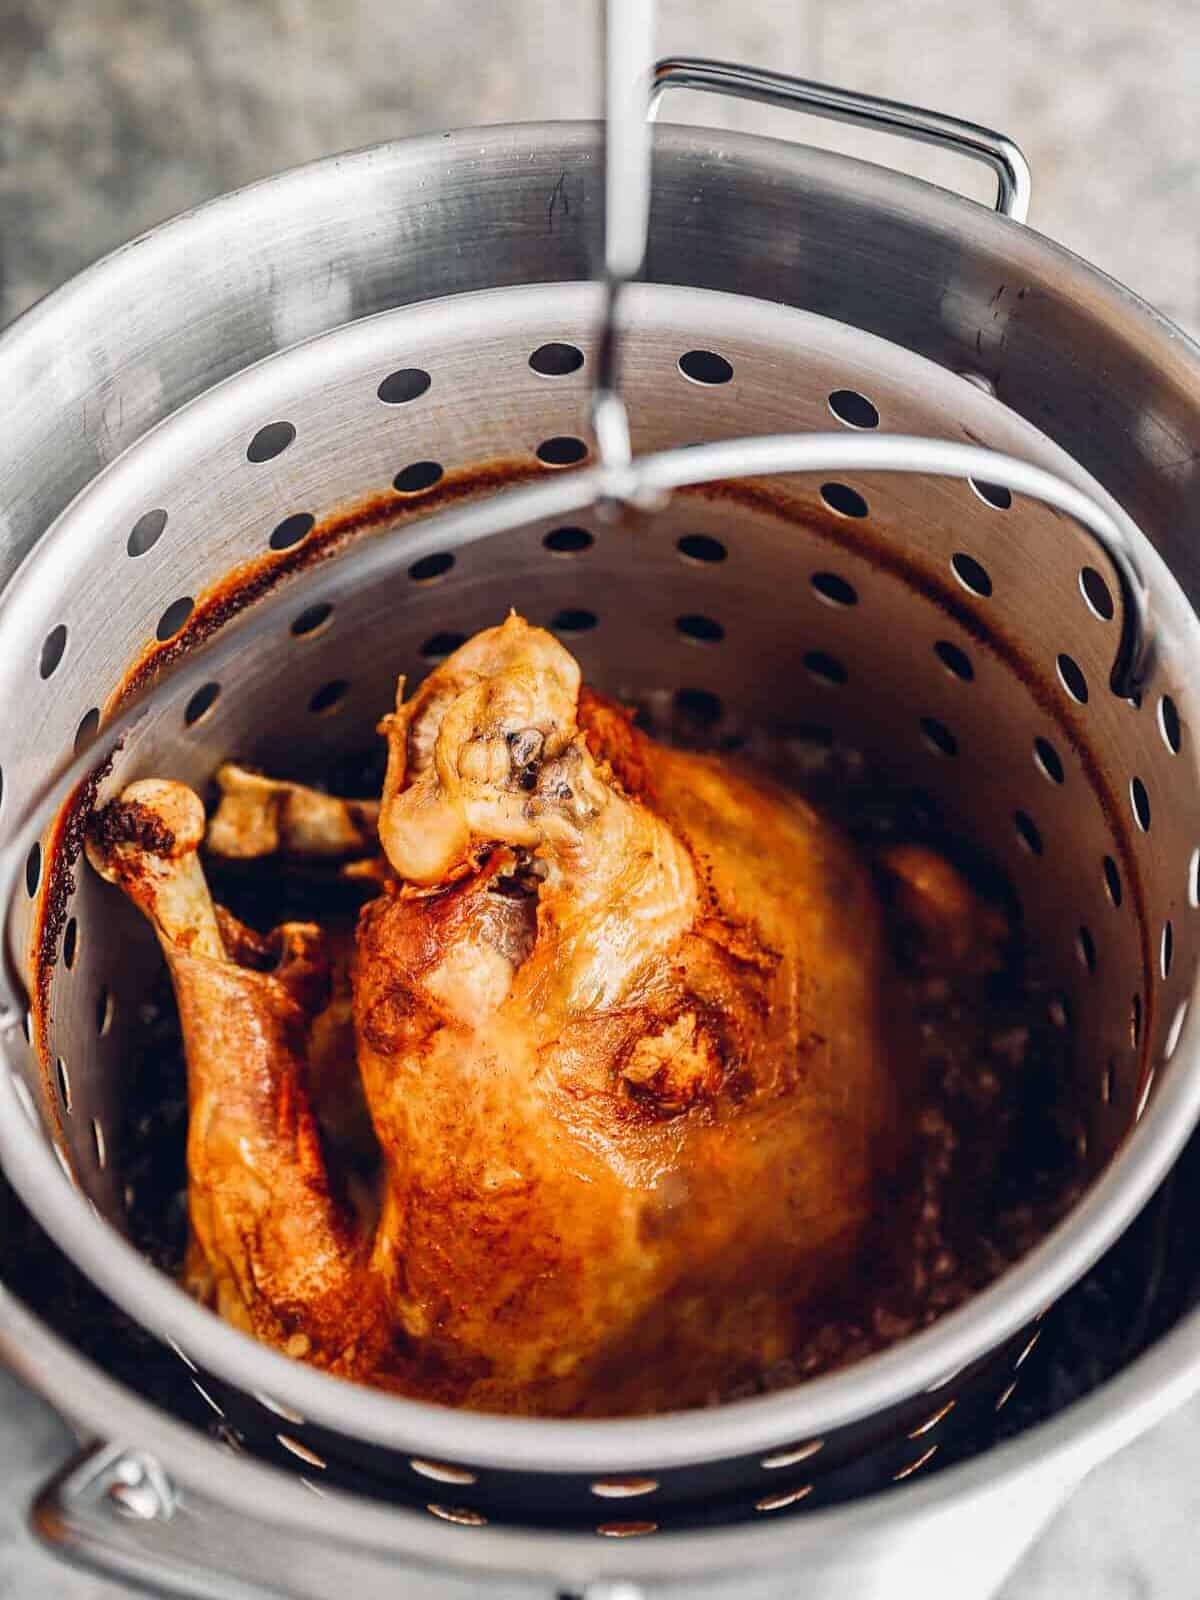
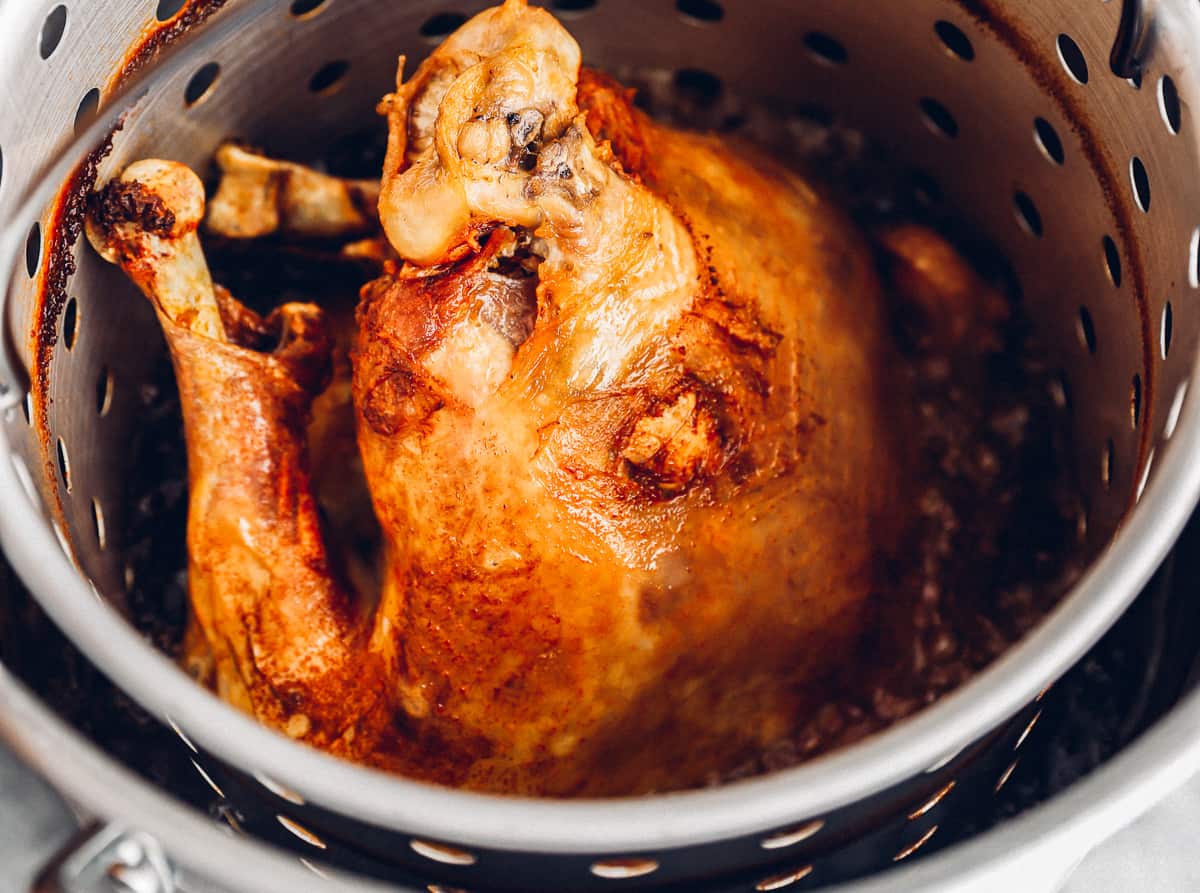
- Once the oil has reached 275°F, place the turkey in the strainer basket. If not attached to the main pot, affix the thermometer to the rim of the strainer basket. Carefully lower the basket into the hot oil.
- Once the temperature has reached 350°F, lower the heat to maintain that temperature throughout frying. Fry the turkey for 3 minutes per pound.
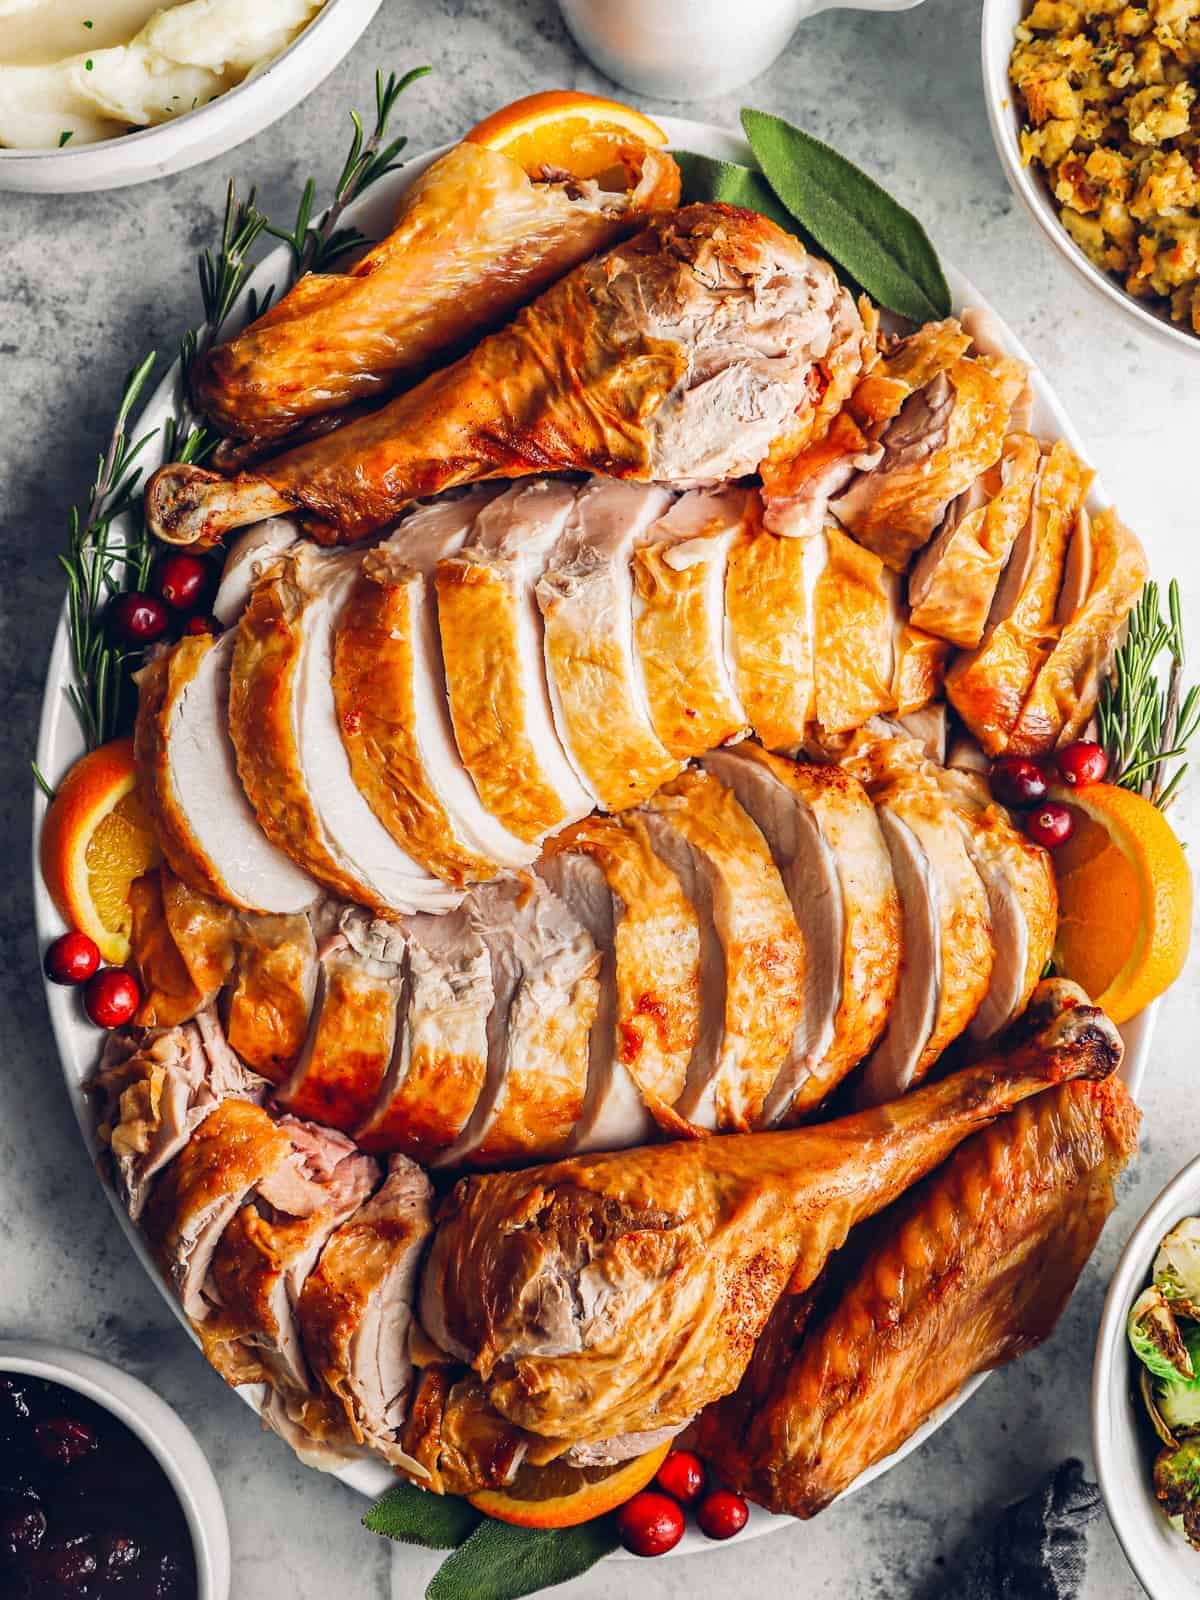
- Remove the basket from the pot and allow the turkey to rest for at least 20 minutes. It’s fine to keep the turkey in the strainer basket and place the basket on a large sheet pan to rest.
- Carefully transfer the turkey to a cutting board to carve. Serve with remaining herbs.
Equipment
- 30-Quart Pot with deep frying basket
- Baking Sheet
- Deep Frying Thermometer
Becky’s Tips
- If you’re using a frozen turkey, follow my guide for how to thaw a turkey !
- Instead of brown sugar, try granulated sugar.
- Feel free to change up the herbs to suit your individual tastes. Basil, parsley, and chives are all great.
- For a spicy brine, try adding a bit of cayenne pepper.
- You can use peanut, corn, or avocado oil instead of vegetable oil.
- Don’t use a pre-seasoned, kosher, salt-injected, or self-basting turkey. Using a salt brine on this type of turkey will make it too salty!
- In general, the bigger the bird, the longer you should brine. Brine for a minimum of 12 hours or up to 2 days!
- Use kosher salt or coarse sea salt; fine or table salt will make your turkey too salty!
- Note that for every 1 pound of turkey, it should take about 3-5 minutes to fry. For a 13-pound turkey, it should take 39-65 minutes.
- Check the internal temperature with an instant-read thermometer. It should be 165°F in the thickest part without hitting the bone.
- Let the turkey rest for 15-20 minutes before slicing to lock in the juices.
- You can fry the turkey outside using a burner suited for outdoor cooking or on the stove. A couple things to be extra cautious of during the frying process, especially if frying indoors, is the overflowing of oil and the splattering of oil. To avoid overflowing, make sure you are using a pot that holds at least 30 quarts, a turkey no heavier than 15 pounds, the same amount of water and oil for brining and frying (3 gallons each). To avoid splattering, ensure the turkey has been completely patted dry.
Nutrition information is automatically calculated, so should only be used as an approximation.
How to Fry a Turkey Step by Step
Brine the Turkey: Add 3 gallons of water, 1¼ cups of kosher salt, and 1 cup of brown sugar to your pot and stir. Add in 1 head of garlic, ¼ cup of fresh thyme, ¼ cup of fresh sage leaves, and ¼ cup of fresh rosemary leaves. Remove the neck and giblets from a 13-15 pound whole turkey. Remove any plastic pieces and packaging attached to the turkey, and place the turkey in the brine. Ensure there is enough water to completely cover the turkey and that you have at least 8 inches from the water line to the top of the pot. Cover and let the turkey brine in the refrigerator for 12-24 hours.
Prep the Turkey: Remove the turkey from the brine and place it on a large baking sheet lined with paper towels. Pat it dry on the inside and outside with extra paper towels, ensuring any liquid is removed. It may help to set the turkey right side up so the liquid drains out on the paper towel. Pour out the brine from the pot and rinse and wipe the pot dry. Pour 3 gallons of vegetable oil into the pot and heat to 275°F. If it will reach to the oil, affix the thermometer to the rim of the pot. If not, check the temperature of the oil every few minutes.

Fry the Turkey: Once the oil has reached 275°F, place the turkey in the strainer basket. If not attached to the main pot, affix the thermometer to the rim of the strainer basket. Carefully lower the basket into the hot oil. Once the temperature has reached 350°F, lower the heat to maintain that temperature throughout frying. Fry the turkey for 3 minutes per pound.
Rest and Carve: Remove the basket from the pot and allow the turkey to rest for at least 20 minutes. It’s fine to keep the turkey in the strainer basket and place the basket on a large sheet pan to rest. Carefully transfer the turkey to a cutting board to carve. Serve with remaining herbs.

Deep Fried Turkey Recipe
Equipment
- 30-Quart Pot with deep frying basket
- Baking Sheet
- Deep Frying Thermometer
Ingredients
- 3 gallons water
- 1¼ cups kosher salt
- 1 cup brown sugar
- 1 head garlic cut in half
- ½ cup fresh thyme divided
- ½ cup fresh sage leaves divided
- ½ cup fresh rosemary leaves divided
- 13-15 pounds whole turkey
- 3 gallons vegetable oil for frying
Instructions
Brine the Turkey
- Add the water, salt, and brown sugar to the pot and stir. Add in the garlic, and half of the thyme, sage, and rosemary. 3 gallons water, 1¼ cups kosher salt, 1 cup brown sugar, 1 head garlic, ½ cup fresh thyme, ½ cup fresh sage leaves, ½ cup fresh rosemary leaves
- Take the turkey out of the packaging and remove the neck and giblets. Remove any plastic pieces attached to the turkey. Place the turkey into the pot. Ensure there is enough water in the pot to completely cover the turkey and that you have at least 8 inches from the water line to top of the pot. See notes. 13-15 pounds whole turkey
- Cover the pot and let the turkey brine in the refrigerator or a cool environment for 12-24 hours.
Prep the Turkey
- Remove the turkey from the brine and place it on a large baking sheet lined with paper towel. Pat it dry on the inside and outside with extra paper towels, ensuring any liquid is removed. It may help to set the turkey right side up so the liquid drains out on the paper towel.
- Pour out the brine from the pot and rinse and wipe the pot dry.
- Pour oil into the pot and heat to 275°F. If it will reach to the oil, affix the thermometer to the rim of the pot. If not, check the temperature of the oil every few minutes. 3 gallons vegetable oil
Fry the Turkey
- Once the oil has reached 275°F, place the turkey in the strainer basket. If not attached to the main pot, affix the thermometer to the rim of the strainer basket. Carefully lower the basket into the hot oil.
- Once the temperature has reached 350°F, lower the heat to maintain that temperature throughout frying. Fry the turkey for 3 minutes per pound.
- Remove the basket from the pot and allow the turkey to rest for at least 20 minutes. It’s fine to keep the turkey in the strainer basket and place the basket on a large sheet pan to rest.
- Carefully transfer the turkey to a cutting board to carve. Serve with remaining herbs.
Notes
- If you’re using a frozen turkey, follow my guide for how to thaw a turkey !
- Instead of brown sugar, try granulated sugar.
- Feel free to change up the herbs to suit your individual tastes. Basil, parsley, and chives are all great.
- For a spicy brine, try adding a bit of cayenne pepper.
- You can use peanut, corn, or avocado oil instead of vegetable oil.
- Don’t use a pre-seasoned, kosher, salt-injected, or self-basting turkey. Using a salt brine on this type of turkey will make it too salty!
- In general, the bigger the bird, the longer you should brine. Brine for a minimum of 12 hours or up to 2 days!
- Use kosher salt or coarse sea salt; fine or table salt will make your turkey too salty!
- Note that for every 1 pound of turkey, it should take about 3-5 minutes to fry. For a 13-pound turkey, it should take 39-65 minutes.
- Check the internal temperature with an instant-read thermometer. It should be 165°F in the thickest part without hitting the bone.
- Let the turkey rest for 15-20 minutes before slicing to lock in the juices.
- You can fry the turkey outside using a burner suited for outdoor cooking or on the stove. A couple things to be extra cautious of during the frying process, especially if frying indoors, is the overflowing of oil and the splattering of oil. To avoid overflowing, make sure you are using a pot that holds at least 30 quarts, a turkey no heavier than 15 pounds, the same amount of water and oil for brining and frying (3 gallons each). To avoid splattering, ensure the turkey has been completely patted dry.
Nutrition
By Becky Hardin
Published Jul 12, 2017


This Essential Grocery List is an absolute life saver for my family on the busy weeks. When I started this journey to learn how to cook, I quickly realized that the first step in cooking is having staple ingredients on hand. I want to avoid having to run out to the grocery store every single time I prepare a new recipe. Having a well-stocked pantry has made my life in the kitchen so much simpler, because when it’s time to cook, I have what I need.

Essential Grocery List
It’s so helpful to have a basic grocery list to help me remember which foods to buy at the store. This food shopping list is my go-to!
It’s better to stock up on things like grains, seasonings and spices, baking essentials, oils, condiments, canned and frozen foods, etc. so I can just grab them when I need them. These things have a long shelf life , so I keep them in my kitchen for convenience.
However, I do have to go to the supermarket sometimes, and there’s a way to make that trip easy and hassle-free: I keep a grocery list! If I go in blindly, I’ll leave with things I don’t need, and nothing that actually helps me prepare a good meal.
In the list below, I’ve compiled everything I always have on my stock-up grocery list.
I’ve got you covered! I created an easy grocery list filled with all of the essentials. Plus there’s a free printable version that you can take with you to the grocery store. It has everything you need to stock your pantry, your freezer, and your refrigerator.

Click to get my Free Printable Grocery List
What to Buy at the Grocery Store
This is the perfect grocery list filled with all the basics and essentials. It should help get you going if you’re new to cooking, or if you’re just left staring helplessly at an empty pantry and don’t know how to fill it.
When I first started cooking, things could seem overwhelming. I quickly realized that they more prepared I could be, the more confident I felt. If you already have the basics in your kitchen, then you can shop stress-free.
So print out our easy grocery list, stock up your pantry and fridge, and you’ll be cooking in no time!
Click to get my Free Printable Grocery List for the perfectly stocked pantry and freezer!
Fresh Produce
- Apples
- Bananas
- Strawberries
- Avocados
- Bell Peppers
- Carrots
- Broccoli
- Garlic
- Lemons/Limes
- Onion
- Parsley
- Cilantro
- Basil
- Potatoes
- Spinach
- Tomatoes
GRAINS
- Breadcrumbs
- Pasta
- Quinoa
- Rice
- Sandwich Bread
- Tortillas
MEAT/PROTEIN
- Chicken
- Eggs
- Ground Beef
- Sliced Turkey
- Lunch Meat
DAIRY
- Butter
- Sliced Cheese
- Shredded Cheese
- Milk
- Sour Cream
- Greek Yogurt
BAKING GOODS
- Baking powder
- Baking Soda
- Granulated Sugar
- Brown Sugar
- Flour
- Honey
- Vanilla Extract
- Dry Yeast
- Chocolate Chips
- Cocoa Powder
- Powdered Sugar
FREEZER
- Fruit and Berries
- Frozen Veggies (Corn, Peas, Broccoli, etc)
- Juice Concentrate
- Pizza or Other Convenience Meals
- Pie Crust
- Cookie Dough
CANNED/DRIED GOODS
- Chicken stock/broth
- Salsa
- Diced Tomatoes
- Jam/Jelly
- Peanut Butter
- Pasta Sauce
- Beans (Black Beans, Chickpeas, Baked Beans, etc)
- Soups
- Tuna
- Green Chiles
- Canned Veggies
- Coffee or Tea
Get more details on the best non-perishable and pantry foods
CONDIMENTS/SPICES
- Black Pepper
- Chili Powder
- Cinnamon
- Crushed Red Pepper
- Cumin
- Garlic Powder
- Ketchup
- Mustard
- Mayo
- Nutmeg
- Paprika
- Salt (Course Sea Salt and Kosher Salt)
- Soy Sauce
- Steak Sauce
- Hot Sauce/ Buffalo Sauce
- Salad Dressings
OILS/VINEGARS
- Apple cider vinegar
- Balsamic vinegar
- Coconut Oil
- Olive Oil
- Vegetable/Canola Oil
- Red Wine Vinegar
- White Vinegar
- Cooking Wine
- White Wine Vinegar
SNACKS
- Crackers
- Nuts
- Quick Oats
- Popcorn
- Tortilla Chips
- Cereal
Click to get my Free Printable Grocery List for the perfectly stocked pantry and freezer!

Click ☝🏻 for my FREE Grocery List Printable!
I hope this essential grocery list can help you buy what you need and make your home cooking so much easier!
Stock Your Kitchen
Find more ideas for your grocery list, stock up your kitchen, and print more cooking guides and charts to keep handy!

Non-Perishable Foods to Stock Up On

Frozen Vegetables to Stock Up On (and Recipes to Make)

Ultimate List of Cooking Herbs for Your Kitchen

Ultimate List of Cooking Spices for Your Kitchen

Cooking Oil 101: Types of Cooking Oils to Use

26 Types of Pasta and When to Use Them

What Fruits and Vegetables are in Season?

Meat Temperature Chart (Free Printable)

How to Meal Prep (Guide for Beginners)

Basic Cooking Measurements & Kitchen Conversion Chart

