
By Becky Hardin
Published Jun 15, 2022
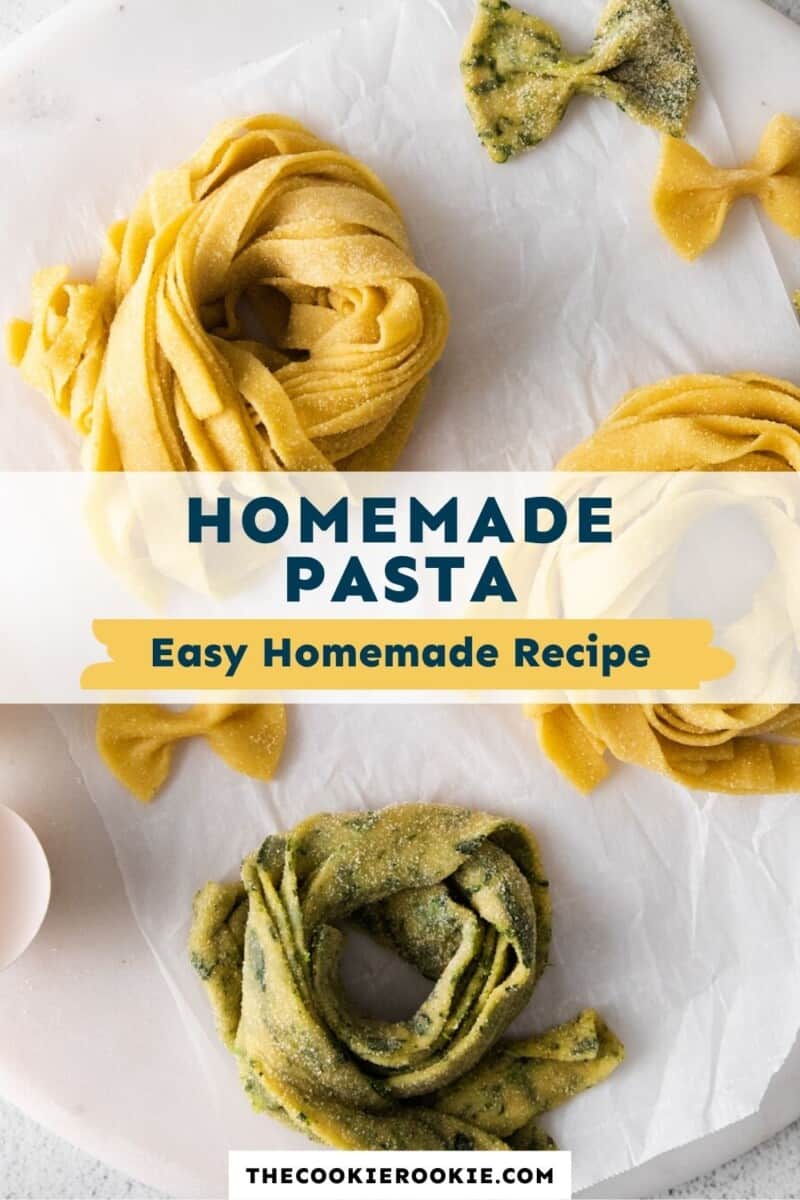
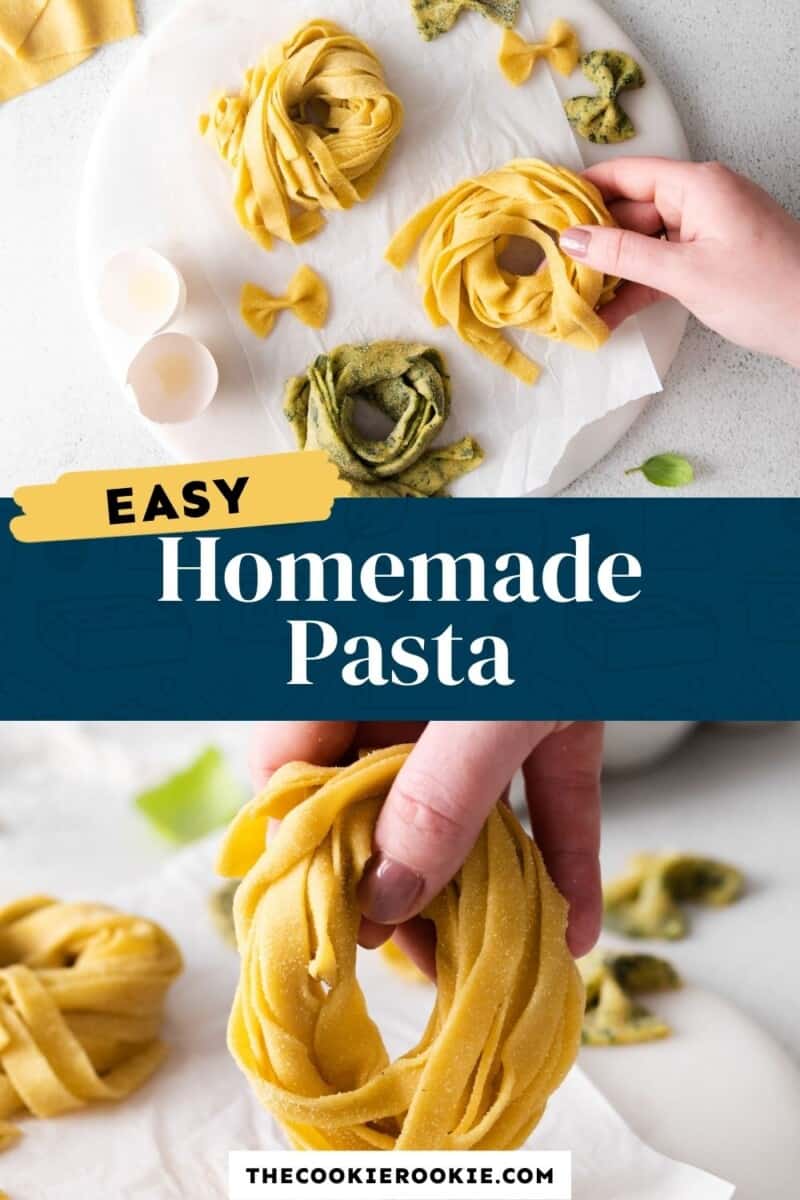
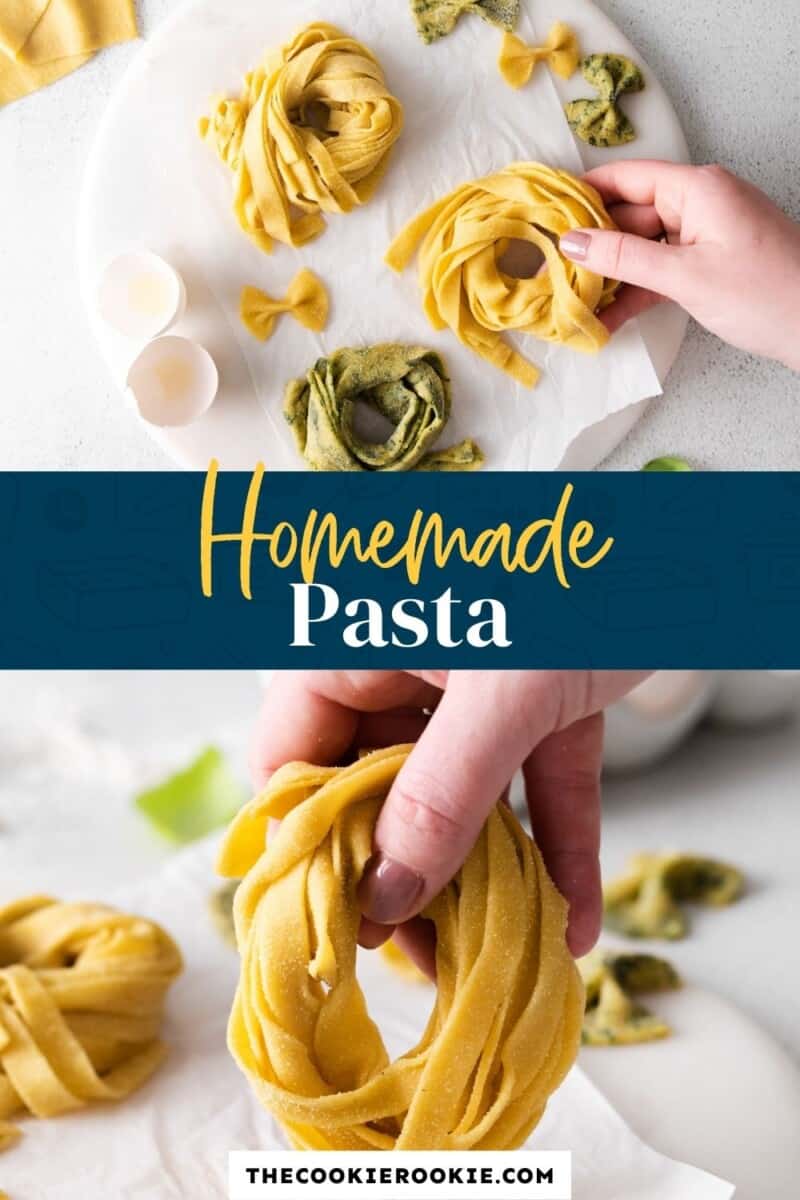
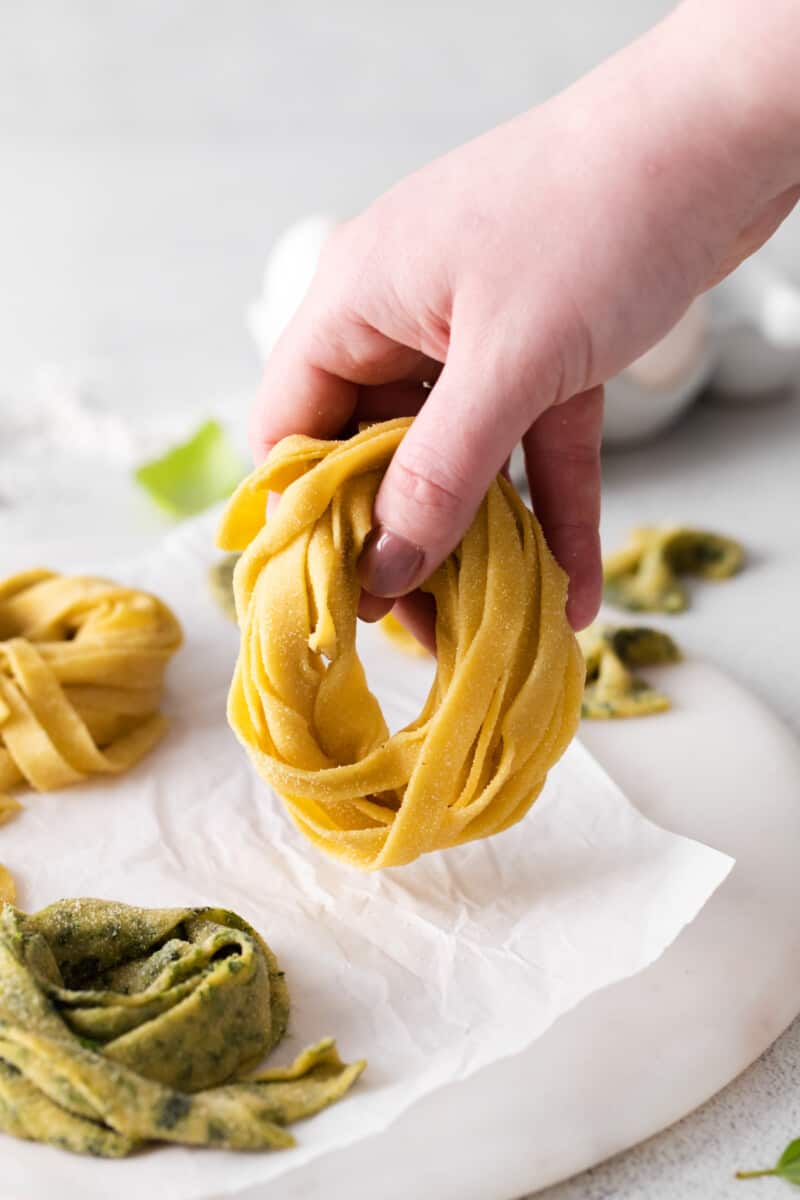
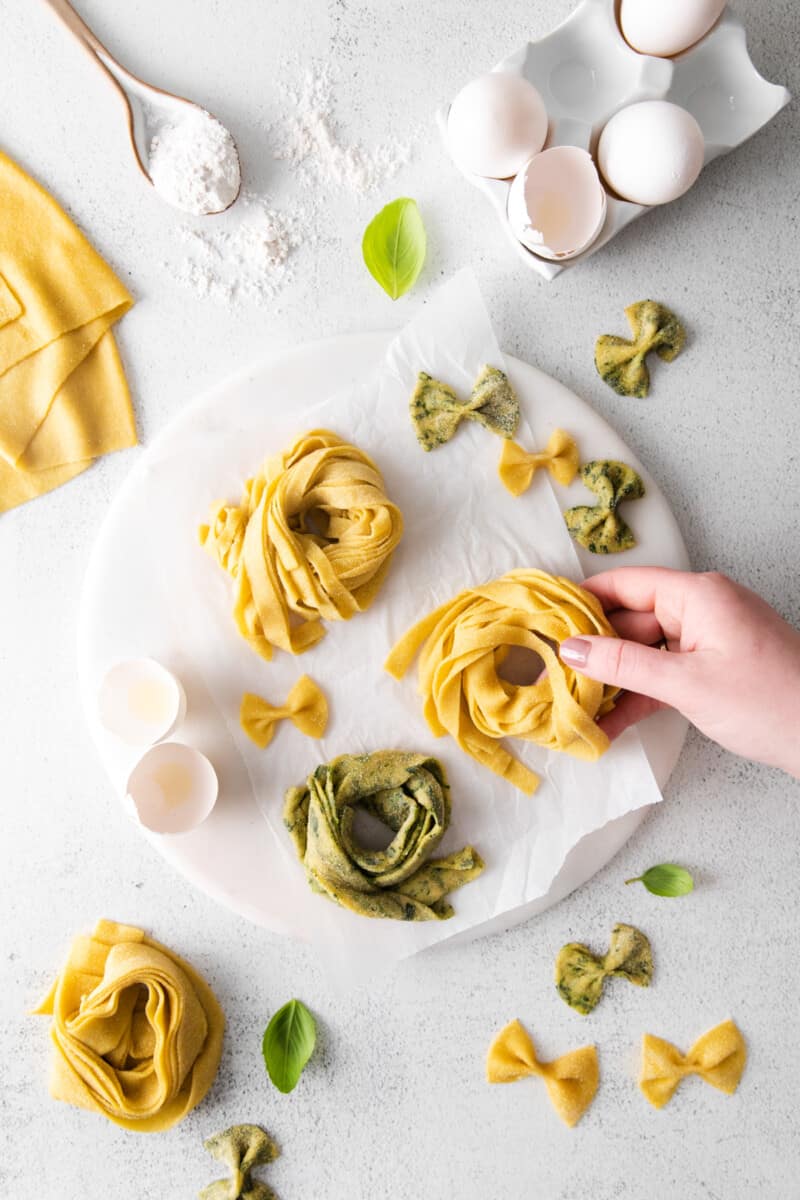
Way more delicious than store bought, this easy Homemade Pasta will rock your world! Fresh, golden noodles you can make by hand or using a pasta roller. Such a useful recipe to have in your repertoire.
Pasta From Scratch
Learn how to make perfect pasta from scratch with this simple pasta recipe! Pasta is the foundation of so many amazing Italian dishes, being able to whip up a fresh batch will elevate your weeknight dinners with ease. Go all out and serve the pasta with homemade ricotta too; you won’t believe how great they taste together.
Looking for some easy dinner ideas? Why not also try my Creamy Swiss Chicken Bake and my Parmesan Crusted Tilapia Recipe !
Why You’ll Love this Homemade Pasta Dough Recipe:
- EASY HOMEMADE PASTA: Made with kitchen staples, you’ll be amazed at how such a simple recipe yields the most amazing results!
- VEGETARIAN: These yummy noodles can be a simple meal on their own, drizzled with olive oil, or pair with veggies for a hearty vegetarian meal.
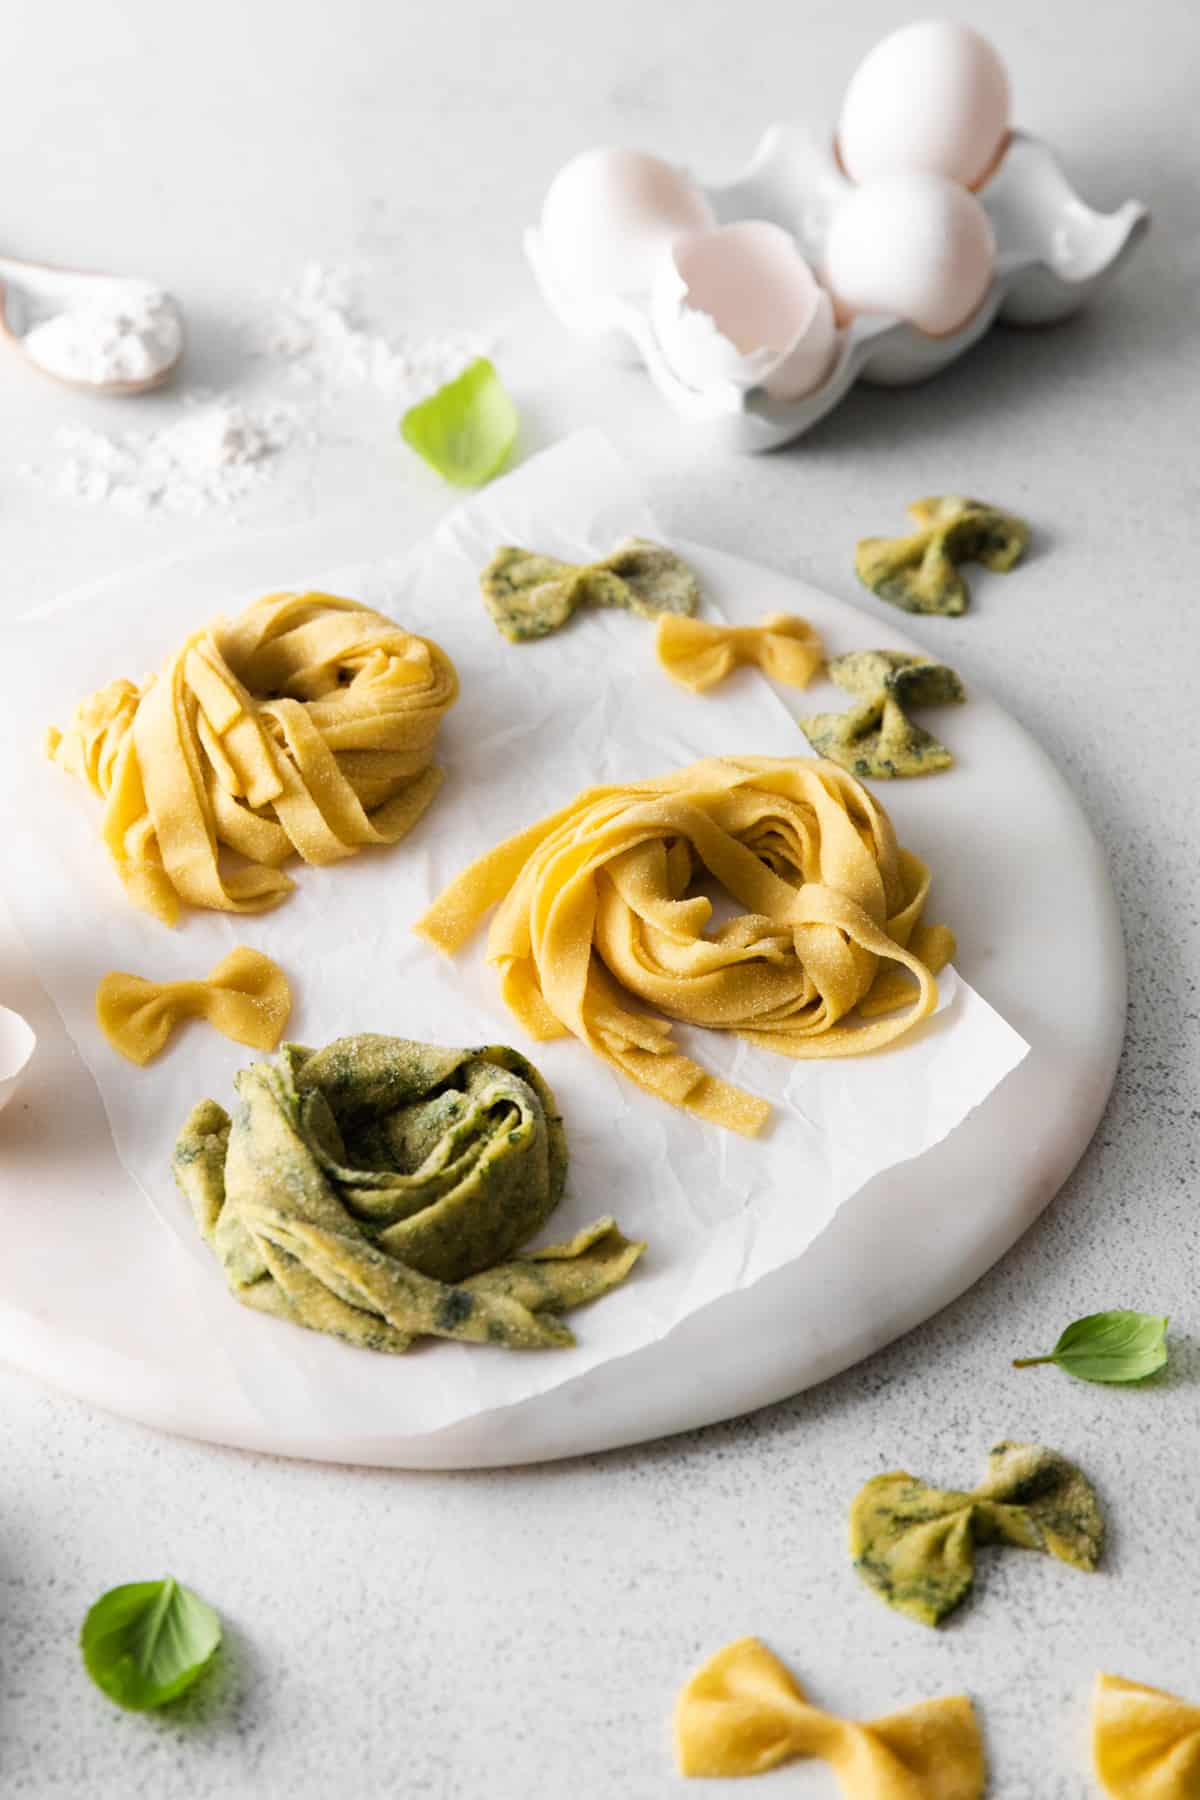
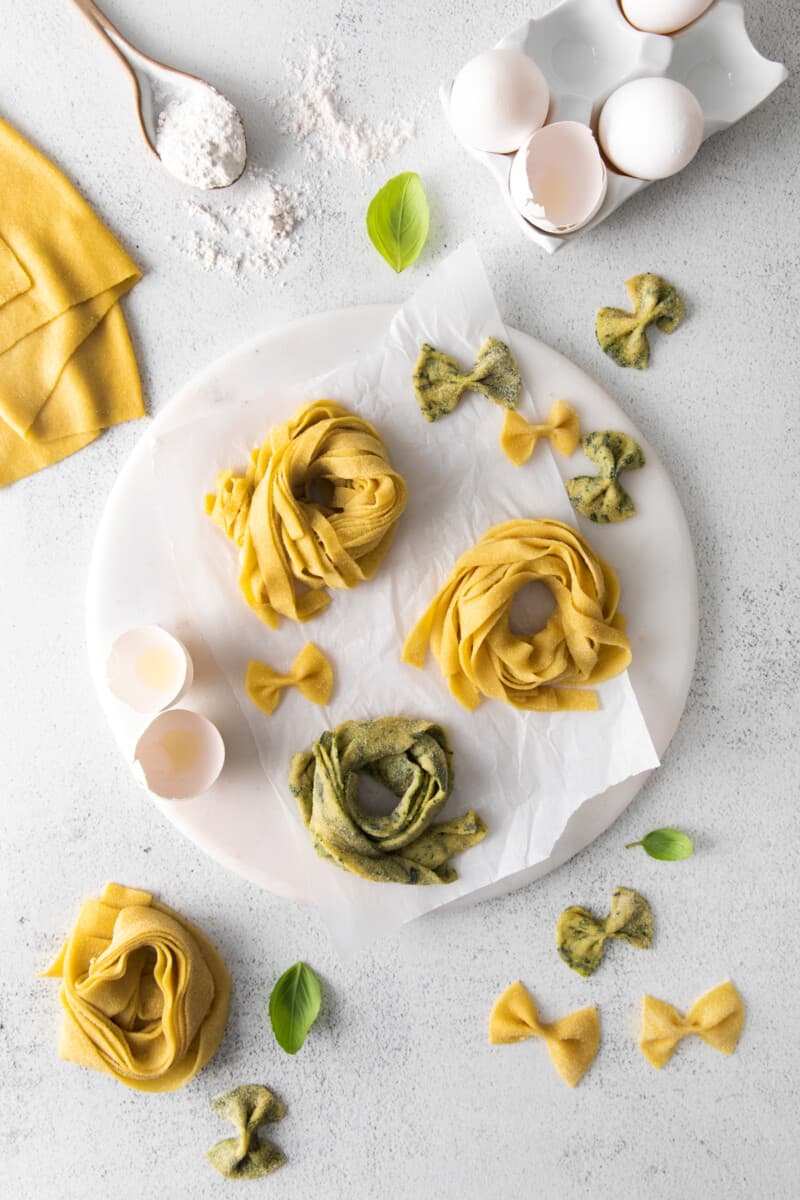
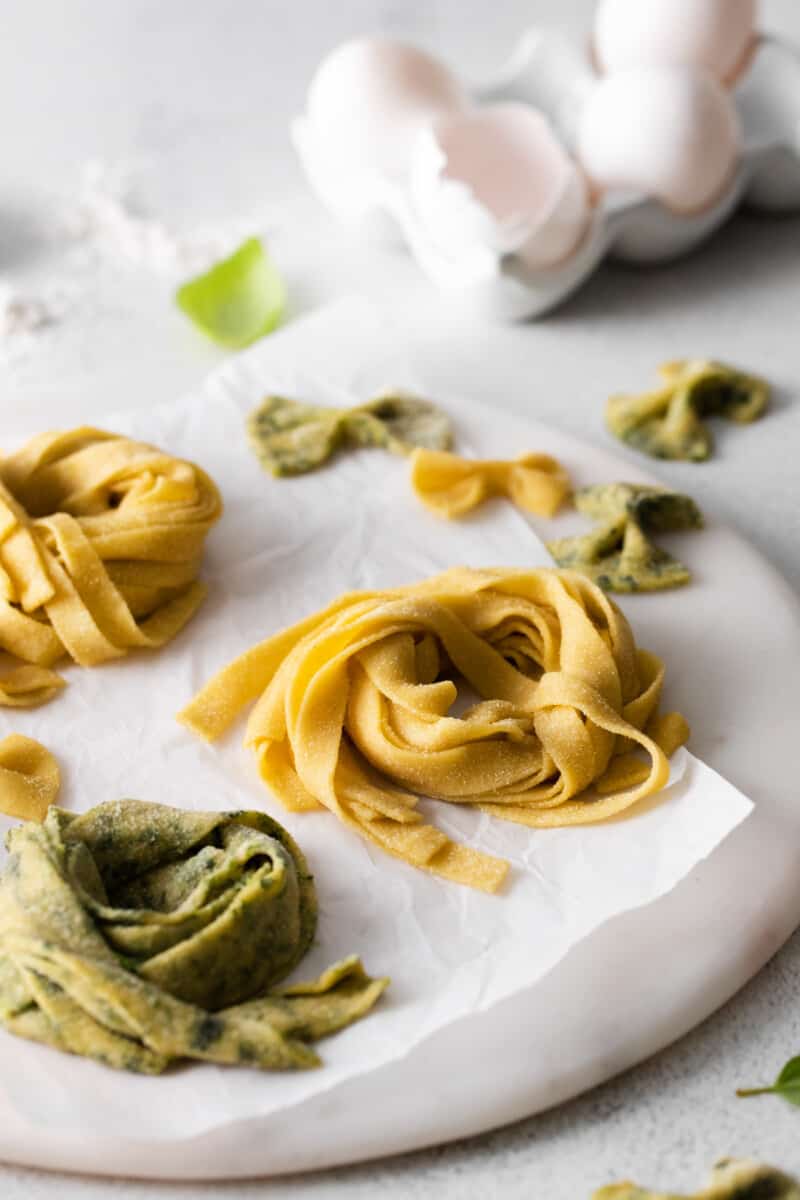
- VERSATILE: This homemade pasta can be laminated with herbs for a flavor twist, so good!
Such a simple recipe, even the kids can get involved! You can make all different kinds of pasta shapes once you know how to make the dough yourself.
How to Make Homemade Pasta
You can jump to the recipe card for full ingredients & instructions!
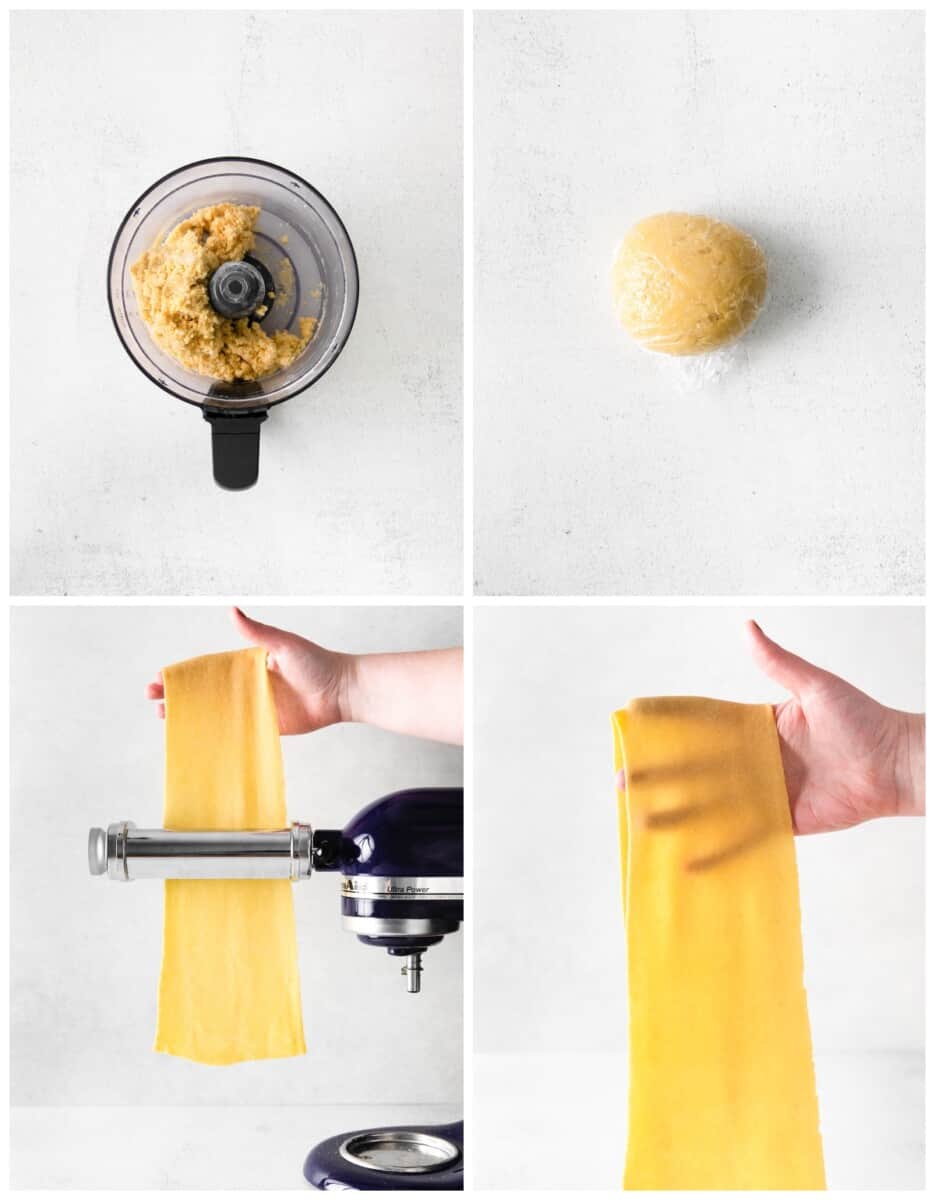
- In a food processor combine your dry and wet ingredients.
- On a clean work surface, knead the dough into a smooth ball.
- Allow dough to rest.
- Roll out your pasta, either by hand or using your pasta machine.
Homemade Pasta Recipe Notes
- Flour: If you have 00 flour (“double O flour”) on hand, it will create an even softer and chewier pasta. If not, all-purpose works too!
- Semolina Flour: A bit larger and more hearty, so it adds a bit more texture to the dough. If you don’t have any, substitute additional all-purpose or 00 flour.
- Salt: Brings out the flavor of the pasta.
- Eggs: Help bring the dough together. The extra egg yolk adds richness and color.
- Olive Oil: Adds great flavor to the pasta dough. Make sure to use a really robust (preferably unfiltered) olive oil.
- Water: Used to bring the dough together if it’s too dry. You shouldn’t need to add more than ¼ cup at the most!
Homemade pasta can be made with nearly any type of flour. Semolina flour is the most traditional and gives pasta a rougher texture, but it can be hard to find in stores. Many stores do carry 00 flour, though, which will yield soft, supple pasta. When in doubt, all-purpose flour works just fine, though. You can also use a mix of any of the above to get your desired texture.
All you really need is your own two hands and a rolling pin. However, making pasta can be extremely time consuming this way, so I recommend using a food processor and a pasta roller to speed up the process.
Yes! Homemade pasta has a texture unlike store-bought, and you can really customize it to get the perfect bite. Experiment with different flours, different pasta shapes, and different add-ins to create a unique pasta your family will love!
Giving the pasta dough time to rest allows the flour to properly hydrate and the gluten network to relax. If you try to roll out your dough right away, it will be too dry and crumbly. It will also be too elastic, so it will spring back every time you try to roll it out.
If your pasta is sticking together, the dough is probably too moist. Add some flour to the dough, then reroll it. Be sure to use plenty of flour to coat the pasta once cut to prevent it from sticking together while it dries and during cooking.
If your pasta is tearing apart, it is either too dry or it needs more time to rest. Let it rest for an additional 5 minutes, then try again. If it is still too crumbly, add a little bit of water and knead until it feels smoother.
Yes! If you do not allow the pasta to dry out slightly before cooking, it will all stick together as soon as it hits the water, leading to unevenly cooked clumps of pasta.
Serving Suggestions
You can have homemade pasta very simply, with garlic and olive oil, or you can amp things up. Here’s some favorites:
- Air Fryer Meatballs
- Crockpot Swedish Meatballs
- Cherry Tomato Pasta Sauce
- Homemade Marinara Sauce
- Crockpot Spaghetti Sauce
Nothing compares to the taste and texture of homemade pasta – especially when it is so easy to make!

Storage Instructions
- Uncooked Pasta: Allow uncooked pasta to dry for at least 30 minutes or up to 2 hours before storing. Store in an airtight container in the refrigerator for up to 2 days.
- Cooked Pasta: Store cooked pasta in an airtight container in the refrigerator for up to 2 days. Mix with sauce before storing, or toss with olive oil to prevent sticking.
Freezer Instructions
- Uncooked Pasta: Allow uncooked pasta to dry for at least 30 minutes or up to 2 hours before storing. Store in an airtight container in the freezer for up to 2 weeks. Allow frozen pasta to thaw for 4-6 hours in the refrigerator before cooking.
- Cooked Pasta: Store cooked pasta in an airtight container in the freezer for up to 1 month. Mix with sauce before storing, or toss with olive oil to prevent sticking. Allow frozen pasta to thaw overnight in the refrigerator before reheating.
Flavor Variations
- My favorite way to flavor pasta dough is to laminate it with herbs. Follow the recipe through step 6, except once you have your pasta dough rolled out, place herbs (basil, parsley, sage, thyme, etc) on half of the dough. Fold the other half over the dough and press down to seal. Roll the dough out again until you can see your fingers through it and cut/cook as normal.
- To make colored doughs, I usually opt for either purees or powders! If using a puree, swap the olive oil for 2 tablespoons of puree (spinach, beet, carrot, etc). If using a powder (beet root, pea powder, golden milk), just add 1-2 tablespoons with the dry ingredients!
Troubleshooting
Pasta can be finicky. The hydration of the dough depends largely on how humid (or dry!) it is in your house. Don’t be afraid to make adjustments on the fly!
- Dough too sticky? Add more flour.
- Dough too dry? Let it rest an extra 5 minutes, then add more water if it still seems dry.
- Cut pasta sticking together? Add more flour and toss to coat. Allow the pasta to dry out for at least 30 minutes before cooking.
MorePasta RecipesWe Love
- Cajun Chicken Pasta
- One Pot Chicken Alfredo
- Italian Pasta Salad
- Loaded Chili Mac and Cheese
Sometimes the simplest recipes produce the most gorgeous results! You only need 6 ingredients to make this homemade pasta and whether you roll by hand or use a pasta roller, you will not regret adding this classic Italian staple to your cooking repertoire!
MoreItalianDinner Recipesto Try:
- Mozzarella Stuffed Italian Meatballs
- Baked Spaghetti
- Easy Stromboli
- Grandma’s Best Meatballs
- Baked Chicken Parmesan
- Pizza Casserole
If you make this recipe be sure to upload a photo in the comment section below or leave a rating. Enjoy!
Ingredients1x2x3x
- ▢ 1½ cups all-purpose flour
- ▢ ¼ cup semolina flour
- ▢ ½ teaspoon kosher salt
- ▢ 2 large eggs
- ▢ 1 egg yolk
- ▢ 2 tablespoons olive oil
- ▢ 2 tablespoons ice water if needed
Video
Instructions
For the Dough
- Add the all-purpose flour, semolina flour, and kosher salt to the bowl of a food processor and pulse to combine. 1½ cups all-purpose flour, ¼ cup semolina flour, ½ teaspoon kosher salt
- Add the eggs, egg yolk, and olive oil, and pulse to combine again. The dough should form into a ball around the blade. If it doesn’t add a tablespoon of ice water and pulse again. Repeat until the dough forms into a ball. 2 large eggs, 1 egg yolk, 2 tablespoons olive oil, 2 tablespoons ice water
- Transfer the dough to a clean work surface and knead for 15-20 seconds, until a smooth ball forms (the dough should be very tough).
- Wrap the dough tightly in plastic wrap and allow it to rest at room temperature for 25 minutes.
- Once the dough has rested, it should be soft to the touch. Divide it in half and wrap one half in plastic wrap to keep it from drying out.
- Lightly dust the other half of the pasta with semolina flour and roll it according to the manufacturer’s instructions on your pasta machine.
If rolling by hand
- Lightly dust your work surface with semolina flour and, using a rolling pin, roll the pasta into a long rectangle until it is thin enough that you can see your hand through it.
- Fold it in thirds (like you would a letter) and roll it again until you can see your fingers through it– this will take some muscle!
- Slice into your desired size and place the pasta on a lightly floured tray while you repeat the process with the second piece of dough.
If using a KitchenAid pasta roller or tabletop pasta roller
- Begin with the largest setting (#1) and pass the pasta through starting from the top.
- Turn the knob to one setting smaller (#2) and pass the pasta through again.
- Fold the dough into thirds (like you would fold a letter) and return the pasta machine to the largest setting (#1). Lightly flour the pasta with semolina flour and pass the dough through the machine.
- Turn the knob to #2 and pass the pasta through. Continue with settings 3, 4, and 5.
- Once the pasta has been passed through #5, you should be able to see your fingers through it. If you can’t, pass it through setting #6.
- Slice into your desired size and place the pasta on a lightly floured baking sheet while you repeat with the remaining dough.
To Cook
- Set the cut pasta aside to dry at room temperature for at least 30 minutes before cooking.
- To cook, bring a pot of salted water to a boil and cook the pasta for 1-2 minutes, or until it floats to the top. Transfer to your sauce and serve.
Equipment
- Food Processor
- Stand Mixer (optional)
- KitchenAid Pasta Roller Attachment (optional; if using stand mixer)
- Pasta Roller (optional)
- Rolling Pin (optional)
Becky’s Tips
Dough too sticky? Add more flour.
Dough too dry? Let it rest an extra 5 minutes, then add more water if it still seems dry.
Cut pasta sticking together? Add more flour and toss to coat. Allow the pasta to dry out for at least 30 minutes before cooking.
Uncooked Pasta: Allow uncooked pasta to dry for at least 30 minutes or up to 2 hours before storing. Store in an airtight container in the refrigerator for up to 2 days or in the freezer for up to 2 weeks. Allow frozen pasta to thaw for 4-6 hours in the refrigerator before cooking.
Cooked Pasta: Store cooked pasta in an airtight container in the refrigerator for up to 2 days or in the freezer for up to 1 month. Mix with sauce before storing, or toss with olive oil to prevent sticking. Allow frozen pasta to thaw overnight in the refrigerator before reheating.
Nutrition information is automatically calculated, so should only be used as an approximation.

Homemade Pasta Recipe
Equipment
- Food Processor
- Stand Mixer (optional)
- KitchenAid Pasta Roller Attachment (optional; if using stand mixer)
- Pasta Roller (optional)
- Rolling Pin (optional)
Ingredients
- 1½ cups all-purpose flour
- ¼ cup semolina flour
- ½ teaspoon kosher salt
- 2 large eggs
- 1 egg yolk
- 2 tablespoons olive oil
- 2 tablespoons ice water if needed
Instructions
For the Dough
- Add the all-purpose flour, semolina flour, and kosher salt to the bowl of a food processor and pulse to combine. 1½ cups all-purpose flour, ¼ cup semolina flour, ½ teaspoon kosher salt
- Add the eggs, egg yolk, and olive oil, and pulse to combine again. The dough should form into a ball around the blade. If it doesn’t add a tablespoon of ice water and pulse again. Repeat until the dough forms into a ball. 2 large eggs, 1 egg yolk, 2 tablespoons olive oil, 2 tablespoons ice water
- Transfer the dough to a clean work surface and knead for 15-20 seconds, until a smooth ball forms (the dough should be very tough).
- Wrap the dough tightly in plastic wrap and allow it to rest at room temperature for 25 minutes.
- Once the dough has rested, it should be soft to the touch. Divide it in half and wrap one half in plastic wrap to keep it from drying out.
- Lightly dust the other half of the pasta with semolina flour and roll it according to the manufacturer’s instructions on your pasta machine.
If rolling by hand
- Lightly dust your work surface with semolina flour and, using a rolling pin, roll the pasta into a long rectangle until it is thin enough that you can see your hand through it.
- Fold it in thirds (like you would a letter) and roll it again until you can see your fingers through it– this will take some muscle!
- Slice into your desired size and place the pasta on a lightly floured tray while you repeat the process with the second piece of dough.
If using a KitchenAid pasta roller or tabletop pasta roller
- Begin with the largest setting (#1) and pass the pasta through starting from the top.
- Turn the knob to one setting smaller (#2) and pass the pasta through again.
- Fold the dough into thirds (like you would fold a letter) and return the pasta machine to the largest setting (#1). Lightly flour the pasta with semolina flour and pass the dough through the machine.
- Turn the knob to #2 and pass the pasta through. Continue with settings 3, 4, and 5.
- Once the pasta has been passed through #5, you should be able to see your fingers through it. If you can’t, pass it through setting #6.
- Slice into your desired size and place the pasta on a lightly floured baking sheet while you repeat with the remaining dough.
To Cook
- Set the cut pasta aside to dry at room temperature for at least 30 minutes before cooking.
- To cook, bring a pot of salted water to a boil and cook the pasta for 1-2 minutes, or until it floats to the top. Transfer to your sauce and serve.
Video
Notes
Dough too sticky? Add more flour.
Dough too dry? Let it rest an extra 5 minutes, then add more water if it still seems dry.
Cut pasta sticking together? Add more flour and toss to coat. Allow the pasta to dry out for at least 30 minutes before cooking.
Uncooked Pasta: Allow uncooked pasta to dry for at least 30 minutes or up to 2 hours before storing. Store in an airtight container in the refrigerator for up to 2 days or in the freezer for up to 2 weeks. Allow frozen pasta to thaw for 4-6 hours in the refrigerator before cooking.
Cooked Pasta: Store cooked pasta in an airtight container in the refrigerator for up to 2 days or in the freezer for up to 1 month. Mix with sauce before storing, or toss with olive oil to prevent sticking. Allow frozen pasta to thaw overnight in the refrigerator before reheating.
Nutrition
By Becky Hardin
Published Jul 12, 2017


This Essential Grocery List is an absolute life saver for my family on the busy weeks. When I started this journey to learn how to cook, I quickly realized that the first step in cooking is having staple ingredients on hand. I want to avoid having to run out to the grocery store every single time I prepare a new recipe. Having a well-stocked pantry has made my life in the kitchen so much simpler, because when it’s time to cook, I have what I need.

Essential Grocery List
It’s so helpful to have a basic grocery list to help me remember which foods to buy at the store. This food shopping list is my go-to!
It’s better to stock up on things like grains, seasonings and spices, baking essentials, oils, condiments, canned and frozen foods, etc. so I can just grab them when I need them. These things have a long shelf life , so I keep them in my kitchen for convenience.
However, I do have to go to the supermarket sometimes, and there’s a way to make that trip easy and hassle-free: I keep a grocery list! If I go in blindly, I’ll leave with things I don’t need, and nothing that actually helps me prepare a good meal.
In the list below, I’ve compiled everything I always have on my stock-up grocery list.
I’ve got you covered! I created an easy grocery list filled with all of the essentials. Plus there’s a free printable version that you can take with you to the grocery store. It has everything you need to stock your pantry, your freezer, and your refrigerator.

Click to get my Free Printable Grocery List
What to Buy at the Grocery Store
This is the perfect grocery list filled with all the basics and essentials. It should help get you going if you’re new to cooking, or if you’re just left staring helplessly at an empty pantry and don’t know how to fill it.
When I first started cooking, things could seem overwhelming. I quickly realized that they more prepared I could be, the more confident I felt. If you already have the basics in your kitchen, then you can shop stress-free.
So print out our easy grocery list, stock up your pantry and fridge, and you’ll be cooking in no time!
Click to get my Free Printable Grocery List for the perfectly stocked pantry and freezer!
Fresh Produce
- Apples
- Bananas
- Strawberries
- Avocados
- Bell Peppers
- Carrots
- Broccoli
- Garlic
- Lemons/Limes
- Onion
- Parsley
- Cilantro
- Basil
- Potatoes
- Spinach
- Tomatoes
GRAINS
- Breadcrumbs
- Pasta
- Quinoa
- Rice
- Sandwich Bread
- Tortillas
MEAT/PROTEIN
- Chicken
- Eggs
- Ground Beef
- Sliced Turkey
- Lunch Meat
DAIRY
- Butter
- Sliced Cheese
- Shredded Cheese
- Milk
- Sour Cream
- Greek Yogurt
BAKING GOODS
- Baking powder
- Baking Soda
- Granulated Sugar
- Brown Sugar
- Flour
- Honey
- Vanilla Extract
- Dry Yeast
- Chocolate Chips
- Cocoa Powder
- Powdered Sugar
FREEZER
- Fruit and Berries
- Frozen Veggies (Corn, Peas, Broccoli, etc)
- Juice Concentrate
- Pizza or Other Convenience Meals
- Pie Crust
- Cookie Dough
CANNED/DRIED GOODS
- Chicken stock/broth
- Salsa
- Diced Tomatoes
- Jam/Jelly
- Peanut Butter
- Pasta Sauce
- Beans (Black Beans, Chickpeas, Baked Beans, etc)
- Soups
- Tuna
- Green Chiles
- Canned Veggies
- Coffee or Tea
Get more details on the best non-perishable and pantry foods
CONDIMENTS/SPICES
- Black Pepper
- Chili Powder
- Cinnamon
- Crushed Red Pepper
- Cumin
- Garlic Powder
- Ketchup
- Mustard
- Mayo
- Nutmeg
- Paprika
- Salt (Course Sea Salt and Kosher Salt)
- Soy Sauce
- Steak Sauce
- Hot Sauce/ Buffalo Sauce
- Salad Dressings
OILS/VINEGARS
- Apple cider vinegar
- Balsamic vinegar
- Coconut Oil
- Olive Oil
- Vegetable/Canola Oil
- Red Wine Vinegar
- White Vinegar
- Cooking Wine
- White Wine Vinegar
SNACKS
- Crackers
- Nuts
- Quick Oats
- Popcorn
- Tortilla Chips
- Cereal
Click to get my Free Printable Grocery List for the perfectly stocked pantry and freezer!

Click ☝🏻 for my FREE Grocery List Printable!
I hope this essential grocery list can help you buy what you need and make your home cooking so much easier!
Stock Your Kitchen
Find more ideas for your grocery list, stock up your kitchen, and print more cooking guides and charts to keep handy!

Non-Perishable Foods to Stock Up On

Frozen Vegetables to Stock Up On (and Recipes to Make)

Ultimate List of Cooking Herbs for Your Kitchen

Ultimate List of Cooking Spices for Your Kitchen

Cooking Oil 101: Types of Cooking Oils to Use

26 Types of Pasta and When to Use Them

What Fruits and Vegetables are in Season?

Meat Temperature Chart (Free Printable)

How to Meal Prep (Guide for Beginners)

Basic Cooking Measurements & Kitchen Conversion Chart

