
By Becky Hardin
Published Mar 24, 2021
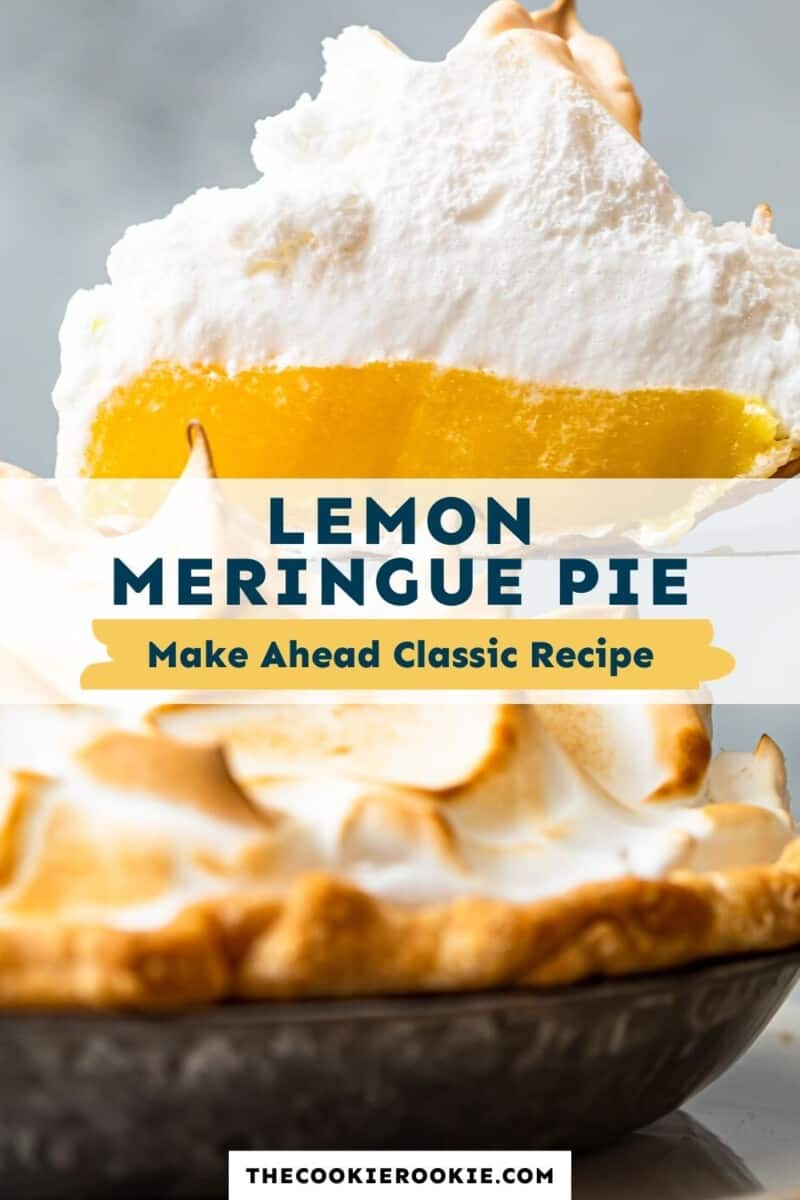


For me, there’s no better way to end Easter brunch than with a classic lemon meringue pie. Wonderfully fresh and full of vibrant flavors, it is truly a show-stopping dessert. But when I was making it, I wondered, how can I make this ahead without the meringue weeping? Folks, I’ve figured it out, and I’m here to share all my tips and tricks with you for less stress in the kitchen!
What’s in This Lemon Meringue Pie Recipe?
Fresh lemons are what give this pie its bright and fresh flavor. I really can’t recommend getting the real thing enough for the best flavor. I tried with bottled juice, and the flavor just wasn’t up to snuff.
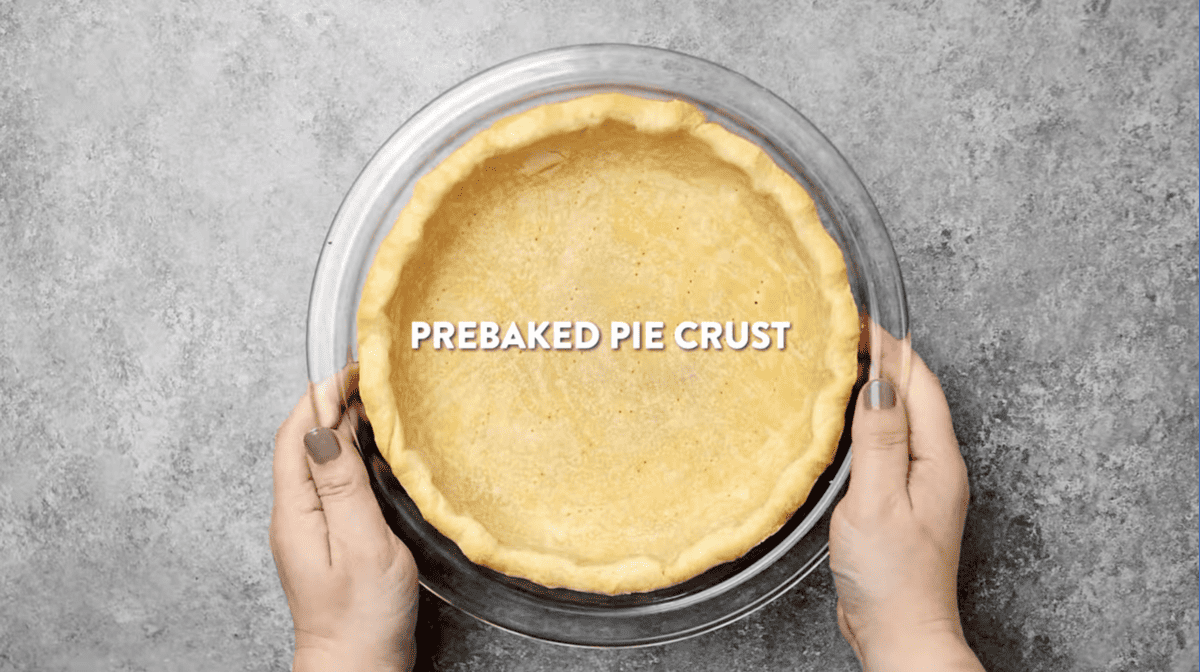
- Pie Crust: Use a pre-baked and cooled store-bought or homemade pie crust .
- Sugar: Granulated sugar sweetens both the filling and the meringue topping.
- Lemon: Fresh lemon juice and zest add a punchy citrus flavor to the filling.
- Water: Combines with cornstarch to help thicken the filling and stabilize the meringue.
- Cornstarch: Binds to free water in the filling to thicken it up.
- Eggs: You’ll need 8 egg yolks for the filling and 4 egg whites for the meringue. Save the remaining 4 yolks to make some hollandaise sauce or homemade mayonnaise for next-day ham sandwiches.
- Butter: Unsalted butter adds richness to the filling.
- Cream of Tartar : Stabilizes the meringue topping so it doesn’t collapse.
- Vanilla Extract : Adds a hint of warmth and sweet flavor to contrast the freshness of the filling.
Can You Make Lemon Meringue Pie The Day Before?
I’ve constantly wondered how to avoid a deflated, weepy lemon meringue pie. Making it the day of just isn’t an option for me when my oven is already stuffed with a giant Easter ham . But making the fresh filling and fluffy meringue separately was the simple solution I needed to solve my weepy woes!
Now, I just scoop the meringue on top of the filling and pop it in the oven while everyone’s eating, and it’s ready just in time for dessert!
How to Store and Reheat
With this recipe, I have found that I can make the filling a day ahead of time, and the meringue and baked pie crust will both keep in the fridge for up to 2 days. Once assembled, I recommend enjoying the pie ASAP, as it will begin to weep once the filling and meringue come in contact.
I do not recommend freezing this pie, though, as both the filling and the meringue topping do not freeze well.
Serving Suggestions
This classic fresh and creamy dessert is honestly perfect all by itself. I like it best with a mimosa or bellini to wash it all down.
Notes from the Test Kitchen
If you’re making this pie all in one day, I highly recommend prepping the meringue as the pie cooks so that you are ready to put it on top as soon as the pie comes out of the oven. Placing the meringue directly on the hot filling (no chilling required) kickstarts the cooking process, helping ensure the meringue cooks all the way through and doesn’t weep on the day of.
5-Star Review
“This the BEST Lemon Meringue pie recipe! I have been in search for the PERFECT PIE RECIPE! Thank you.” -Charlotte Simms-Swanick
Ingredients1x2x3x
For the Crust
- ▢ 1 9-inch pie crust 213 grams (homemade or store-bought), prebaked & cooled
For the Lemon Filling
- ▢ 1¼ cups granulated sugar 250 grams
- ▢ 1 cup fresh lemon juice 227 grams, from 6 lemons
- ▢ ½ cup water 114 grams
- ▢ ¼ cup cornstarch 28 grams
- ▢ ½ teaspoon kosher salt
- ▢ 4 large eggs 200 grams, separated (whites reserved for meringue below)
- ▢ 4 egg yolks 56 grams
- ▢ 2 tablespoons grated lemon zest 12 grams, from 2 lemons
- ▢ 3 tablespoons unsalted butter 42 grams, room temperature and cut into pieces
For the Meringue (an Italian Meringue)
- ▢ ½ cup water 114 grams
- ▢ 1 cup granulated sugar 200 grams
- ▢ ¼ teaspoon kosher salt
- ▢ ½ teaspoon cream of tartar
- ▢ ½ teaspoon pure vanilla extract 2 grams
Video
Instructions
For the Pie Crust
- The crust needs to be blind-baked (prebaked) before adding the filling. If using store-bought pie crust, prepare the crust per package directions and cool completely before filling. 1 9-inch pie crust
- If using homemade, follow the directions to your favorite pie crust.
For the Filling
- In a large saucepan set over medium heat, whisk sugar, lemon juice water, cornstarch, and salt until cornstarch dissolves. Bring to a simmer, whisking occasionally, for about 5 minutes, or until the mixture becomes translucent and just begins to thicken. 1¼ cups granulated sugar, 1 cup fresh lemon juice, ½ cup water, ¼ cup cornstarch, ½ teaspoon kosher salt, 4 large eggs
- Vigorously whisk while adding the yolks. 4 egg yolks
- Add the zest and butter and stir until combined. Once again, bring the mixture to a simmer while stirring constantly. Cook another 2 minutes, or until the mixture is thick enough to coat the back of a spoon without it sliding off the spoon. 2 tablespoons grated lemon zest, 3 tablespoons unsalted butter
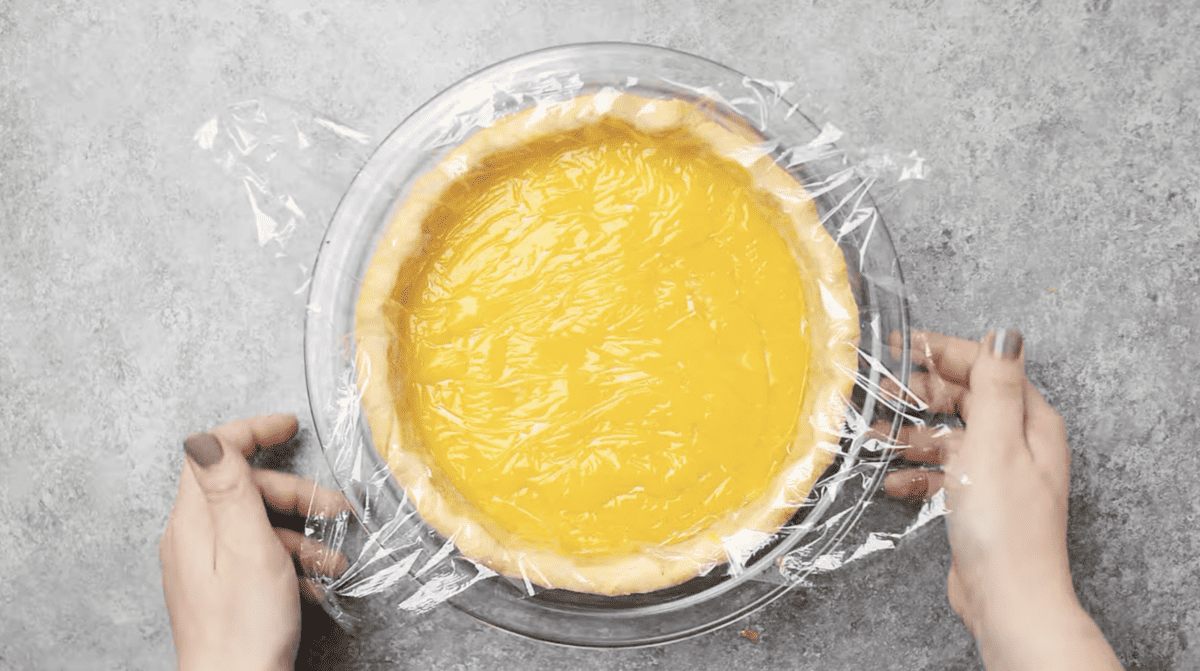
- Strain the filling through a fine-mesh strainer into the prepared pie shell. Remember to scrape the excess filling from the underside of the strainer into the shell. Place plastic-wrap directly on the surface of the filling, and place in the fridge to cool until set (at least 2 hours or up to 24 hours).
For the Meringue
- Preheat oven to 400°F and adjust oven rack to middle position.
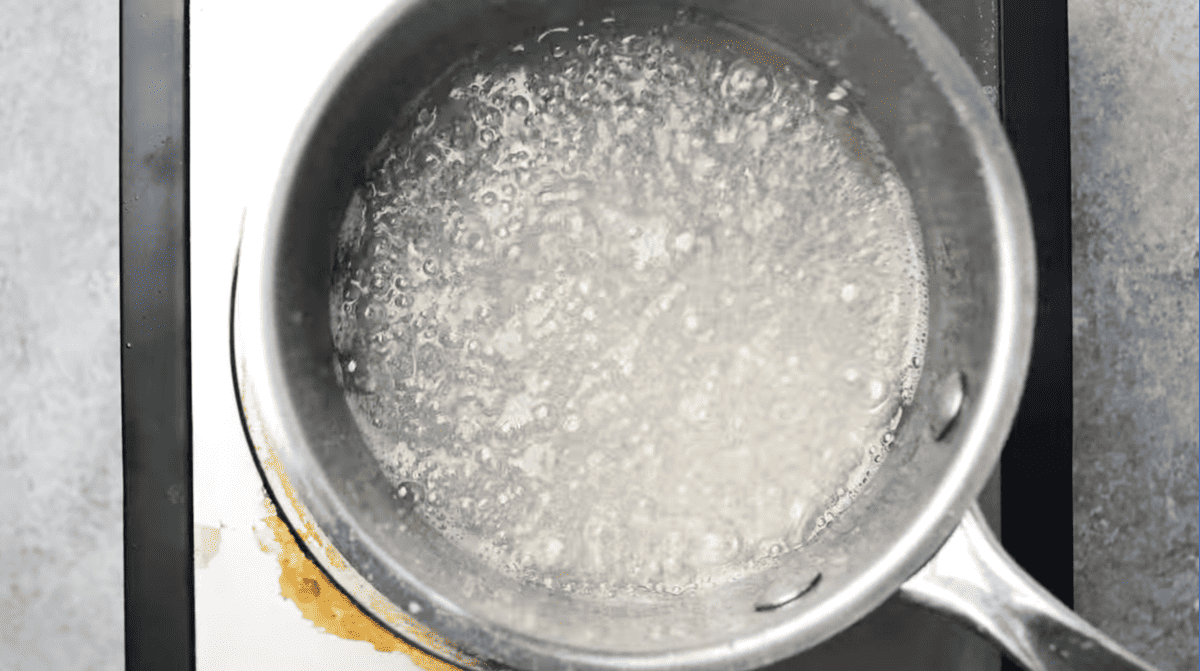
- In the small saucepan set over medium-high heat, add the water and sugar. Bring to a vigorous boil. Once the syrup is boiling vigorously, cook for exactly 4 minutes (set a timer). The mixture should be syrupy and slightly thickened. Remove from the heat after 4 minutes and set aside. (At this time, it isn’t necessary, but I found it helpful to pour the sugar syrup into a 2-cup, heatproof, measuring cup). ½ cup water, 1 cup granulated sugar
- In the bowl of a stand mixer fitted with the balloon whisk attachment, beat the reserved 4 egg whites at medium speed until frothy, about 1 minute. Add the salt and cream of tartar, and gradually increase the speed to medium-high, about 2 minutes, or until whites hold soft peaks. ¼ teaspoon kosher salt, ½ teaspoon cream of tartar
- With the mixer running, slowly pour the hot syrup down the inside of the bowl and into the whites (avoid the whisk so the syrup won’t splash).
- Add the vanilla and continue beating until the meringue has cooled and is very thick and still shiny, about 7-10 minutes. ½ teaspoon pure vanilla extract
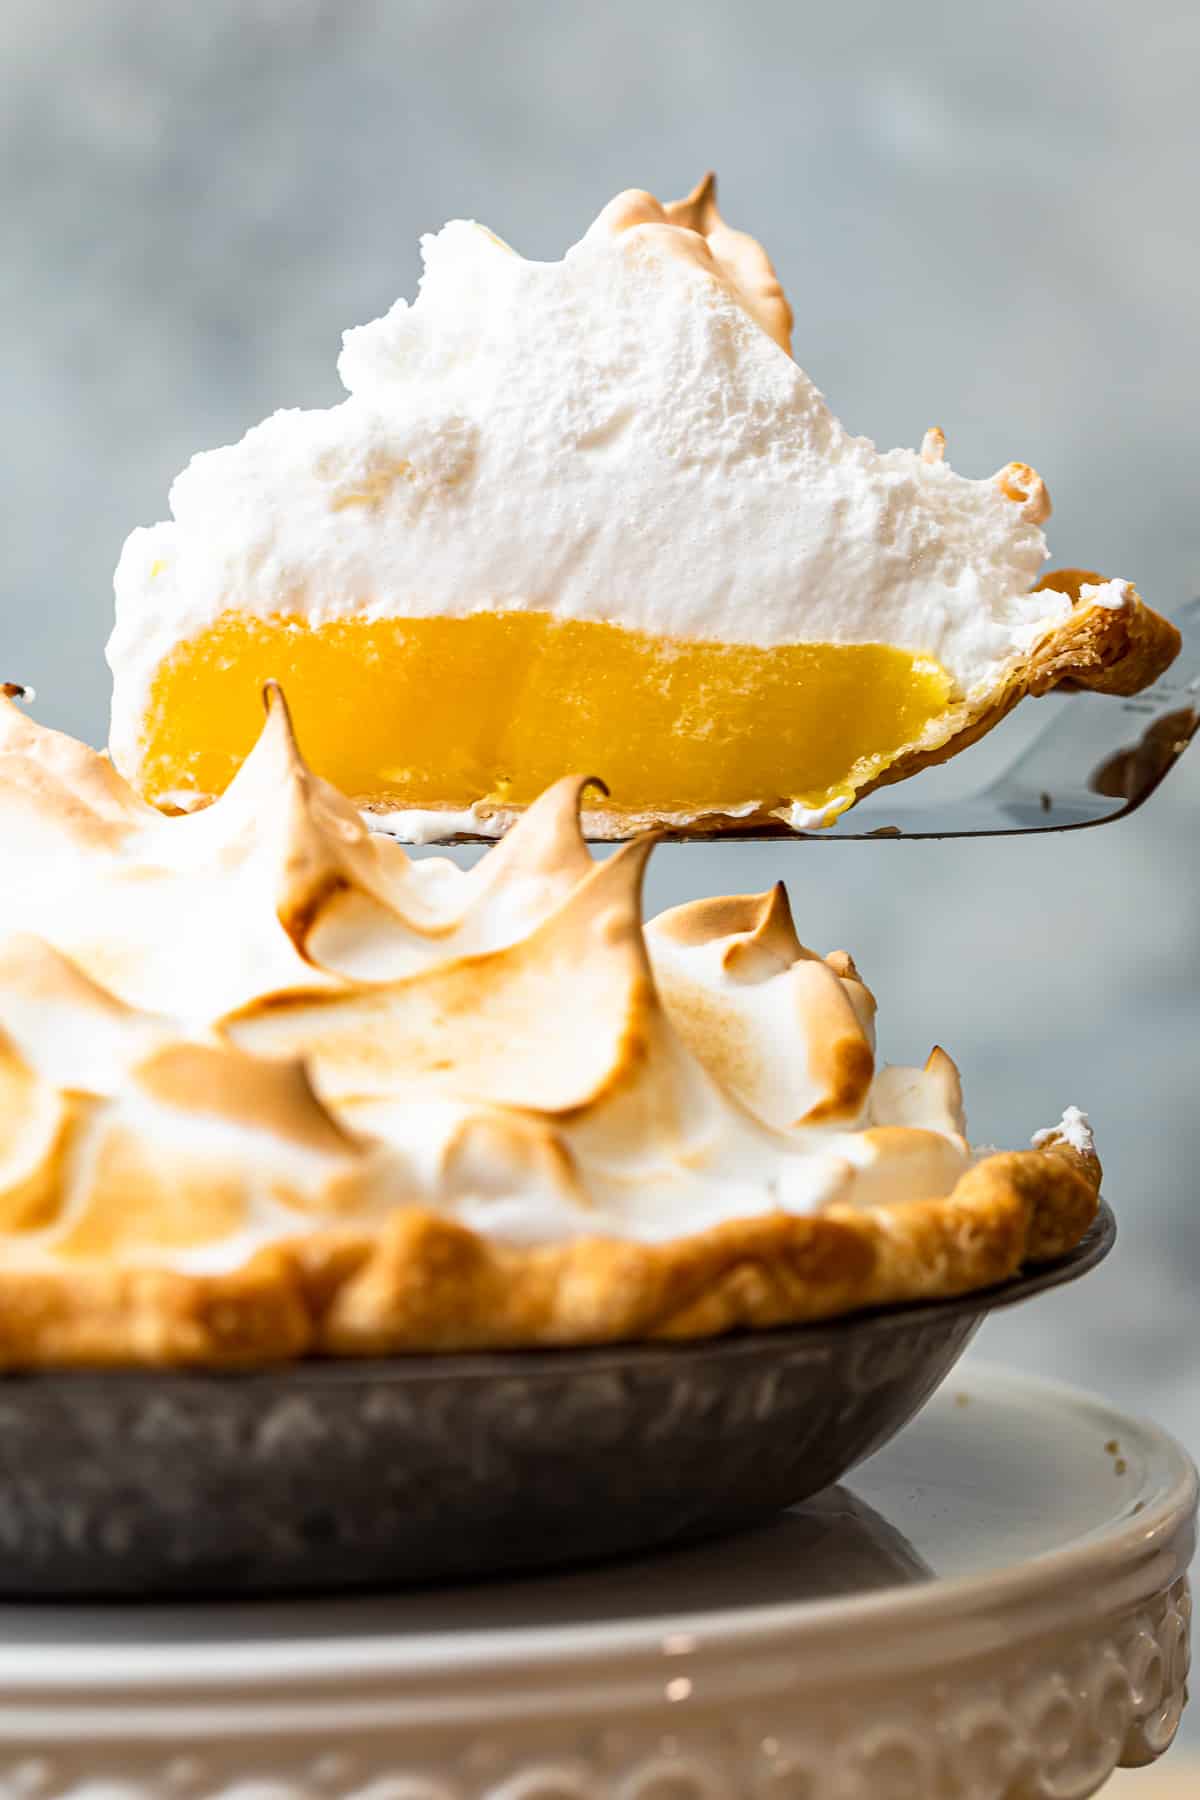
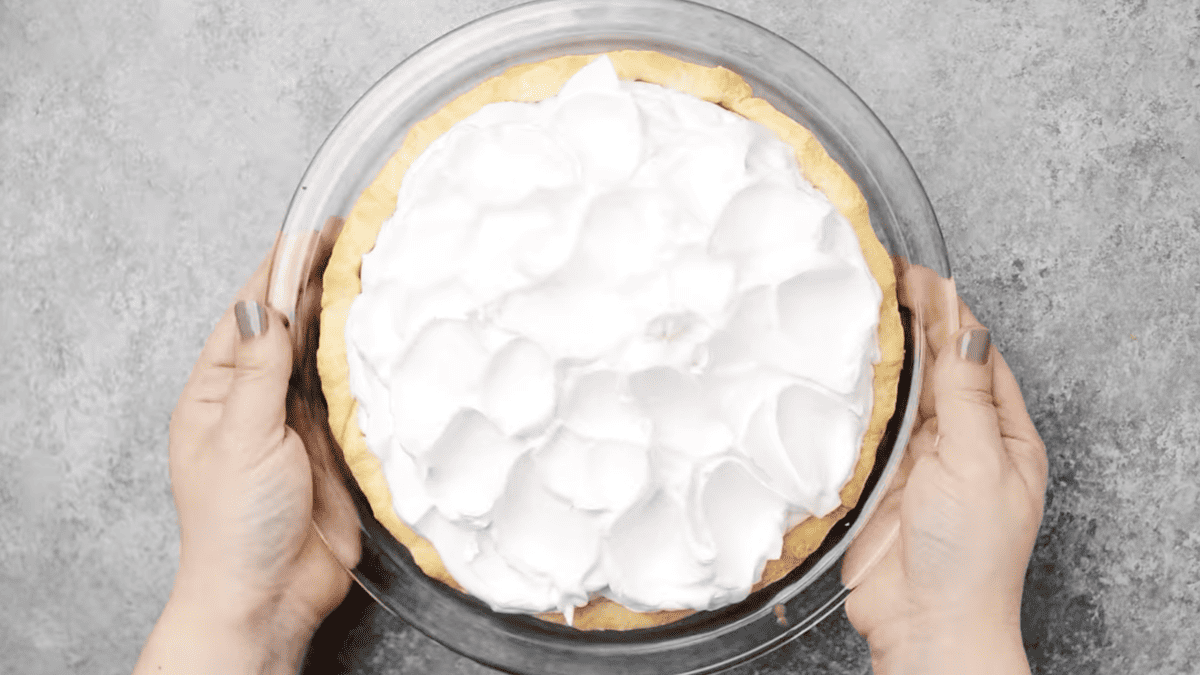
- Once the lemon filling is cooled and set (see above), mound the meringue over the filling and then work your way around the edge being sure the meringue butts up against the crust. Once the meringue is all around the edge of the crust, mound more meringue toward the middle, pressing down slightly to ensure there are no air pockets and the meringue completely covers the filling.
- Add as much meringue as you like, then use a tablespoon or rubber spatula to create peaks all over the meringue.
- Place the pie on a baking sheet (for easier handling) and bake until peaks turn golden brown with white meringue showing through.
- Remove the pie to a cooling rack.
- At this point, the pie is beautiful and can be left alone to cool, but… if you’d like a more dramatic presentation, use a kitchen torch to toast the meringue where wanted. Be very careful to be ready to blow out any meringue that catches fire and to go slowly. Practice makes perfect.
Equipment
- Kitchen Scale (optional)
- Pie Pan
- Fine Mesh Sieve
- Stand Mixer
- Baking Sheet
- Kitchen Torch (Click for my favorite) (optional)
Becky’s Tips
- This pie, like all Lemon Meringue Pies, is best the day it is assembled. Unlike most lemon meringue pies, the lemon filling can be made one day ahead and stored refrigerated in an airtight container.
- The pie crust can be cooked and stored (in the pie tin) in an airtight container (or zipper-style bag) up to two days before.
- The assembled Lemon Meringue Pie will keep a few days in the fridge, but the meringue and/or the lemon filling will begin to weep. It is best eaten the day it is assembled. If perfection isn’t necessary (ie: if not making to share) the pie will still be delicious – just not ideal.
Nutrition information is automatically calculated, so should only be used as an approximation.
How to Make Lemon Meringue Pie Step by Step
Bake the Crust: The crust needs to be blind-baked (prebaked) before adding the filling. If using store-bought pie crust, prepare a 9-inch refrigerated crust per package directions and cool completely before filling. If using homemade, follow the directions to your favorite pie crust.
Cook the Filling: In a large saucepan set over medium heat, whisk 1¼ cups of granulated sugar, 1 cup of fresh lemon juice, ½ cup of water, ¼ cup of cornstarch, and ½ teaspoon of kosher salt until cornstarch dissolves. Bring to a simmer, whisking occasionally, for about 5 minutes, or until the mixture becomes translucent and just begins to thicken.

Add the Egg Yolks: Vigorously whisk while adding 8 egg yolks.
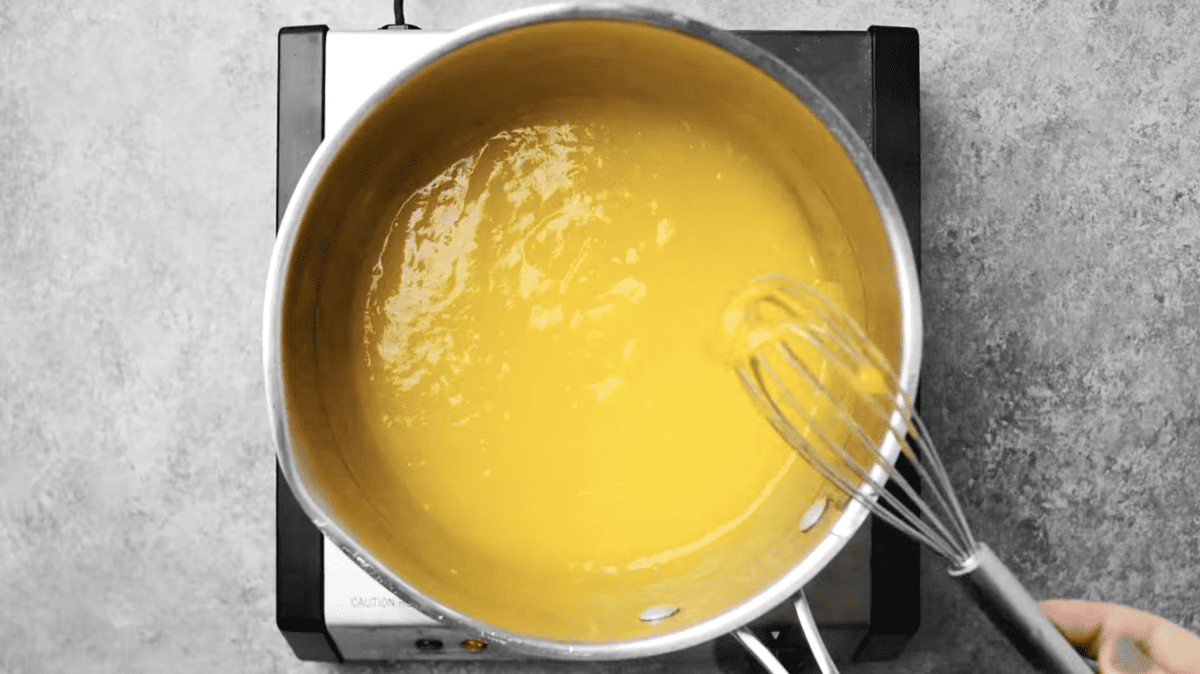
Add the Zest and Butter: Add 2 tablespoons of grated lemon zest and 3 tablespoons of unsalted butter and stir until combined. Once again, bring the mixture to a simmer while stirring constantly. Cook another 2 minutes, or until the mixture is thick enough to coat the back of a spoon without it sliding off the spoon.

Chill the Filling: Strain the filling through a fine-mesh strainer into the prepared pie shell. Remember to scrape the excess filling from the underside of the strainer into the shell. Place plastic-wrap directly on the surface of the filling, and place in the fridge to cool until set (at least 2 hours or up to 24 hours).
Make the Sugar Syrup: Preheat oven to 400°F and adjust oven rack to middle position. In the small saucepan set over medium-high heat, add ½ cup of water and 1 cup of granulated sugar. Bring to a vigorous boil. Once the syrup is boiling vigorously, cook for exactly 4 minutes (set a timer). The mixture should be syrupy and slightly thickened. Remove from the heat after 4 minutes and set aside.
Whisk the Egg Whites: In the bowl of a stand mixer fitted with the balloon whisk attachment, beat the reserved 4 egg whites at medium speed until frothy, about 1 minute. Add ¼ teaspoon of salt and ½ teaspoon of cream of tartar, and gradually increase the speed to medium-high, about 2 minutes, or until whites hold soft peaks.

Add the Sugar Syrup: With the mixer running, slowly pour the hot syrup down the inside of the bowl and into the whites (avoid the whisk so the syrup won’t splash).

Beat the Meringue: Add ½ teaspoon of vanilla and continue beating until the meringue has cooled and is very thick and still shiny, about 7-10 minutes.

Top and Bake the Pie: Once the lemon filling is cooled and set, mound the meringue over the filling and then use a tablespoon or rubber spatula to create peaks all over the meringue. Place the pie on a baking sheet (for easier handling) and bake until peaks turn golden brown with white meringue showing through.
In this recipe, I chose to use an Italian meringue, which is made by melting sugar and water together into a syrup that is slowly added to the egg whites. This cooks the egg whites, creating a stable meringue that is less prone to deflating.
When whipping the egg whites, wait until they have formed soft peaks until you add the sugar. Don’t whip them on full speed, lower it a little so small, rather than large air pockets form.
This pie is prone to weeping because both the meringue and the filling are extremely moist. This pie also needs to be refrigerated, so placing it in the refrigerator adds to the humidity and moisture. Keeping the components separate until you’re ready to serve is the key to avoiding a weepy pie.
More Pie Recipes To Try
- Homemade Apple Pie
- McDonald’s Strawberry Cream Pie
- Caramel Pie
- Strawberry Jello Pie

Lemon Meringue Pie Recipe
Equipment
- Kitchen Scale (optional)
- Pie Pan
- Fine Mesh Sieve
- Stand Mixer
- Baking Sheet
- Kitchen Torch (Click for my favorite) (optional)
Ingredients
For the Crust
- 1 9-inch pie crust 213 grams (homemade or store-bought), prebaked & cooled
For the Lemon Filling
- 1¼ cups granulated sugar 250 grams
- 1 cup fresh lemon juice 227 grams, from 6 lemons
- ½ cup water 114 grams
- ¼ cup cornstarch 28 grams
- ½ teaspoon kosher salt
- 4 large eggs 200 grams, separated (whites reserved for meringue below)
- 4 egg yolks 56 grams
- 2 tablespoons grated lemon zest 12 grams, from 2 lemons
- 3 tablespoons unsalted butter 42 grams, room temperature and cut into pieces
For the Meringue (an Italian Meringue)
- ½ cup water 114 grams
- 1 cup granulated sugar 200 grams
- ¼ teaspoon kosher salt
- ½ teaspoon cream of tartar
- ½ teaspoon pure vanilla extract 2 grams
Instructions
For the Pie Crust
- The crust needs to be blind-baked (prebaked) before adding the filling. If using store-bought pie crust, prepare the crust per package directions and cool completely before filling. 1 9-inch pie crust
- If using homemade, follow the directions to your favorite pie crust.
For the Filling
- In a large saucepan set over medium heat, whisk sugar, lemon juice water, cornstarch, and salt until cornstarch dissolves. Bring to a simmer, whisking occasionally, for about 5 minutes, or until the mixture becomes translucent and just begins to thicken. 1¼ cups granulated sugar, 1 cup fresh lemon juice, ½ cup water, ¼ cup cornstarch, ½ teaspoon kosher salt, 4 large eggs
- Vigorously whisk while adding the yolks. 4 egg yolks
- Add the zest and butter and stir until combined. Once again, bring the mixture to a simmer while stirring constantly. Cook another 2 minutes, or until the mixture is thick enough to coat the back of a spoon without it sliding off the spoon. 2 tablespoons grated lemon zest, 3 tablespoons unsalted butter
- Strain the filling through a fine-mesh strainer into the prepared pie shell. Remember to scrape the excess filling from the underside of the strainer into the shell. Place plastic-wrap directly on the surface of the filling, and place in the fridge to cool until set (at least 2 hours or up to 24 hours).
For the Meringue
- Preheat oven to 400°F and adjust oven rack to middle position.
- In the small saucepan set over medium-high heat, add the water and sugar. Bring to a vigorous boil. Once the syrup is boiling vigorously, cook for exactly 4 minutes (set a timer). The mixture should be syrupy and slightly thickened. Remove from the heat after 4 minutes and set aside. (At this time, it isn’t necessary, but I found it helpful to pour the sugar syrup into a 2-cup, heatproof, measuring cup). ½ cup water, 1 cup granulated sugar
- In the bowl of a stand mixer fitted with the balloon whisk attachment, beat the reserved 4 egg whites at medium speed until frothy, about 1 minute. Add the salt and cream of tartar, and gradually increase the speed to medium-high, about 2 minutes, or until whites hold soft peaks. ¼ teaspoon kosher salt, ½ teaspoon cream of tartar
- With the mixer running, slowly pour the hot syrup down the inside of the bowl and into the whites (avoid the whisk so the syrup won’t splash).
- Add the vanilla and continue beating until the meringue has cooled and is very thick and still shiny, about 7-10 minutes. ½ teaspoon pure vanilla extract
- Once the lemon filling is cooled and set (see above), mound the meringue over the filling and then work your way around the edge being sure the meringue butts up against the crust. Once the meringue is all around the edge of the crust, mound more meringue toward the middle, pressing down slightly to ensure there are no air pockets and the meringue completely covers the filling.
- Add as much meringue as you like, then use a tablespoon or rubber spatula to create peaks all over the meringue.
- Place the pie on a baking sheet (for easier handling) and bake until peaks turn golden brown with white meringue showing through.
- Remove the pie to a cooling rack.
- At this point, the pie is beautiful and can be left alone to cool, but… if you’d like a more dramatic presentation, use a kitchen torch to toast the meringue where wanted. Be very careful to be ready to blow out any meringue that catches fire and to go slowly. Practice makes perfect.
Video
Notes
- This pie, like all Lemon Meringue Pies, is best the day it is assembled. Unlike most lemon meringue pies, the lemon filling can be made one day ahead and stored refrigerated in an airtight container.
- The pie crust can be cooked and stored (in the pie tin) in an airtight container (or zipper-style bag) up to two days before.
- The assembled Lemon Meringue Pie will keep a few days in the fridge, but the meringue and/or the lemon filling will begin to weep. It is best eaten the day it is assembled. If perfection isn’t necessary (ie: if not making to share) the pie will still be delicious – just not ideal.
Nutrition
By Becky Hardin
Published Jul 12, 2017


This Essential Grocery List is an absolute life saver for my family on the busy weeks. When I started this journey to learn how to cook, I quickly realized that the first step in cooking is having staple ingredients on hand. I want to avoid having to run out to the grocery store every single time I prepare a new recipe. Having a well-stocked pantry has made my life in the kitchen so much simpler, because when it’s time to cook, I have what I need.

Essential Grocery List
It’s so helpful to have a basic grocery list to help me remember which foods to buy at the store. This food shopping list is my go-to!
It’s better to stock up on things like grains, seasonings and spices, baking essentials, oils, condiments, canned and frozen foods, etc. so I can just grab them when I need them. These things have a long shelf life , so I keep them in my kitchen for convenience.
However, I do have to go to the supermarket sometimes, and there’s a way to make that trip easy and hassle-free: I keep a grocery list! If I go in blindly, I’ll leave with things I don’t need, and nothing that actually helps me prepare a good meal.
In the list below, I’ve compiled everything I always have on my stock-up grocery list.
I’ve got you covered! I created an easy grocery list filled with all of the essentials. Plus there’s a free printable version that you can take with you to the grocery store. It has everything you need to stock your pantry, your freezer, and your refrigerator.

Click to get my Free Printable Grocery List
What to Buy at the Grocery Store
This is the perfect grocery list filled with all the basics and essentials. It should help get you going if you’re new to cooking, or if you’re just left staring helplessly at an empty pantry and don’t know how to fill it.
When I first started cooking, things could seem overwhelming. I quickly realized that they more prepared I could be, the more confident I felt. If you already have the basics in your kitchen, then you can shop stress-free.
So print out our easy grocery list, stock up your pantry and fridge, and you’ll be cooking in no time!
Click to get my Free Printable Grocery List for the perfectly stocked pantry and freezer!
Fresh Produce
- Apples
- Bananas
- Strawberries
- Avocados
- Bell Peppers
- Carrots
- Broccoli
- Garlic
- Lemons/Limes
- Onion
- Parsley
- Cilantro
- Basil
- Potatoes
- Spinach
- Tomatoes
GRAINS
- Breadcrumbs
- Pasta
- Quinoa
- Rice
- Sandwich Bread
- Tortillas
MEAT/PROTEIN
- Chicken
- Eggs
- Ground Beef
- Sliced Turkey
- Lunch Meat
DAIRY
- Butter
- Sliced Cheese
- Shredded Cheese
- Milk
- Sour Cream
- Greek Yogurt
BAKING GOODS
- Baking powder
- Baking Soda
- Granulated Sugar
- Brown Sugar
- Flour
- Honey
- Vanilla Extract
- Dry Yeast
- Chocolate Chips
- Cocoa Powder
- Powdered Sugar
FREEZER
- Fruit and Berries
- Frozen Veggies (Corn, Peas, Broccoli, etc)
- Juice Concentrate
- Pizza or Other Convenience Meals
- Pie Crust
- Cookie Dough
CANNED/DRIED GOODS
- Chicken stock/broth
- Salsa
- Diced Tomatoes
- Jam/Jelly
- Peanut Butter
- Pasta Sauce
- Beans (Black Beans, Chickpeas, Baked Beans, etc)
- Soups
- Tuna
- Green Chiles
- Canned Veggies
- Coffee or Tea
Get more details on the best non-perishable and pantry foods
CONDIMENTS/SPICES
- Black Pepper
- Chili Powder
- Cinnamon
- Crushed Red Pepper
- Cumin
- Garlic Powder
- Ketchup
- Mustard
- Mayo
- Nutmeg
- Paprika
- Salt (Course Sea Salt and Kosher Salt)
- Soy Sauce
- Steak Sauce
- Hot Sauce/ Buffalo Sauce
- Salad Dressings
OILS/VINEGARS
- Apple cider vinegar
- Balsamic vinegar
- Coconut Oil
- Olive Oil
- Vegetable/Canola Oil
- Red Wine Vinegar
- White Vinegar
- Cooking Wine
- White Wine Vinegar
SNACKS
- Crackers
- Nuts
- Quick Oats
- Popcorn
- Tortilla Chips
- Cereal
Click to get my Free Printable Grocery List for the perfectly stocked pantry and freezer!

Click ☝🏻 for my FREE Grocery List Printable!
I hope this essential grocery list can help you buy what you need and make your home cooking so much easier!
Stock Your Kitchen
Find more ideas for your grocery list, stock up your kitchen, and print more cooking guides and charts to keep handy!

Non-Perishable Foods to Stock Up On

Frozen Vegetables to Stock Up On (and Recipes to Make)

Ultimate List of Cooking Herbs for Your Kitchen

Ultimate List of Cooking Spices for Your Kitchen

Cooking Oil 101: Types of Cooking Oils to Use

26 Types of Pasta and When to Use Them

What Fruits and Vegetables are in Season?

Meat Temperature Chart (Free Printable)

How to Meal Prep (Guide for Beginners)

Basic Cooking Measurements & Kitchen Conversion Chart

