By Krista Teigen
Published Jan 14, 2026
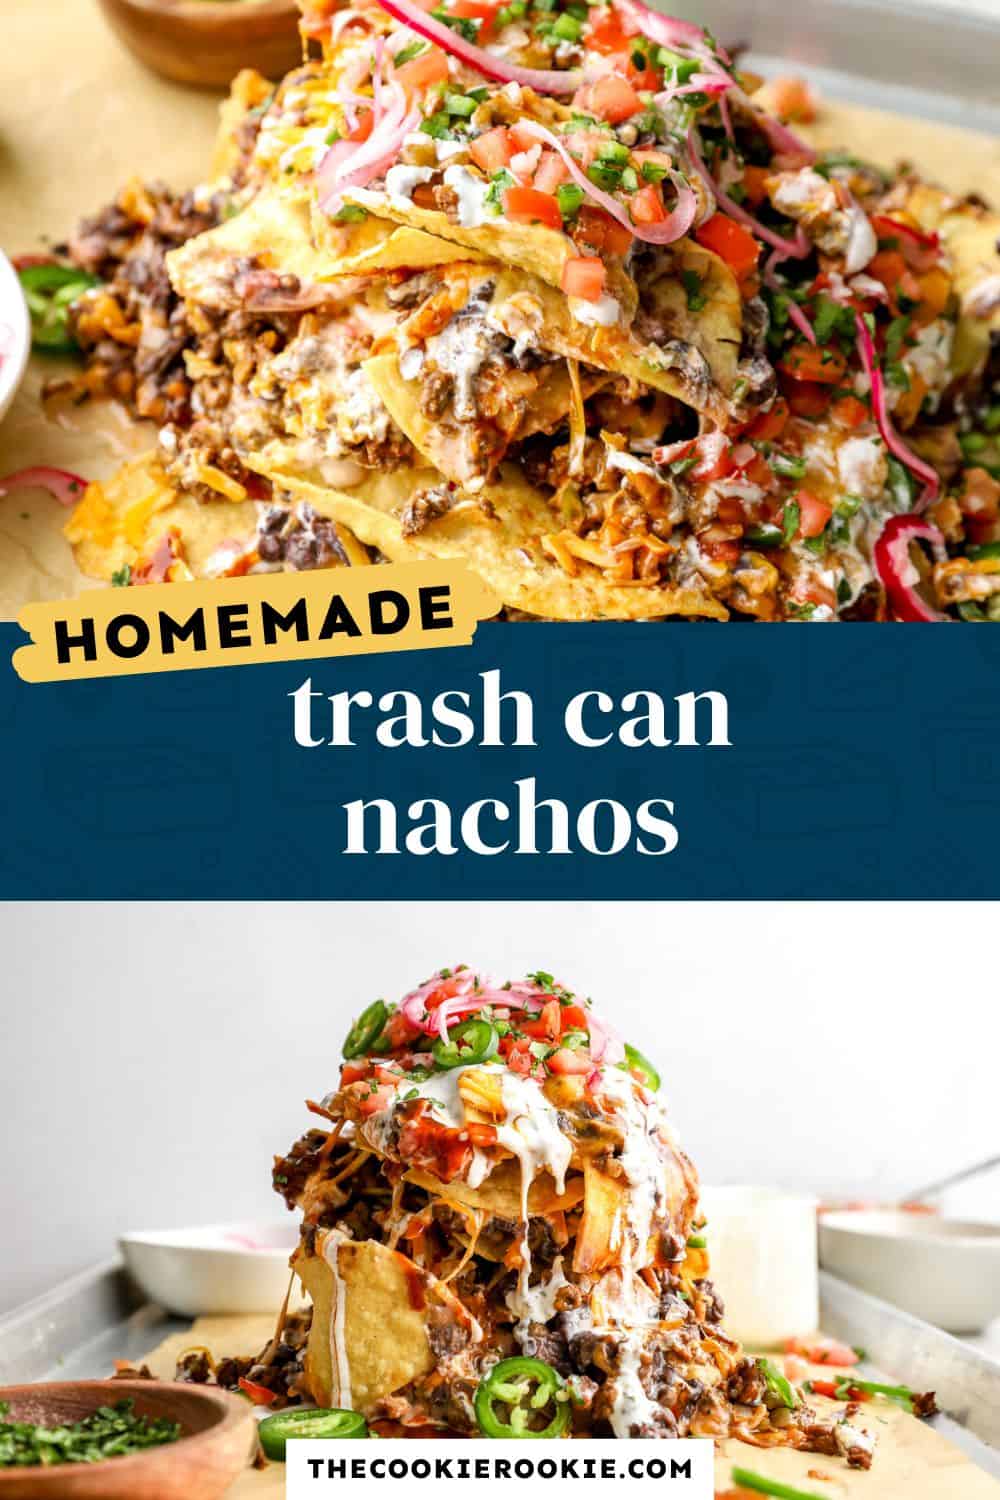
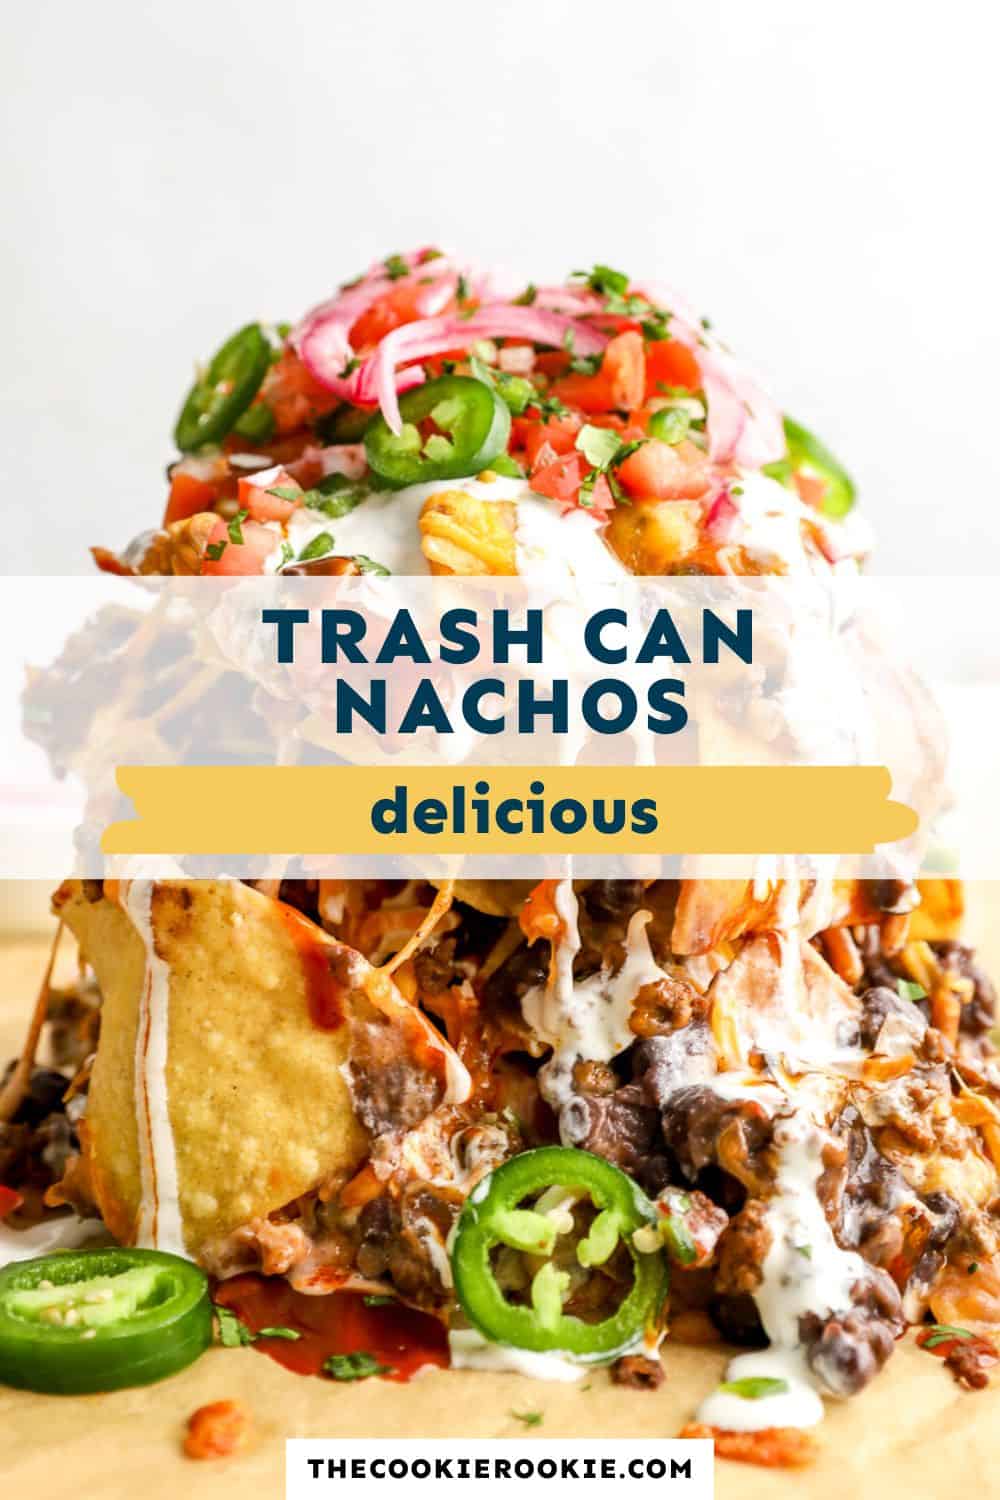
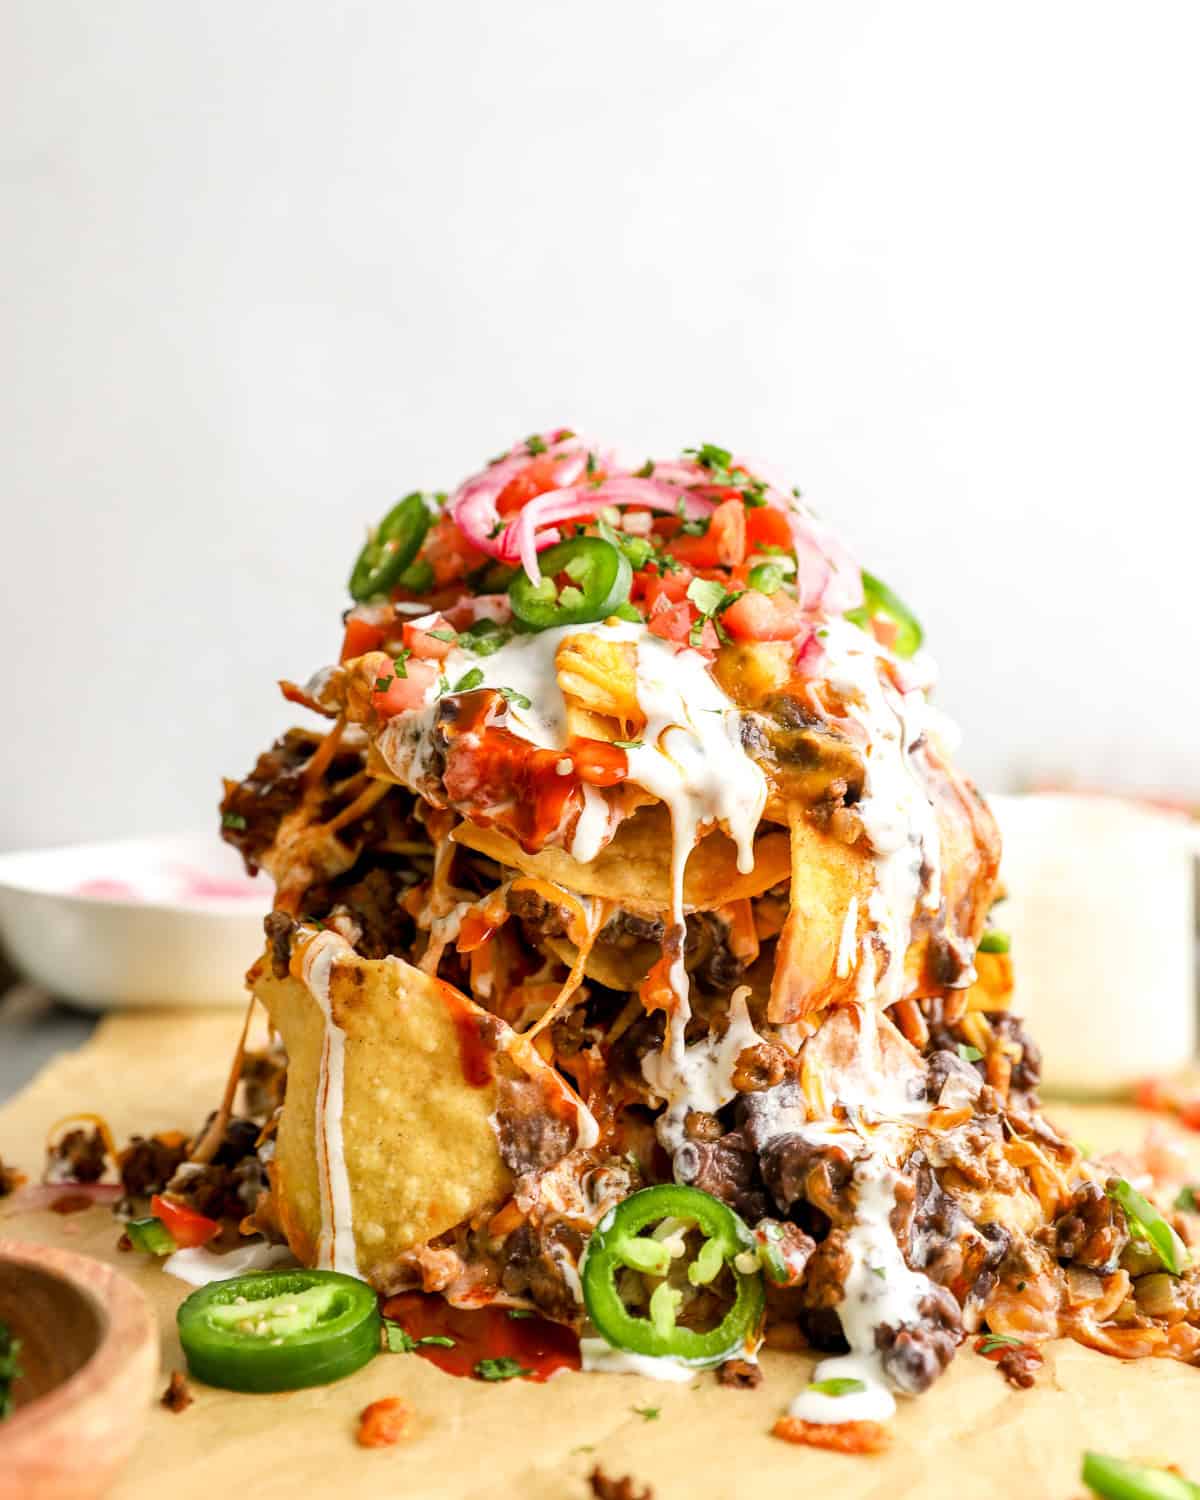
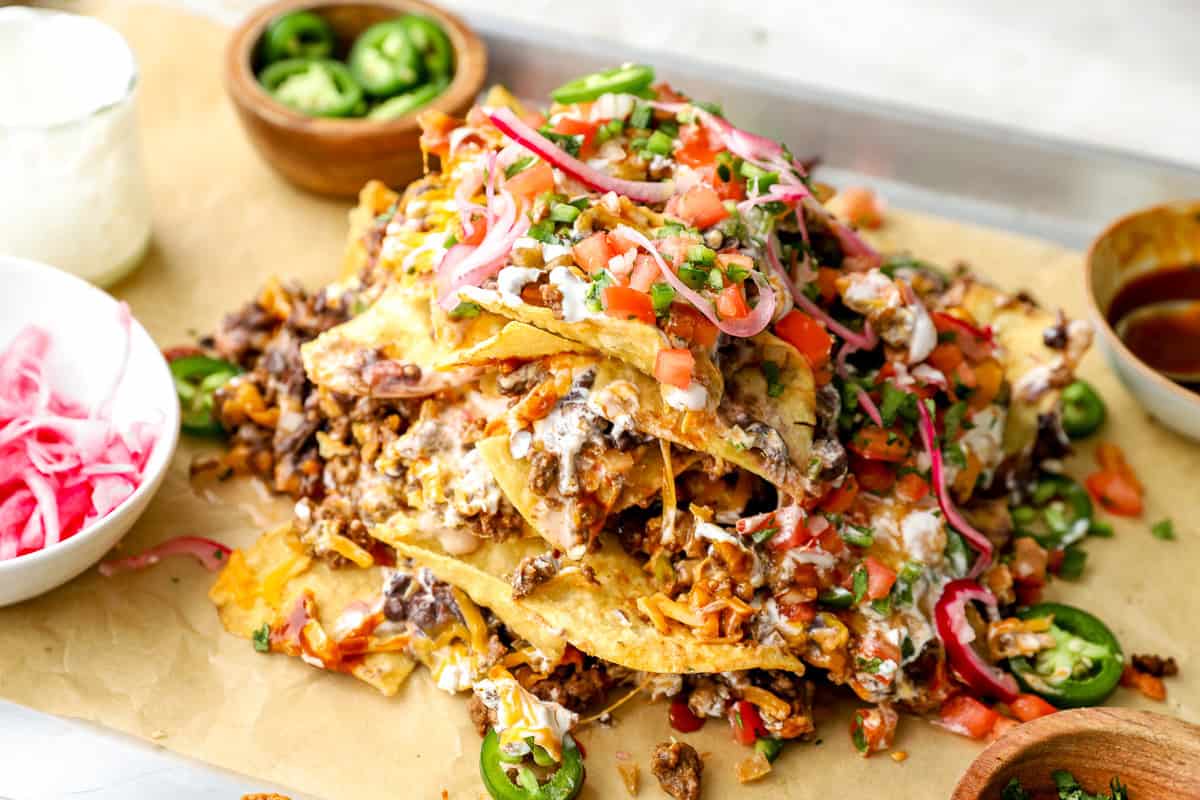
Trash can nachos are the ultimate party food, stacked high with layers of delicious toppings from top to bottom. We’ve all had nachos that fall short, with plain chips hiding underneath and all the good stuff piled on top. That’s not the case here. These nachos are layered inside a “trash” can, then flipped out so every single chip gets its fair share of beef, beans, melty queso, and cheese. The result is a bold, loaded nacho tower that’s just as fun to eat as it is to serve.
Pin this recipe for later!
Tips for Beginners
- Use thick, restaurant-style tortilla chips. Thin chips crack under the weight and cause the tower to slump, while sturdier chips help the layers hold their shape. If you’re brave enough, try making your own homemade tortilla chips .
- Lightly mash the beans before layering. You want a thick, scoopable texture with some whole beans left. This acts like a “glue” that helps anchor the chips.
- Line the sheet pan with parchment paper. Lining the baking tray with parchment paper pevents sticking, makes cleanup easier, and helps the nacho tower release cleanly once the can is lifted.
- Build thin, even layers. Overfilling makes the stack unstable and uneven. Lighter layers melt together better and keep the tower standing tall.
- Let the nachos rest for 1–2 minutes before lifting the can. This brief pause allows the cheese to set slightly, making it easier to remove the can cleanly without collapsing the stack.
Ingredients1x2x3x
- ▢ ½ onion finely chopped
- ▢ 1 lb. ground beef
- ▢ 15 oz. black beans (1 can)
- ▢ sprinkle salt, garlic powder, chili powder, cumin
- ▢ 10 oz. diced tomatoes with green chilies (1 can)
- ▢ 16 oz. Velveeta queso blanco cheese sliced into cubes
- ▢ 12-13 oz. tortilla chips (1 bag)
- ▢ 2 cups shredded cheddar cheese divided
- ▢ sour cream for topping
- ▢ BBQ sauce for topping
- ▢ 3 jalapeño peppers 2 chopped, 1 sliced
- ▢ 3 roma tomatoes diced
- ▢ 2 tbsp finely chopped onion
- ▢ 2 tbsp chopped cilantro
- ▢ juice of 1 lime
- ▢ pickled onions for topping
Instructions
- Add the beef, onion, and taco seasoning to a skillet over medium heat. Brown the ground beef. Take off the heat and set aside.
- Pour the black beans from the can, undrained, into a saucepan over medium heat. Sprinkle with salt, garlic powder, chili powder, and cumin. Stir occasionally until heated. Then, mash with a potato masher, leaving some beans whole. Take off the heat and set aside.
- Add the diced tomatoes and Velveeta to another saucepan over medium heat. Stir until the cheese is completely melted and smooth.
- Preheat the oven to 400°F. Line a large sheet pan with parchment paper.
- Spoon a circular layer of cheese sauce (about the size of the can) in the middle of the sheet pan. Place the can directly over the circle of cheese sauce.
- Layer the following in the can: tortilla chips, cheese sauce, meat, beans, shredded cheese, sour cream, BBQ sauce. Repeat these layers 3 more times.
- Place the nachos in the oven for 10 minutes.
- To make the pico de Gallo, combine the chopped jalapeño peppers, roma tomatoes, cilantro, and lime juice in a bowl.
- Remove the nachos from the oven. Wearing oven mitts, gently lift the can up to reveal the tower of nachos. Drizzle with sour cream and BBQ sauce. Then, add the jalapeño slices, and a few spoonfuls of pico de Gallo and pickled onions on top.
Equipment
- 1 #10 can (a bulk size can of food)
Nutrition information is automatically calculated, so should only be used as an approximation.
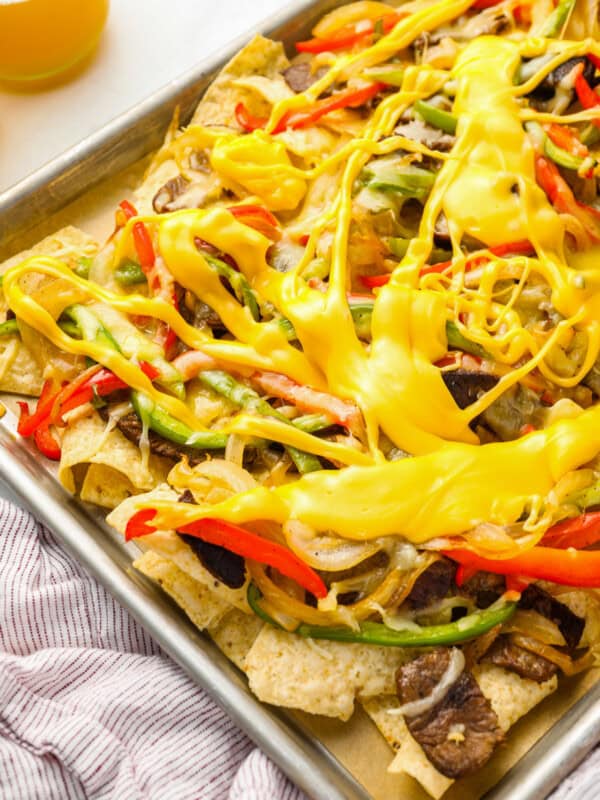
How to Make Trash Can Nachos Step by Step
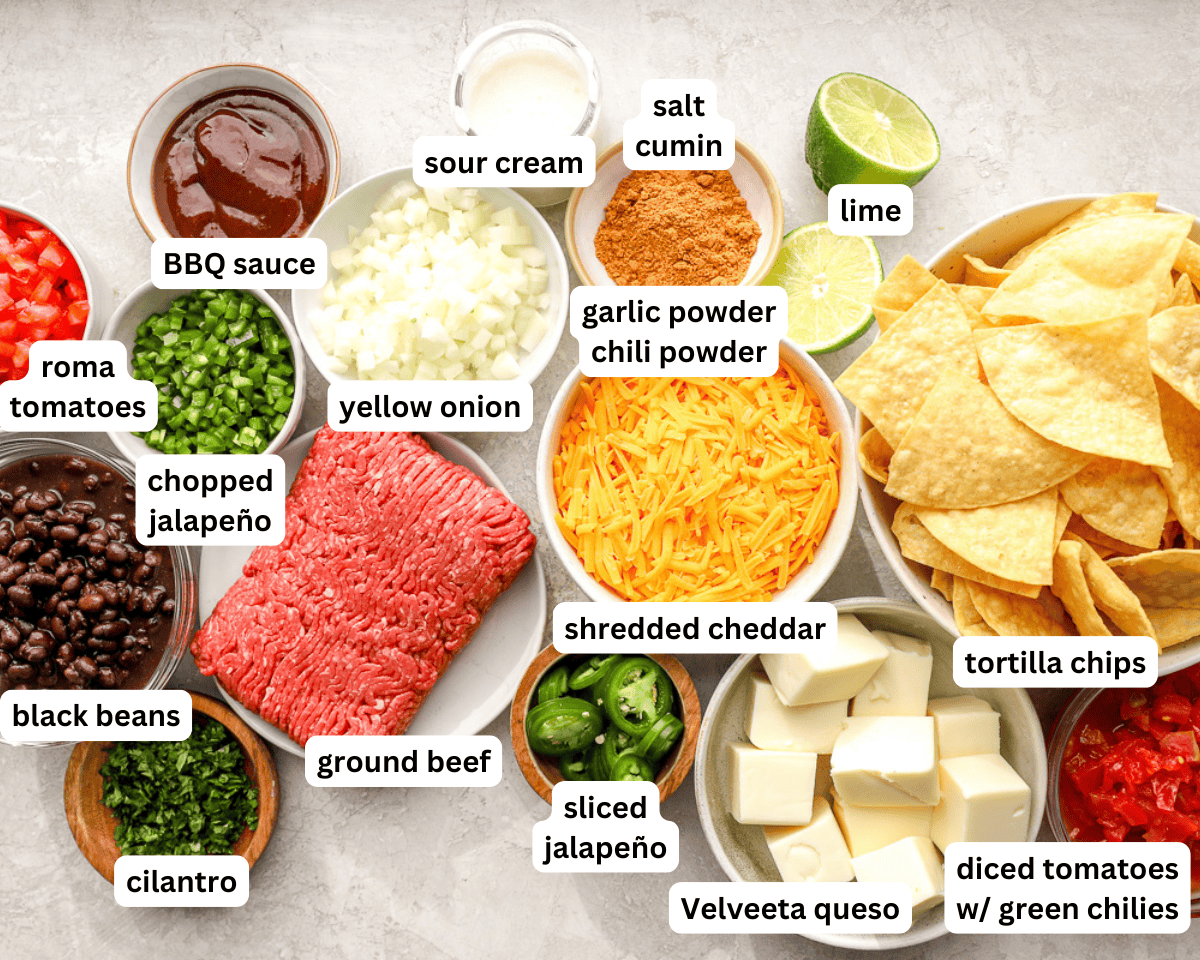
Gather all the ingredients together.
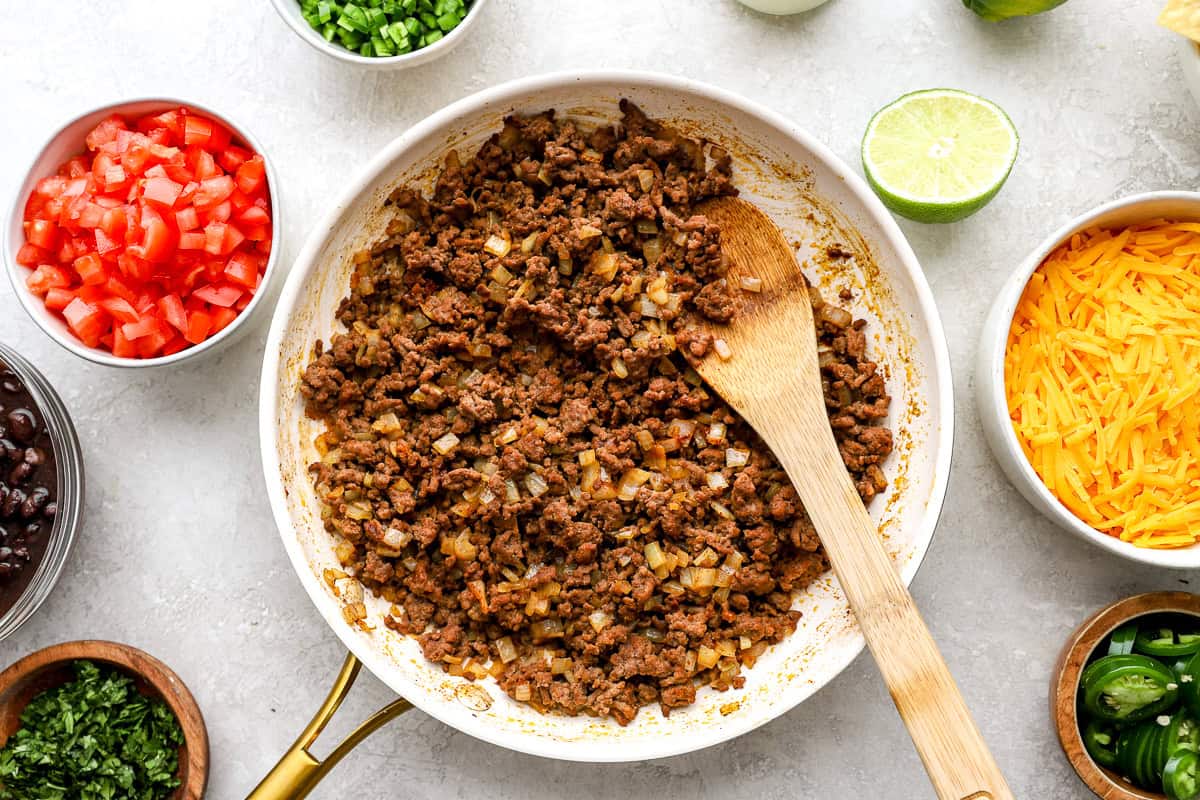
Brown the beef: Heat a large skillet over medium heat. Add 1 lb. ground beef and ½ finely chopped onion. Cook, breaking up the meat, until the beef is fully browned and no pink remains, about 6–8 minutes. Season lightly with salt if needed. Remove from the heat and set aside.
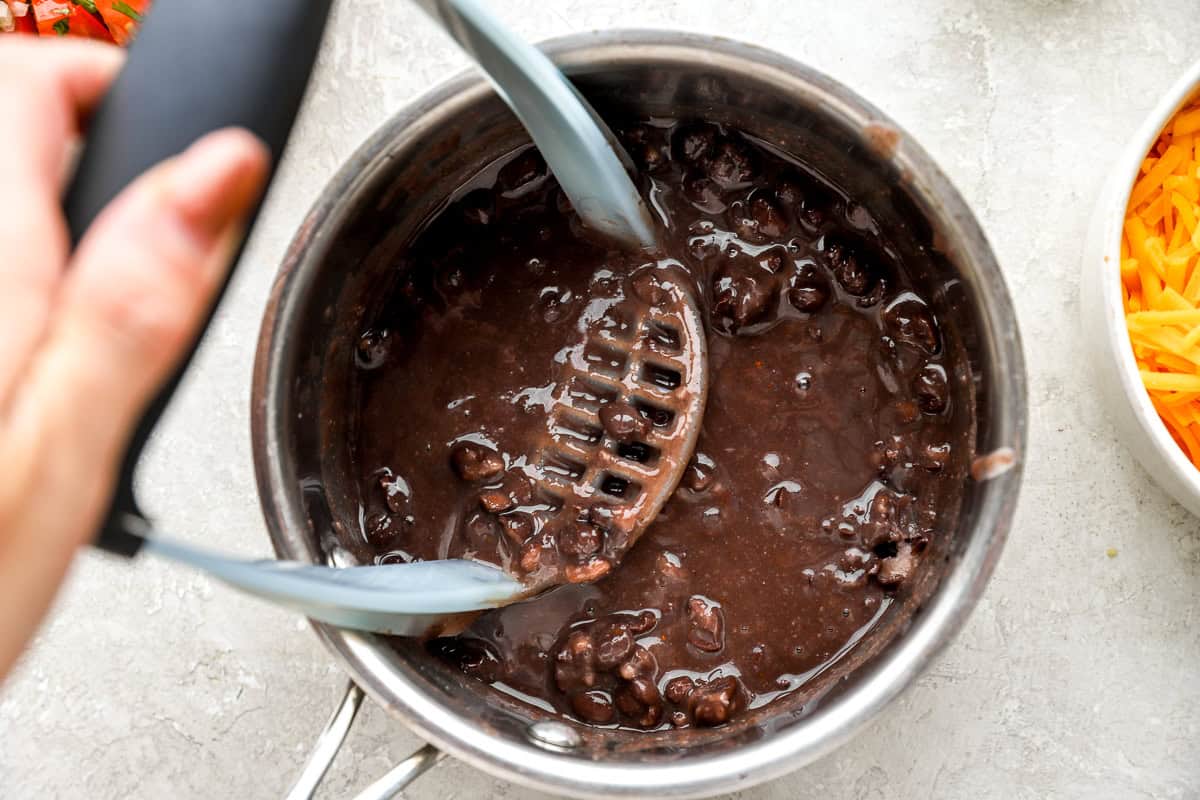
Heat and mash the beans: Pour 1 can (15 oz.) black beans, undrained, into a saucepan over medium heat. Sprinkle in a pinch of salt, garlic powder, chili powder, and cumin. Stir occasionally until warmed through, about 3–4 minutes. Use a potato masher to mash the beans until thick and scoopable, leaving some beans whole for texture. Remove from the heat and set aside.
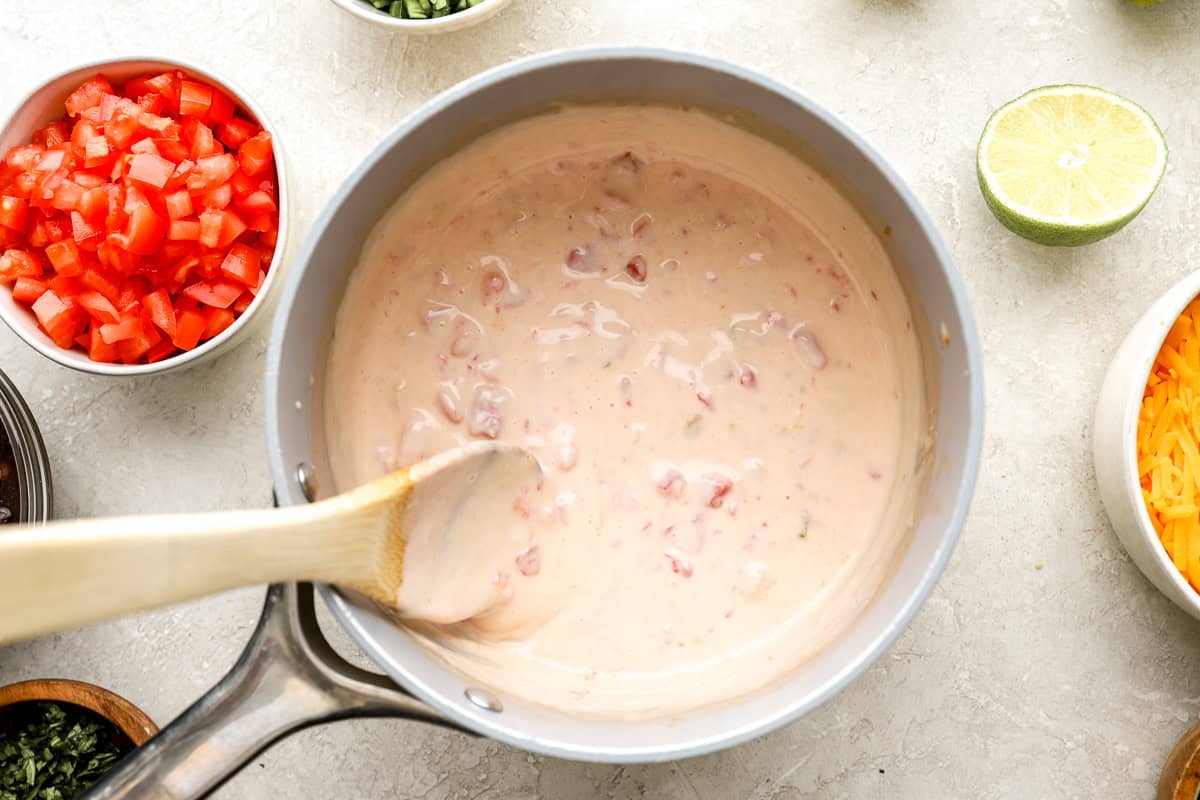
Make the queso: In a separate saucepan over medium heat, add 1 can (10 oz.) diced tomatoes with green chilies and 16 oz. Velveeta queso blanco, cut into cubes. Stir the queso frequently until the cheese is completely melted and the sauce is smooth and pourable, with no visible lumps. Remove from the heat.
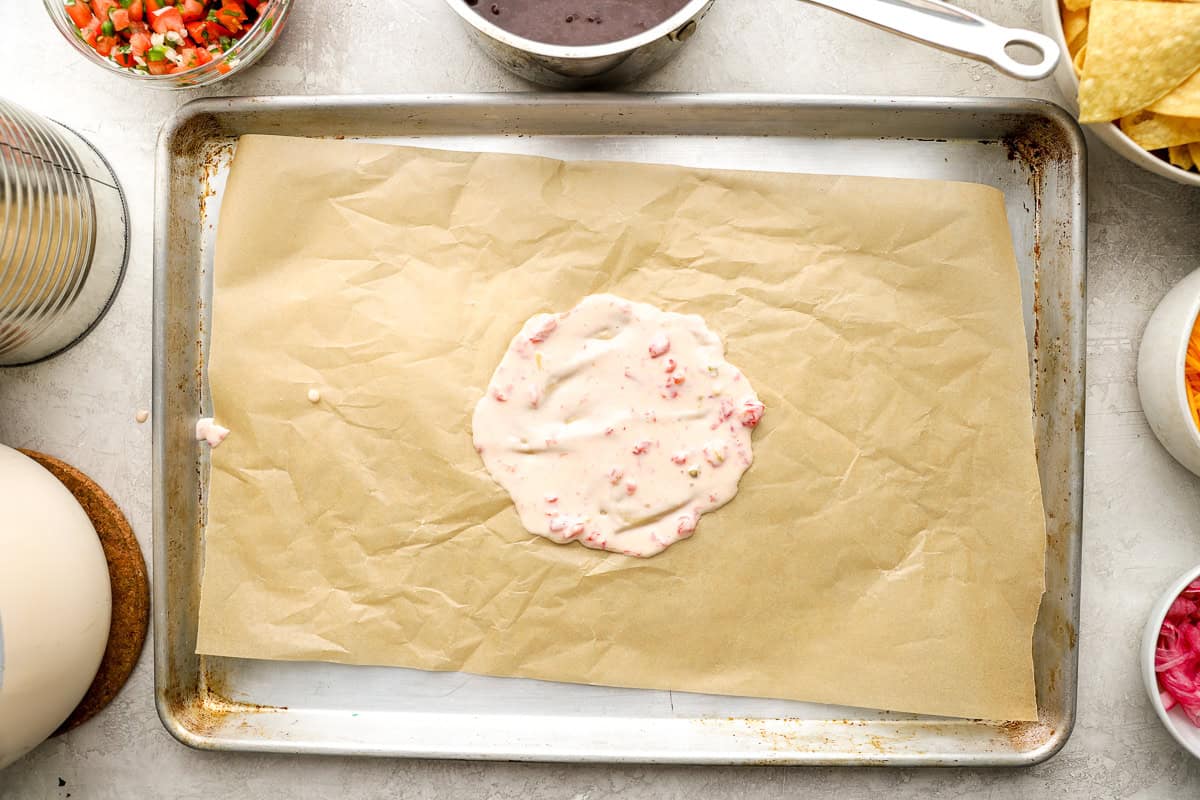
Create the base: Preheat the oven to 400°F. Line a large sheet pan with parchment paper to prevent sticking and make cleanup easier. Spoon a thick, circular layer of queso onto the center of the sheet pan, about the same diameter as the #10 can. Place the can directly over the cheese circle to anchor the nacho tower.
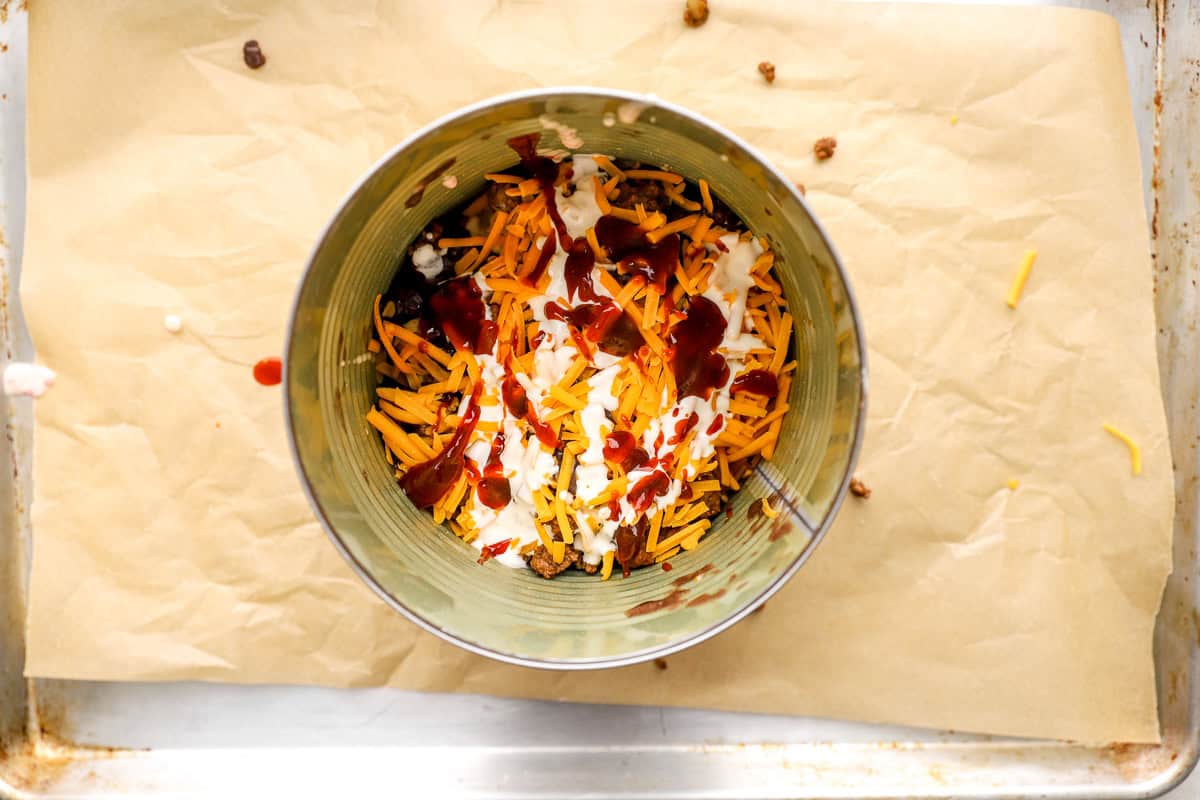
Build the layers: Inside the can, layer tortilla chips, followed by queso, seasoned ground beef, mashed black beans, a sprinkle of shredded cheddar cheese, small dollops of sour cream, and a drizzle of BBQ sauce. Repeat these layers three more times, keeping each layer thin and even, so the tower stays stable.

Bake the nachos: Carefully transfer the pan to the oven and bake for 10 minutes, or until the cheese is fully melted and the layers are heated through.
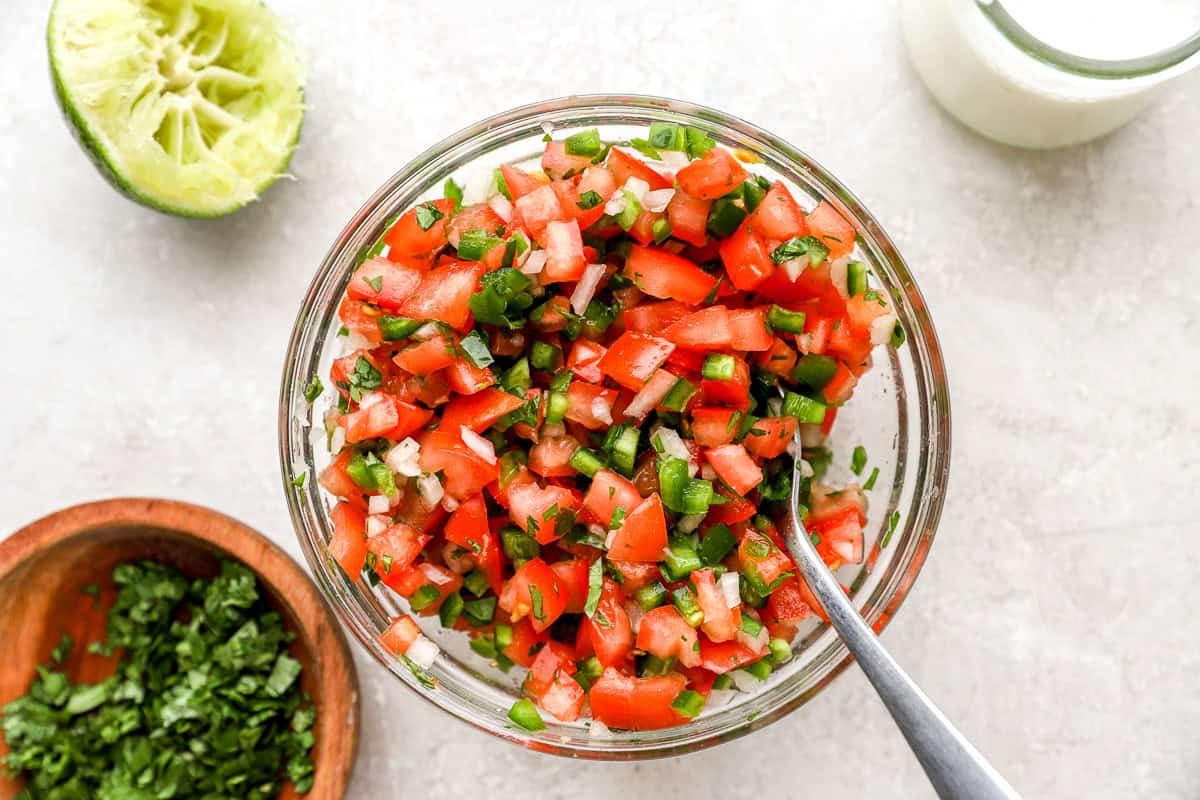
Make the pico de gallo: While the nachos bake, combine 2 chopped jalapeño peppers, 3 diced roma tomatoes, 2 tbsp finely chopped onion, 2 tbsp chopped cilantro, and the juice of 1 lime in a bowl. Stir until evenly mixed and set aside.

Reveal the nachos: Remove the nachos from the oven. Wearing oven mitts, gently lift the can straight up to reveal the nacho tower.
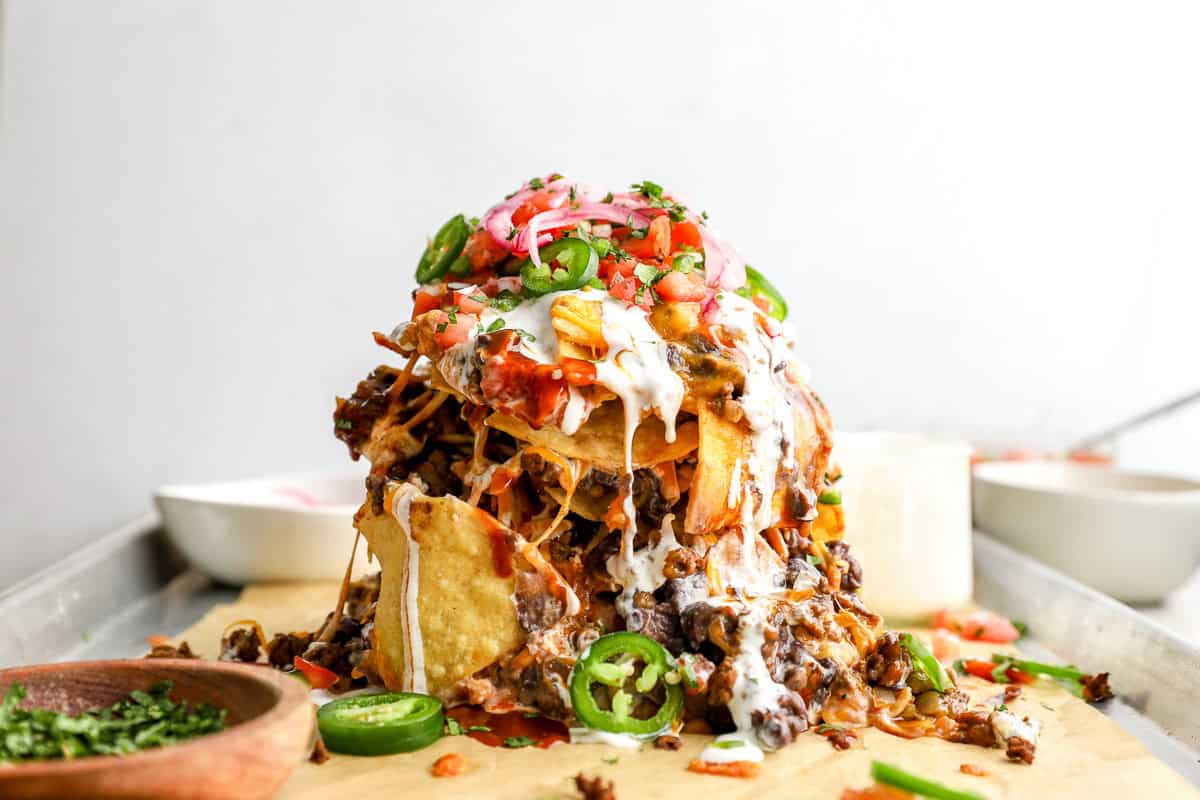
Top and serve: Drizzle with more sour cream and BBQ sauce, then top with sliced jalapeño, spoonfuls of pico de gallo, and pickled onions. Serve immediately.
What Else to Add
- Extra shredded cheese, like Monterey Jack or pepper jack
- Sliced black olives for a salty bite
- Corn or fire-roasted corn for a touch of sweetness
- Diced avocado or guacamole for creaminess
- Pickled red onions or banana peppers for extra tang
- Cooked bacon or chorizo for a smoky, savory twist
- Hot sauce or chipotle sauce for more heat
- Green onions for a fresh, mild finish
How to Store and Reheat
Trash can nachos should be eaten right after baking while the chips are crisp, and the cheese is melty. If you do have leftovers, carefully transfer them to an airtight container and refrigerate for up to 3 days. Keep in mind the chips will soften as they sit. To reheat, spread the nachos out on a sheet pan and warm them in a 350°F oven until heated through. I don’t recommend freezing nachos, as the texture of the chips and cheese doesn’t hold up well once thawed.
Serving Suggestions
I love serving these trash can nachos for game day, Super Bowl parties, backyard get-togethers, or anytime casual entertaining is on the menu. They’re meant to be the centerpiece of the table, maybe next to some white queso dip . A round of margaritas or a few cold beers pairs perfectly, along with easy party favorites like baked meatball sliders or buffalo wings . If you really want to lean into the cheese factor, set out a bowl of white queso on the side and let everyone go all in.
More Game Day Nachos and Party Appetizers
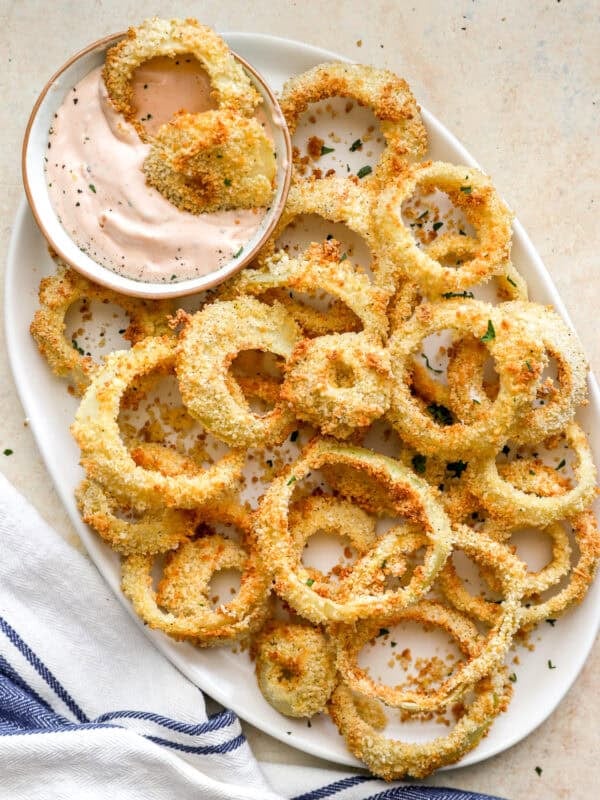
Air Fryer Onion Rings
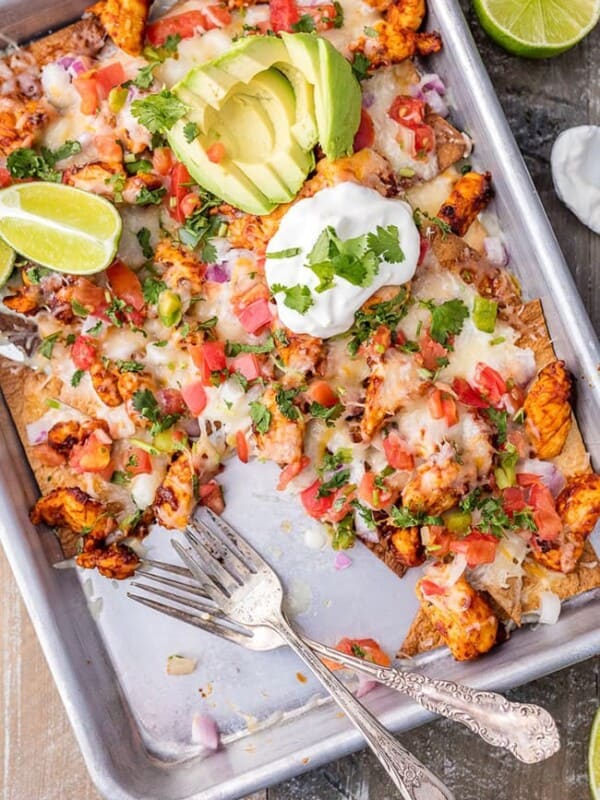
Chicken Nachos Recipe
Philly Cheesesteak Nachos

Ranch Chicken Wings

Trash Can Nachos
Equipment
- 1 #10 can (a bulk size can of food)
Ingredients
- ½ onion finely chopped
- 1 lb. ground beef
- 15 oz. black beans (1 can)
- sprinkle salt, garlic powder, chili powder, cumin
- 10 oz. diced tomatoes with green chilies (1 can)
- 16 oz. Velveeta queso blanco cheese sliced into cubes
- 12-13 oz. tortilla chips (1 bag)
- 2 cups shredded cheddar cheese divided
- sour cream for topping
- BBQ sauce for topping
- 3 jalapeño peppers 2 chopped, 1 sliced
- 3 roma tomatoes diced
- 2 tbsp finely chopped onion
- 2 tbsp chopped cilantro
- juice of 1 lime
- pickled onions for topping
Instructions
- Add the beef, onion, and taco seasoning to a skillet over medium heat. Brown the ground beef. Take off the heat and set aside.
- Pour the black beans from the can, undrained, into a saucepan over medium heat. Sprinkle with salt, garlic powder, chili powder, and cumin. Stir occasionally until heated. Then, mash with a potato masher, leaving some beans whole. Take off the heat and set aside.
- Add the diced tomatoes and Velveeta to another saucepan over medium heat. Stir until the cheese is completely melted and smooth.
- Preheat the oven to 400°F. Line a large sheet pan with parchment paper.
- Spoon a circular layer of cheese sauce (about the size of the can) in the middle of the sheet pan. Place the can directly over the circle of cheese sauce.
- Layer the following in the can: tortilla chips, cheese sauce, meat, beans, shredded cheese, sour cream, BBQ sauce. Repeat these layers 3 more times.
- Place the nachos in the oven for 10 minutes.
- To make the pico de Gallo, combine the chopped jalapeño peppers, roma tomatoes, cilantro, and lime juice in a bowl.
- Remove the nachos from the oven. Wearing oven mitts, gently lift the can up to reveal the tower of nachos. Drizzle with sour cream and BBQ sauce. Then, add the jalapeño slices, and a few spoonfuls of pico de Gallo and pickled onions on top.
Nutrition

By Becky Hardin
Published Jul 12, 2017


This Essential Grocery List is an absolute life saver for my family on the busy weeks. When I started this journey to learn how to cook, I quickly realized that the first step in cooking is having staple ingredients on hand. I want to avoid having to run out to the grocery store every single time I prepare a new recipe. Having a well-stocked pantry has made my life in the kitchen so much simpler, because when it’s time to cook, I have what I need.

Essential Grocery List
It’s so helpful to have a basic grocery list to help me remember which foods to buy at the store. This food shopping list is my go-to!
It’s better to stock up on things like grains, seasonings and spices, baking essentials, oils, condiments, canned and frozen foods, etc. so I can just grab them when I need them. These things have a long shelf life , so I keep them in my kitchen for convenience.
However, I do have to go to the supermarket sometimes, and there’s a way to make that trip easy and hassle-free: I keep a grocery list! If I go in blindly, I’ll leave with things I don’t need, and nothing that actually helps me prepare a good meal.
In the list below, I’ve compiled everything I always have on my stock-up grocery list.
I’ve got you covered! I created an easy grocery list filled with all of the essentials. Plus there’s a free printable version that you can take with you to the grocery store. It has everything you need to stock your pantry, your freezer, and your refrigerator.

Click to get my Free Printable Grocery List
What to Buy at the Grocery Store
This is the perfect grocery list filled with all the basics and essentials. It should help get you going if you’re new to cooking, or if you’re just left staring helplessly at an empty pantry and don’t know how to fill it.
When I first started cooking, things could seem overwhelming. I quickly realized that they more prepared I could be, the more confident I felt. If you already have the basics in your kitchen, then you can shop stress-free.
So print out our easy grocery list, stock up your pantry and fridge, and you’ll be cooking in no time!
Click to get my Free Printable Grocery List for the perfectly stocked pantry and freezer!
Fresh Produce
- Apples
- Bananas
- Strawberries
- Avocados
- Bell Peppers
- Carrots
- Broccoli
- Garlic
- Lemons/Limes
- Onion
- Parsley
- Cilantro
- Basil
- Potatoes
- Spinach
- Tomatoes
GRAINS
- Breadcrumbs
- Pasta
- Quinoa
- Rice
- Sandwich Bread
- Tortillas
MEAT/PROTEIN
- Chicken
- Eggs
- Ground Beef
- Sliced Turkey
- Lunch Meat
DAIRY
- Butter
- Sliced Cheese
- Shredded Cheese
- Milk
- Sour Cream
- Greek Yogurt
BAKING GOODS
- Baking powder
- Baking Soda
- Granulated Sugar
- Brown Sugar
- Flour
- Honey
- Vanilla Extract
- Dry Yeast
- Chocolate Chips
- Cocoa Powder
- Powdered Sugar
FREEZER
- Fruit and Berries
- Frozen Veggies (Corn, Peas, Broccoli, etc)
- Juice Concentrate
- Pizza or Other Convenience Meals
- Pie Crust
- Cookie Dough
CANNED/DRIED GOODS
- Chicken stock/broth
- Salsa
- Diced Tomatoes
- Jam/Jelly
- Peanut Butter
- Pasta Sauce
- Beans (Black Beans, Chickpeas, Baked Beans, etc)
- Soups
- Tuna
- Green Chiles
- Canned Veggies
- Coffee or Tea
Get more details on the best non-perishable and pantry foods
CONDIMENTS/SPICES
- Black Pepper
- Chili Powder
- Cinnamon
- Crushed Red Pepper
- Cumin
- Garlic Powder
- Ketchup
- Mustard
- Mayo
- Nutmeg
- Paprika
- Salt (Course Sea Salt and Kosher Salt)
- Soy Sauce
- Steak Sauce
- Hot Sauce/ Buffalo Sauce
- Salad Dressings
OILS/VINEGARS
- Apple cider vinegar
- Balsamic vinegar
- Coconut Oil
- Olive Oil
- Vegetable/Canola Oil
- Red Wine Vinegar
- White Vinegar
- Cooking Wine
- White Wine Vinegar
SNACKS
- Crackers
- Nuts
- Quick Oats
- Popcorn
- Tortilla Chips
- Cereal
Click to get my Free Printable Grocery List for the perfectly stocked pantry and freezer!

Click ☝🏻 for my FREE Grocery List Printable!
I hope this essential grocery list can help you buy what you need and make your home cooking so much easier!
Stock Your Kitchen
Find more ideas for your grocery list, stock up your kitchen, and print more cooking guides and charts to keep handy!

Non-Perishable Foods to Stock Up On

Frozen Vegetables to Stock Up On (and Recipes to Make)

Ultimate List of Cooking Herbs for Your Kitchen

Ultimate List of Cooking Spices for Your Kitchen

Cooking Oil 101: Types of Cooking Oils to Use

26 Types of Pasta and When to Use Them

What Fruits and Vegetables are in Season?

Meat Temperature Chart (Free Printable)

How to Meal Prep (Guide for Beginners)

Basic Cooking Measurements & Kitchen Conversion Chart

